How to Send Coworkers Slack Kudos From Any Website
Built with PixieBrix’s browser automation software, a Slack kudos extension allows you to shout out your coworkers no matter where you are online.

In the era of remote work, Slack is often the main way we interact with our colleagues and collaborators. To build a strong virtual culture, it’s important that you build in mechanisms to acknowledge the hard work of your coworkers and offer up praise or thanks.
One of the best ways to create this habit of recognition is through a kudos Slack bot. Built with PixieBrix’s browser automation software, this functionality allows you to shout out your coworkers no matter where you are online. Whether you’re watching the marketing team’s latest video, you just finished reading the big press announcement, or you’re amazed at how well that last app update is working, you can let the relevant teammates know that they’ve done a great job.
Ready to shower your team with love? Follow these detailed instructions to build your kudos functionality into Slack.
This is a technical guide to building the mod.
If you’re more of a visual learner, you may want to watch this video before reading the rest of this walkthrough.
Sign up for PixieBrix
Before you start building the mod you’ll need to create your PixieBrix account. That’s as simple as authenticating with a Google or Microsoft account. You can get started on a free plan so you can jump right in.
Once you’re signed up, you’ll want to install the PixieBrix Chrome extension. That’s where the building will take place.
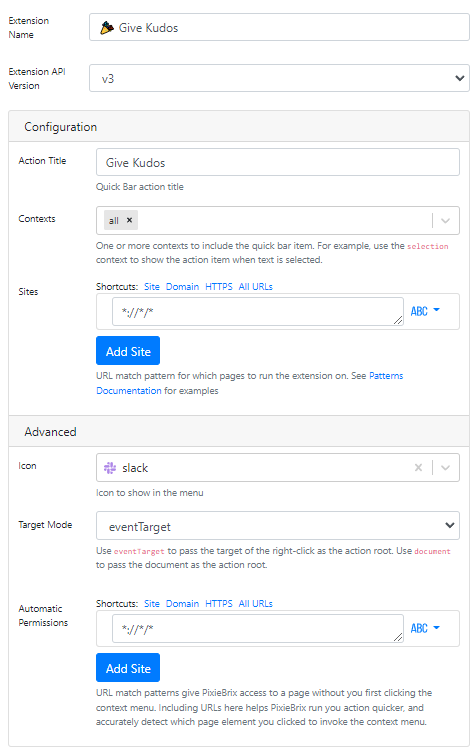
Step 1: Add the Quickbar brick
Go to any website and right-click on the page. Click “inspect” and then scroll through the inspect menu options until you see the PixieBrix Page Editor and open it up. This is your workbench. It’s here that you’ll build all the functionality you need to send Slack Kudos.
Click the Add menu on the right-hand side. There you’ll find a series of pre-constructed bricks—functions or actions that form the building blocks of PixieBrix.
Choose the Quick Bar trigger brick from that list. Quick Bar allows you to pull up a search bar on your browser screen using a keyboard shortcut. This is what you’ll use to send those Slack kudos no matter where you are online.

Then, name your new mod something memorable like “Give Kudos.” And beside the “Sites” configuration option, set the shortcuts menu item to “All URLs”.
Step 2: Add the PixieBrix user profile reader brick
Next, you’re going to add a second brick by clicking the “+” symbol again. Search for a brick called “PixieBrix user profile reader brick.”
This brick allows the mod to pull information from whatever account is logged in. In this case, it will reference the Slack account you’ll be setting up in the next brick.
Step 3: Add the “Slack Get User by Email” brick
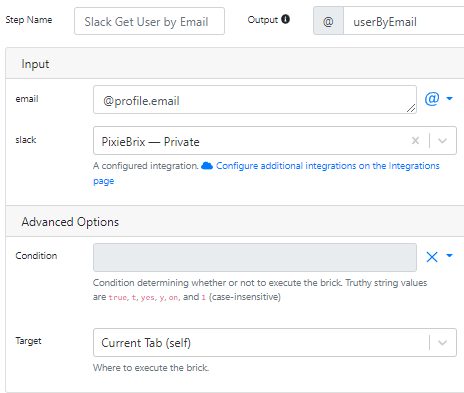
Now you’re going to need to add the “Slack Get User By Email” brick. We’re doing this because we want to pull your user information from Slack, specifically your Slack’s user id.
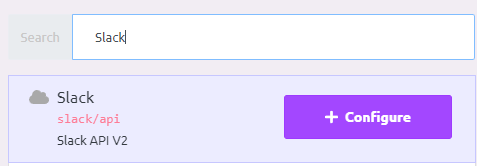
Step 3.5: Configure your Slack integration
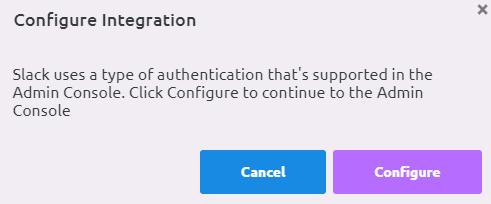
Before setting up this Slack brick, you’re going to need to configure your Sack integration, essentially granting PixieBrix permission to use your Slack. This is only required for some bricks, and when that’s the case it will state “A configured integration.”

Click on the blue link with the cloud icon to start the configuration. A PixieBrix page will open on your screen. On it you’ll see a blue button called “Add Integrations.” Clicking this button brings up a pop-up where you can search for tools that require configuration. In this case, you’ll want to search for Slack.
Clicking configure will bring up another pop-up on which you’ll need to click configure again. For those counting, that’s two configured buttons to click!
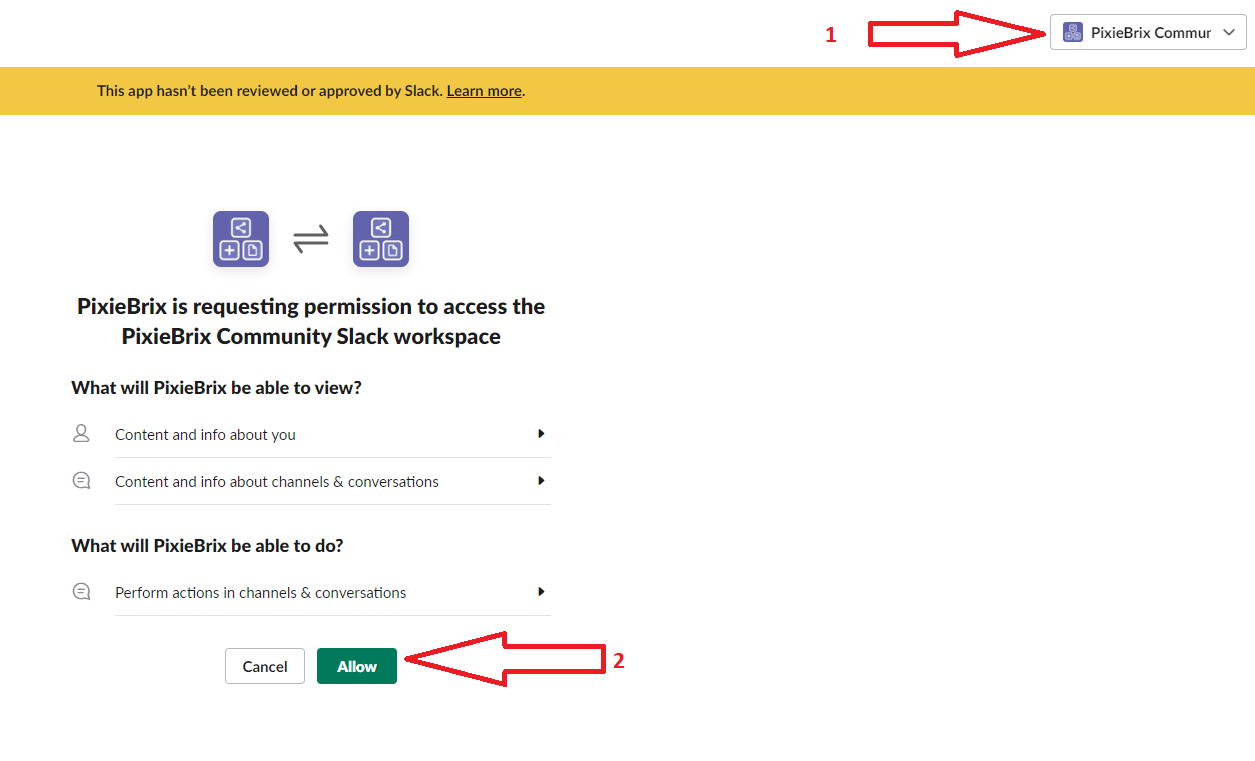
A new tab will open. At the top right you’ll see a drop-down menu in which you’ll need to choose the Slack workspace you want to connect. You need to be logged into Slack for this to work. Then click the green Allow button at the bottom.
If you’ve followed all of these steps, you can continue on with the configuration of your Slack brick.
Back in PixieBrix, enter @profile.email in the “Input” section. This allows your mod to pull information from your Slack account.
Then rename the output variable of this brick to @userByEmail
Step 4: Add the “Slack Get Users” brick
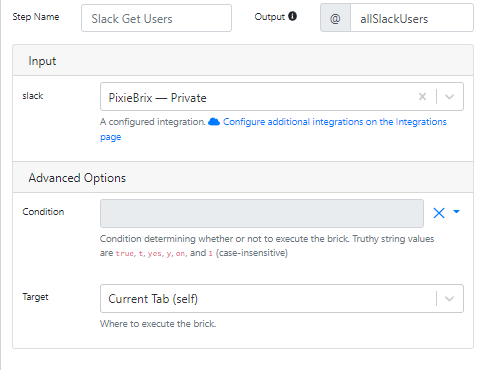
The next brick required for this mod is called “Slack Get Users”. This brick accesses the name and user ID of all the users in your Slack workspace and identifies whether or not they’re bot users/apps.
You’ll need this information to be able to choose the Slack user you want to give kudos to. You may want to rename the Output variable @allSlackUsers to make future steps easier.
Step 5: Add the “jq - JSON processor” brick
This may be the most technical part of your build. The “jq - JSON Processor” brick is powerful but complicated. It allows the mod to modify the user data pulled from Slack and manipulate it in a way that can be fed to the next brick.
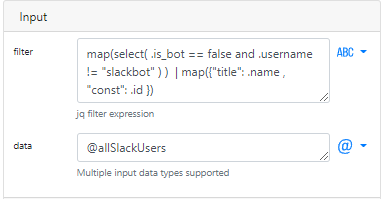
In the Input section, data field write @allSlackUsers as a call-back to the last brick.
Now for the fun bit. You’ll need to construct an array containing multiple objects, each with its own “title” and “const” value.
- The “title” value is basically the human-readable label that we will show in a drop-down menu.
- The “const” value is used to actually perform actions.
Take the following code and paste it under the “filter” field.
map(select( .is_bot == false and .username != "slackbot" ) ) | map({"title": .name , "const": .id })This code essentially removes the bot users from the list. Then, it creates an object with the name and ID of all the users that are left
Step 6: Add the Show a modal or sidebar form brick
Two more steps to go. You’ll now need to add a modal to the mod — basically the interface you’ll use to interact with it. This requires quite a bit of configuration.
The aim here is to give the user triggering the mod a way to select which user from the Slack workspace to give kudos to. It’s also what lets you customize the Slack message.
First, set the Form Title to “Give some Kudos! 🎉” (yes, including the emoji!).

Then, in the “Submit Button Text” field write “Send Kudos 💜.”
Finally, you’ll need to configure three fields, by clicking the “Add new field” button for each. Enter the following information for the three fields exactly.
Field #1:
- Name: user
- Label: 👥 User list from your Slack:
- Field Description: Which user to kudo?
- Input Type: Dropdown with Labels
- Default value:
{{ @users[0].const }} - Options:
@users - Required fields: true (switch on)
- Cancelable?: True

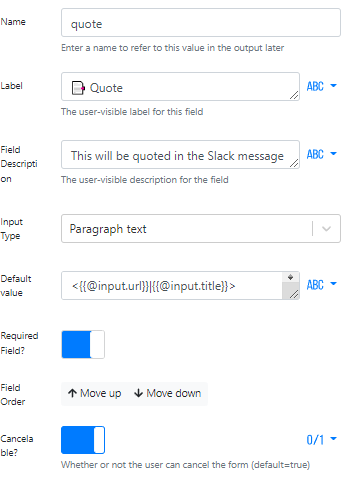
Field #2:
- Name: quote
- Label: 📑 Quote
- Field Description: This will be quoted in the Slack message
- Input Type: Paragraph Text
- Default Value:
<{{@input.url}}|{{@input.title}}> - This will make the default value for this field be the page’s URL, in which you’ve triggered this mod
- Require Field: false
- Cancelable?: True
Field #3:
- Name: comments
- Label: Comments
- Field Description: Add additional comments to this kudo
- Input Type: Single Line text
- Default value: You’re awesome!
- Cancelable?: True

With your three fields configured, your user interface will pre-populate with information pulled from the other bricks you’ve built.
Step 7: Add the “Slack Send Richly-Formatted Message” brick
You’ve made it to the last brick! The “Slack Send Richly-Formatted Message” brick allows you to send data back to Slack.
To configure it, start by identifying the Slack channel you’ll want to send Kudos to.
Then you need to name the bot who will post all of your kudos messages. Set the username field to something like “Kudos Bot.” You can also specify an icon_emoji to be used as the bot’s profile picture.
Then, set link_names to true.

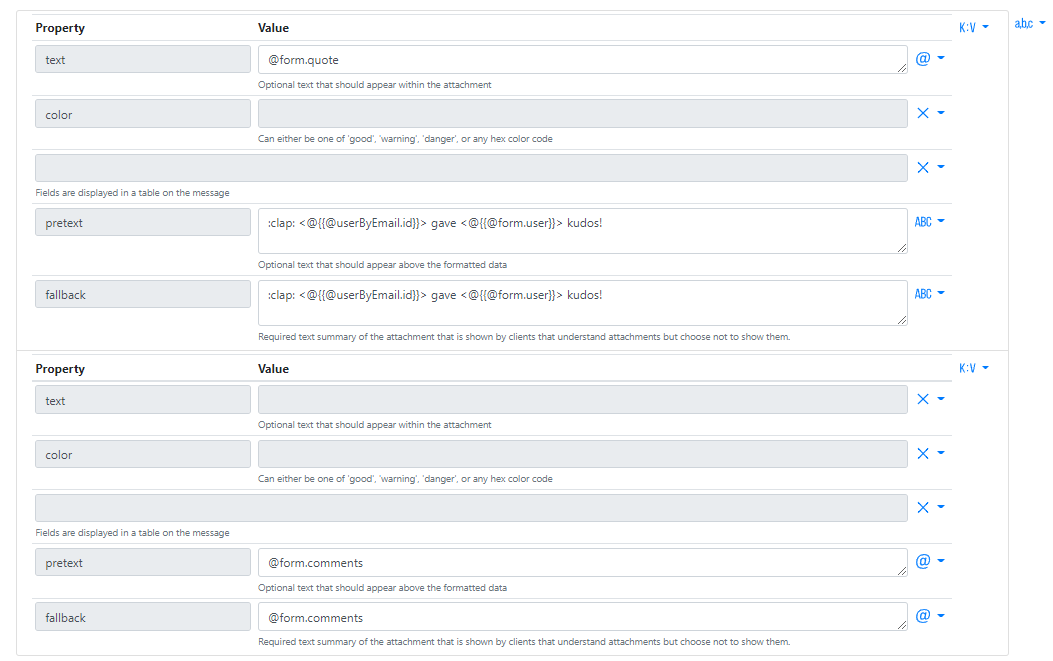
Last but not least, you’ll need to configure attachments. Add a K:V item by clicking the blue “Add Item” button.
Configure it as follows:
- text:
@form.quote - pretext: :clap:
<@{{@userByEmail.id}}> gave <@{{@form.user}}> kudos! - fallback: :clap:
<@{{@userByEmail.id}}> gave <@{{@form.user}}> kudos!
Then go ahead and add another item, with the blue button under this formset. Configure your second item as follows:
- pretext:
@form.comments - fallback:
@form.comments
And with that, you’re done!
Kudos on your next mod!
If you’ve made it this far, consider us impressed. This mod building walkthrough was a bit long, but it will save you exponentially more time throughout the year as you go to give your colleagues Slack kudos. And just think about the positive impact it will have on both team culture and productivity.
Want to build more custom mods like this one?