Walkthrough: Calling an API in Multiple Ways with PixieBrix (F1 Example)
Calling an API in multiple ways based on different intents isn't that hard, especially with PixieBrix doing the heavy lifting.

Building a mod to solve one problem is great. Building an mod to solve multiple problems? Now you're seriously upping your productivity game.
When it comes to calling APIs, people often try to keep things simple — they're complicated enough, right? In reality, calling an API in multiple ways based on different intents isn't that hard, especially with PixieBrix doing the heavy lifting.
To show you how it works, we've built a sample mod for Formula 1 lovers.
This mod works differently depending on how you interact with it:
- If you highlight a F1 driver’s name on any page and run the mod, it will return information about that specific driver.
- If you call the mod without highlighting a driver's name, it will return information about all F1 drivers.
This walkthrough will show you how you can program a mod to do two (or more) things using API and data manipulation as well as conditionals. It will involve creating two separate PixieBrix mods which combine into a single powerful tool.
Let’s get started.
Have you signed up for PixieBrix?
This walkthrough shows you how to build a browser mod with PixieBrix. So it shouldn’t come as a surprise that you need to create your PixieBrix account before getting started. After visiting the PixieBrix website, you can sign up in seconds by authenticating your account through Google or Microsoft. Then, pick the plan that works for you. There’s a free plan so you can dive in and explore.
Once you’re signed up, install the PixieBrix browser extension. Then on any webpage right click and choose “inspect” from the menu. Scroll through the inspect menu options until you land on the PixieBrix Page Editor. It’s from this editor that you’ll be able to tackle the rest of this walkthrough and build your mod.
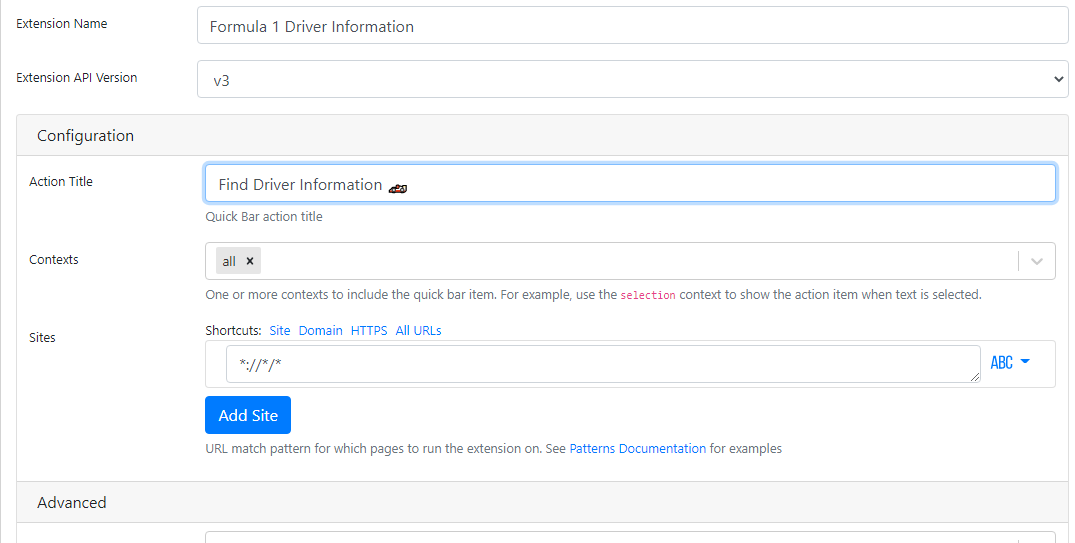
Step 1. Create a new "Quickbar" mod
From the page editor, create a new mod by first adding the Quickbar.
Our example mod will be named "Formula 1 Driver Information" and the Action Title will be "Find Driver Information." You can name these whatever suits your own mod.
Set Sites to All URLs and then this first brick is complete.
Step 2. Add a "Show a modal or sidebar form" brick
This step asks the mod user to select a year, which is needed for the API request you'll be building with the next brick.
The year will require four digits (YYYY) and will be part of the GET request URL.
Without this data, the example mod won't be able to determine which Formula 1 season to query through the API.
Configure this form like this:
Form Title: What year?
Name: year
Label: Year driver raced
Input Type: Single line text

Step 3. Add a "HTTP GET" brick
This step represents the actual API query. In the case of our example mod, we're querying the Formula 1 API hosted on ergast.com.
To do so, add the HTTP GET brick and specify the url.
- url:
<https://ergast.com/api/f1/>{{@form.year | default("2022", true)}}/drivers.json
<aside> ℹ️ If you notice, there is some nunjucks code in the middle of the above endpoint.
This code provides a default value in the case where the value for @form.year is empty.
</aside>
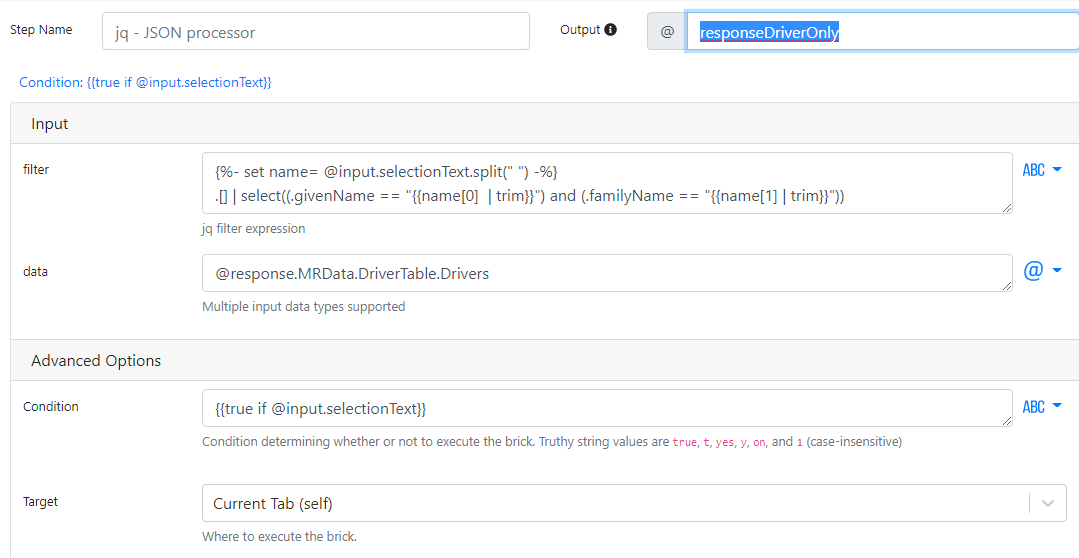
Step 4. Add a "jq - JSON processor" brick
Now to parse the results from your previous API call.
First of all, set the output variable for this brick to @responseDriverOnly.
You only want to extract very specific data data, which in our example mod is about one driver that an mod user has highlighted.
The mod pulls the driver’s information from the text highlighted on the page using @input.selectionText. After it retrieves the highlighted value that you from the body of a page, you'll split it into first name and last name using nunjucks: That’s the {% set.. %} part in the code below.
Then this data will be sent into a jq filter. Use select to filter out all data objects that do NOT contain the data belonging to the driver in question. You'l also use trim to get rid of any whitespace trailing the first or last name.
Thus, the filter code will appear as follows:
{%- set name= @input.selectionText.split(" ") -%}
.[] | select((.givenName == "{{name[0]  | trim}}") and (.familyName == "{{name[1] | trim}}"))
- data: You’re going to pass a sub-object from the previous brick execution as the data field:
@response.MRData.DriverTable.Drivers
Last but not least for this brick, you’re only going to execute this brick if the condition matches.
The condition in our example is that the user must have highlighted some text on a page. We can verify it by using this expression {{true if @input.selectionText}}. The expression fails and returns false if the user hasn’t selected some text within the browser tab prior to executing the mod.
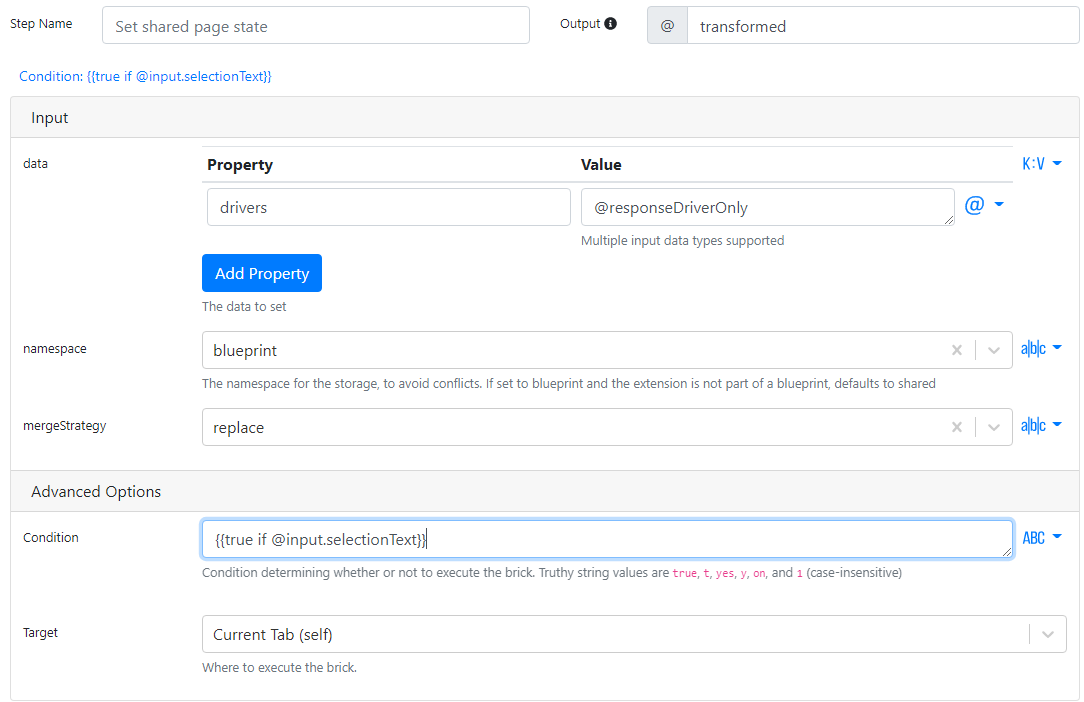
Step 5. Add a "Set shared page state" brick
The mod will store the information pulled in the previous brick in the Page state using this brick.
To do so, you'll need to add a property.
Click the blue “Add Property” button and add the following:
Property name: drivers
Property value: @responseDriverOnly
Then, under mergeStrategy select replace.
Scroll down and find the Condition field. Here you'll want to make sure you’re only running this brick if you have data highlighted in the page. To do so, use the following condition:{{true if @input.selectionText}}.
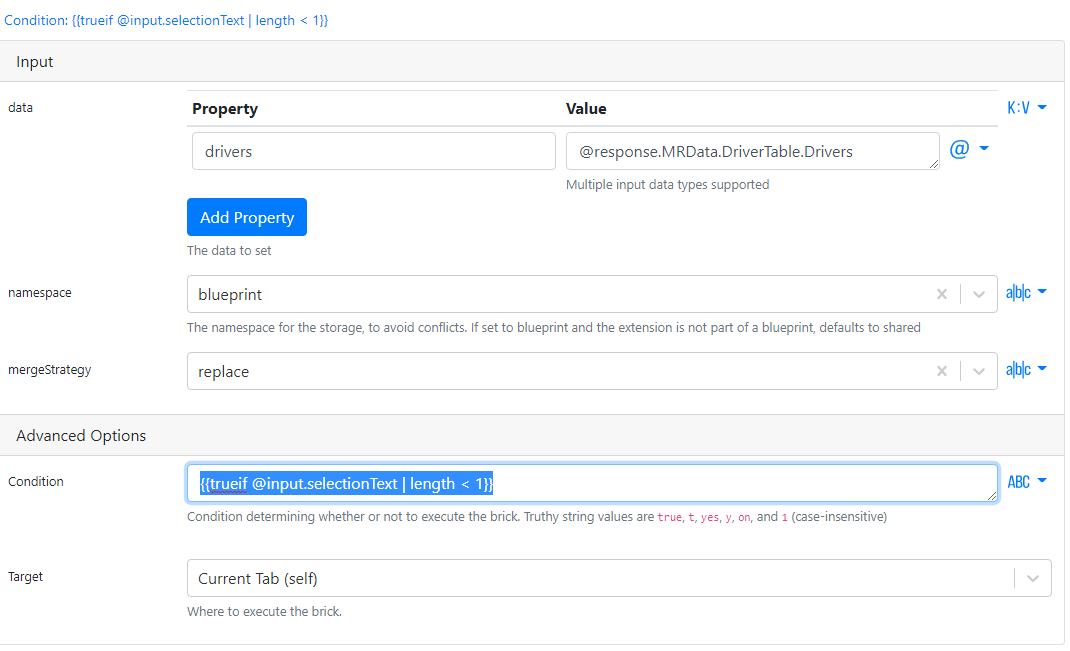
Step 6. Add another "Set shared page state" brick.
Now you'll add a second Set shared page state brick.
This brick will store some data in case where the user DID NOT highlight a driver’s name on the page.
Click the blue “Add Property” button and add the following:
Property name: drivers
Property value: @response.MRData.DriverTable.Drivers
Under mergeStrategy we’re going to select replace
Scroll down to the Condition field. In this case, you want to make sure you’re running this brick only if you DO NOT HAVE data highlighted on the page. To do this, use the following condition:{{trueif @input.selectionText | length < 1}}.
Step 7. Add a "Show sidebar" brick
As the last brick for the first mod, add the “Show Sidebar” brick. There's nothing to configure for this one.
The first mod, which focuses on triggering the API query, is now complete. Now, let's move onto the second mod, which dictates how the resulting information is manipulated and displayed.
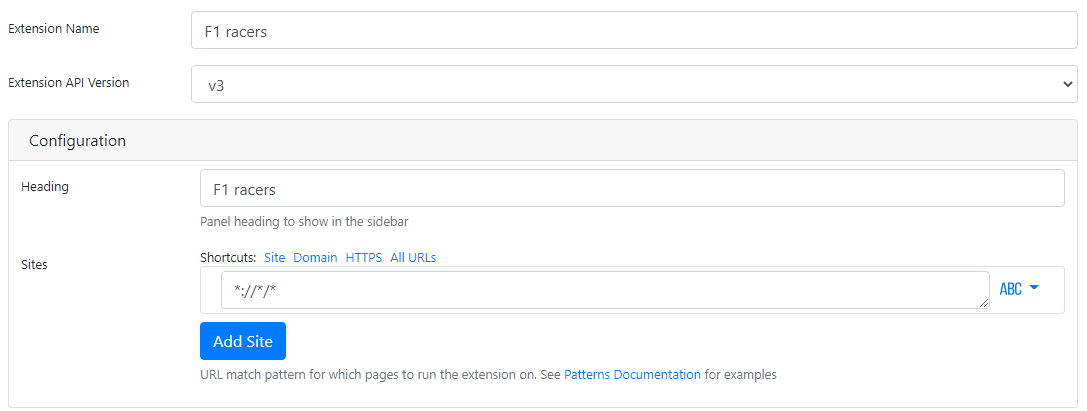
Step 8. Create a new "Sidebar Panel" mod
Go ahead and create a new mod of the Sidebar panel type.
Now, configure it as follows:
- Mod name:
F1 Racers - Heading:
F1 racers - Sites:
All URLs
Step 9. Add a "Get shared page state" brick
Remember in the first mod when you "share state" with the page?
This brick retrieves that state.
There's nothing to configure here, so you can quickly move onto the next step.
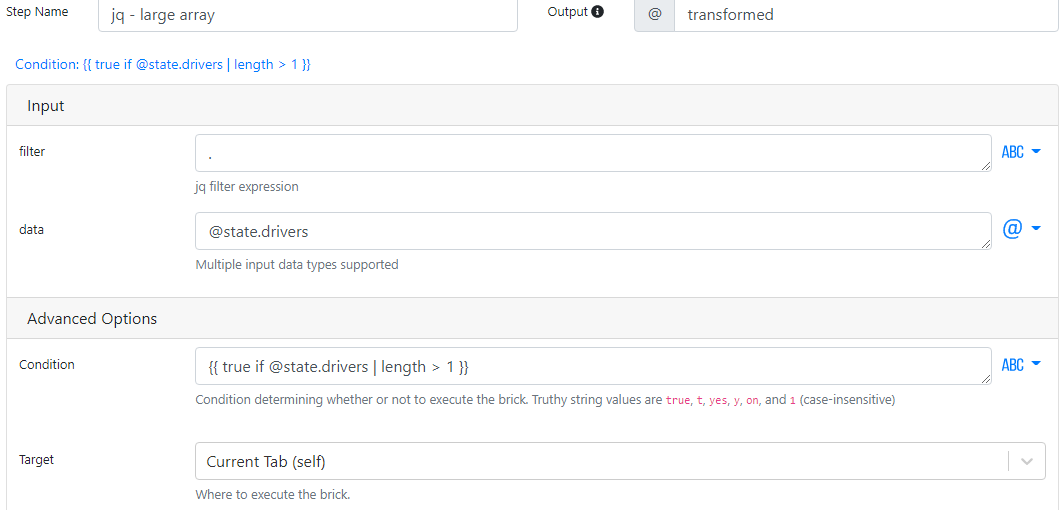
Step 10. Add a "jq - JSON Processor" brick
Add a jq - JSON Processor brick and name it something like jq - large array. This brick will process the data if you have a large array stored in your state (from the previous brick).
Configure it as follows:
- filter:
. - data:
@state.drivers
Then set a Condition:
{{ true if @state.drivers | length > 1 }}
This condition ensures this brick executes only if you have multiple entries in my array of drivers.
11. Add another "jq - JSON Processor" brick
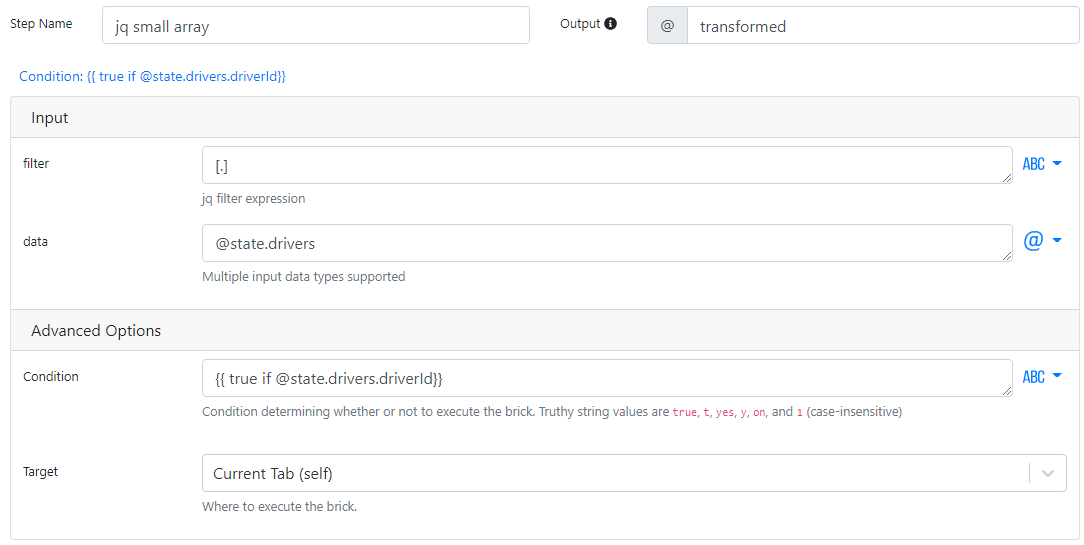
Now to add another jq brick (the reason we named the first one). In this case name it something like jq - small array. You guessed it — this brick will process the data if you have a small array stored in your state.
Configure this brick as follows:
- filter:
[.] - data:
@state.drivers
Then add the condition:
{{ true if @state.drivers.driverId}}
This brick will execute only if the conditional block returns true, and this condition is set to verify that the array contains the key driverId. Which means that if the array contains multiple items (meaning it matches the previous “large array” case) it will not execute.
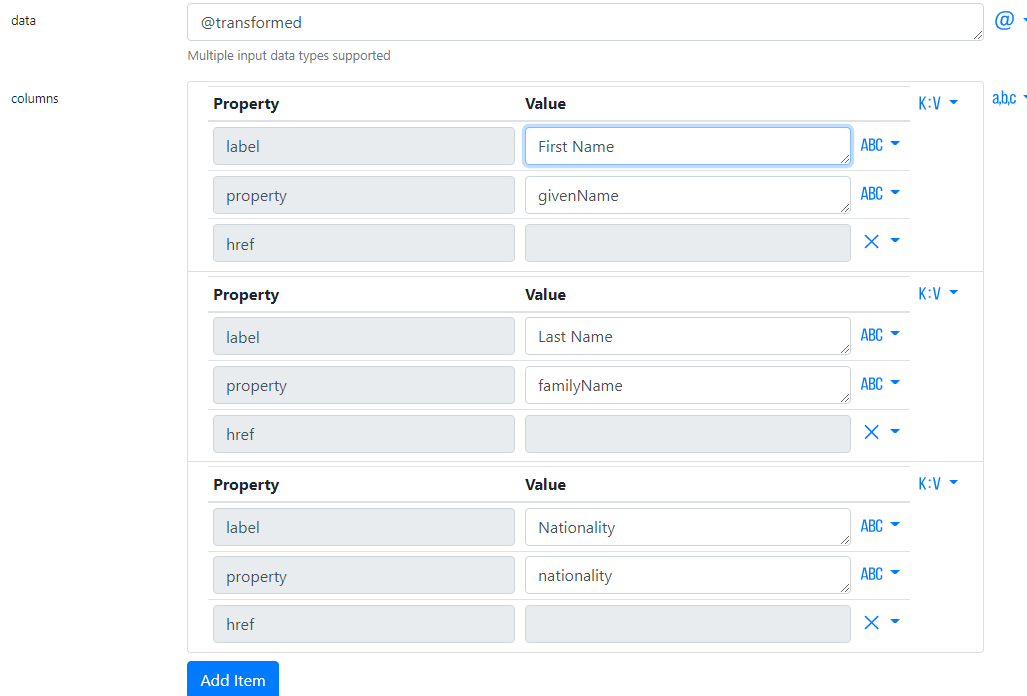
12. Add a "customizable table" brick
For the last step, you’re going to set up your mod to display the data returned by one of the jq bricks in a table on the sidebar.
Configure a customizable table brick as follows:
- data:
@transformed - columns: Add three fields and configure them as follows
1st field
- label:
First Name - property:
givenName - href: leave it as is
2nd field
- label:
Last Name - property:
familyName - href: leave it as is
3rd field
- label: Nationality
- property:
nationality - href: leave it as is
And with that, your mods are completed.
If you navigate to any website that has an F1 driver’s name, you can highlight it and run the quickbar mod called “Find Driver Information” to return some data on the driver.
You can also customize the data that you show in the sidebar by editing the label of the table. Perhaps you want to show more information than just their name and nationality — like maybe their team name. That’s entirely up to you!
Don't be intimidated by APIs
While the Formula 1 example we just walked you through is a neat illustration of how to call on an API in multiple ways, this is really just the tip of the iceberg.
You can create an infinite number of customize mods, using PixieBrix to build API sidebars, call on any API, request all kinds of different information. Think of all the ways this can be used to increase your productivity and simplify your browsing experience.
Want to explore some other examples? Visit the PixieBrix community.