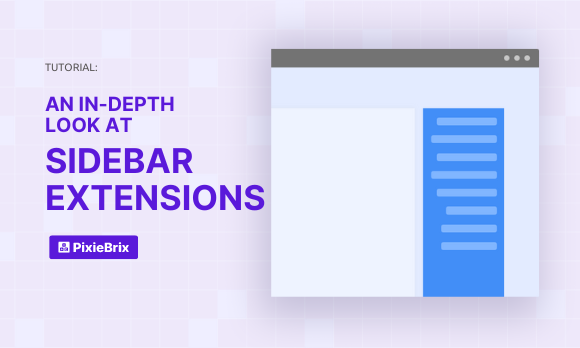
An In Depth look at Sidebars
In this article you will learn everything that will enable you to be successful in building sidebars on the PixieBrix platform. Read or watch a comprehensive tutorial
The PixieBrix Sidebar is a display area that appears on the right side of your browser.
It enables you to add real-time interactive content into any application, and bring information and actions with you across applications as you work.
Here's a preview of the sidebar that we'll build in this tutorial:
The beauty of the PixieBrix Sidebar is that is fully programmable and you can display many types of information:
- Text
- Images
- Lists
- Tables
- Buttons
- and more
In this article we're going to do a deep-dive into sidebars. You'll learn how to create a sidebar from scratch. No prior experience needed!
If you prefer to watch a video rather than read this article, here it is! Otherwise skip ahead.
Full run-through of the tutorial
Table of Contents
1. Getting started
- Sidebar overview: How to build a sidebar with the Page Editor
- Adding the sidebar to the Page Editor
- Different mechanisms for building a sidebar
- What and how to use Auto-render
- Moving elements on the sidebar
- How the brick pipeline works in the sidebar
2. Building a sidebar: Learning Airtable
- How to add basic sections (headers, images)
- Adding advanced content: Markdown, Buttons, API requests
3. Triggering actions in the sidebar
- Adding a pop-out form
- Showing and saving data in a database
- Refreshing the sidebar on selection change
4. Customizing the sidebar elements
- Using the WYSIWYG options on the sidebar elements
- Using bootstrap CSS classes to improve the look
1. Getting started
Sidebar overview
A PixieBrix sidebar can be used for a plethora of use cases. In this post we're going to create a helpful sidebar to help us learn about Airtable.
Using a sidebar in this fashion we can keep track of our learning path, store notes, and we can add utilities to help us in our tasks.
This is what the sidebar we're building will eventually look like:
To build this sidebar we're going to use the Page Editor, which is the bread and butter of PixieBrix's platform.
Specifically, we're going to use the sidebar mod and configure it according to our needs.
Adding a sidebar with the Page Editor
To create a sidebar you need to open the Page Editor by doing one of the following:
- Windows:
Control+Shift+I - Mac:
Command+Option+J, or useF12 - Either: right-click and select "Inspect" from the context menu
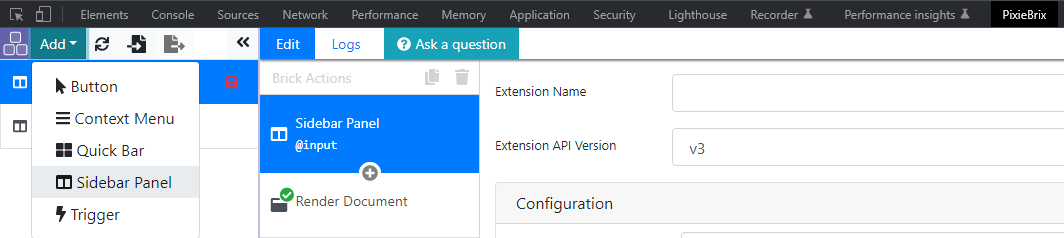
You can add a new sidebar by clicking the Add button and selecting Sidebar Panel.
Different mechanisms for building a sidebar
Every sidebar that you add comes by default with a Render Document brick.
The Render Document brick is special because it allows you to build all the visual aspects of your sidebar.
This brick also needs to be in a sidebar for the sidebar to render correctly (if you don't have a render brick you will receive an error message).
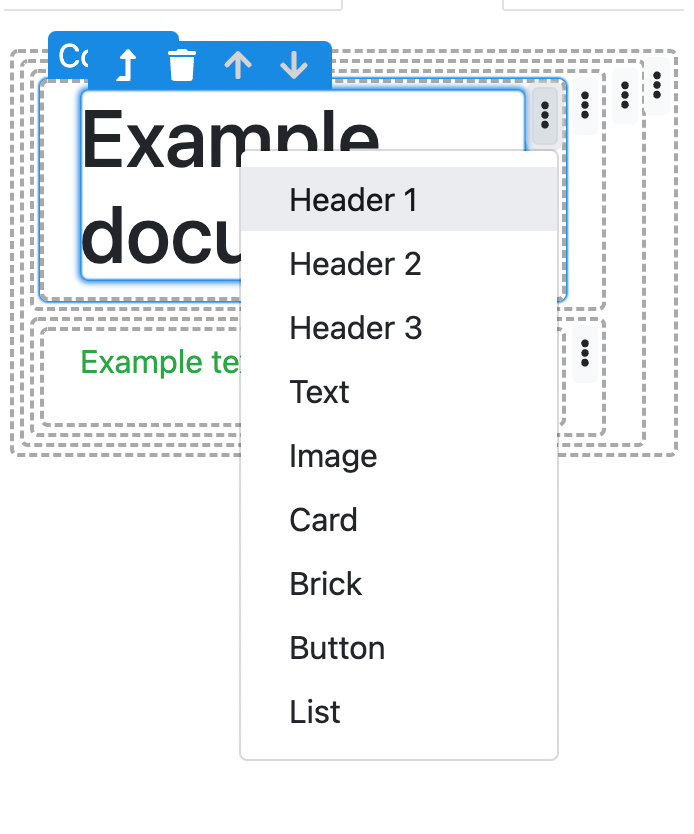
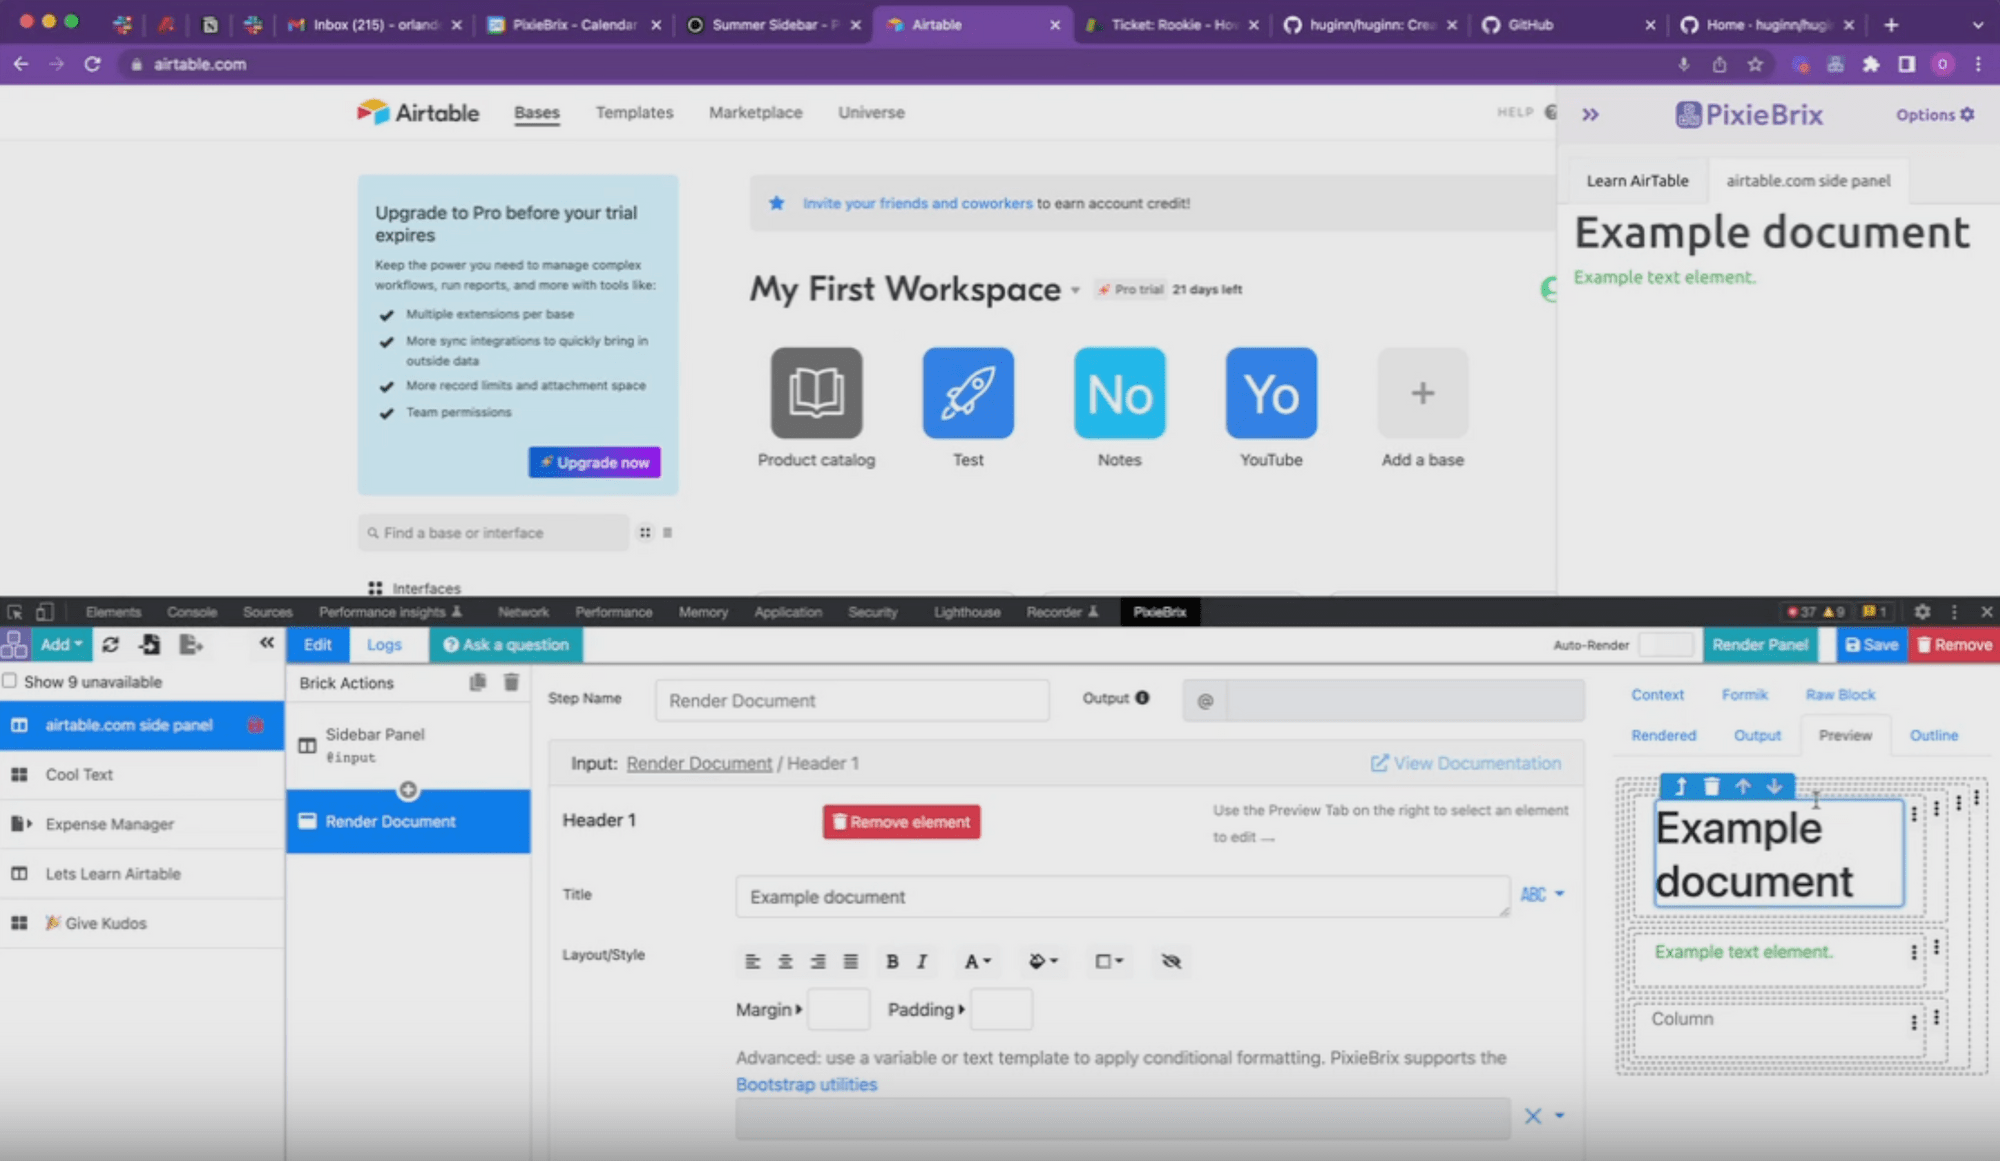
As an example, if you want to add a block of text that says Hello World in your sidebar, you would select the Render Document brick and you would see settings like in the image below.
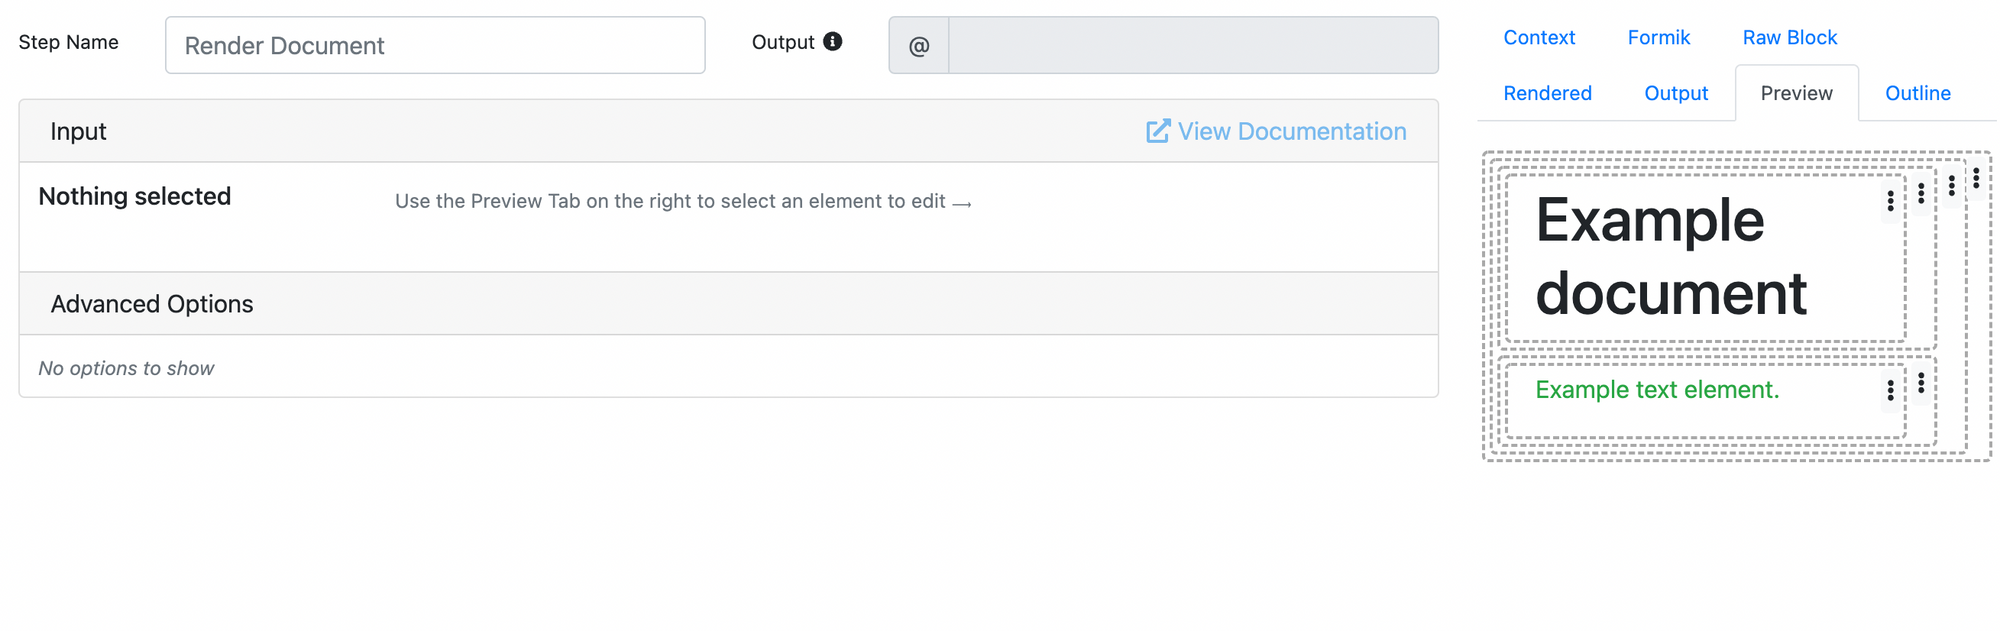
If you click elements in the Preview Tab (that is the text that says Example Document or Example text element), you will see the part in the middle of the Page Editor (the configuration panel) change.
By interacting with the configuration panel you can change various settings that will in turn change the look and feel of the text.
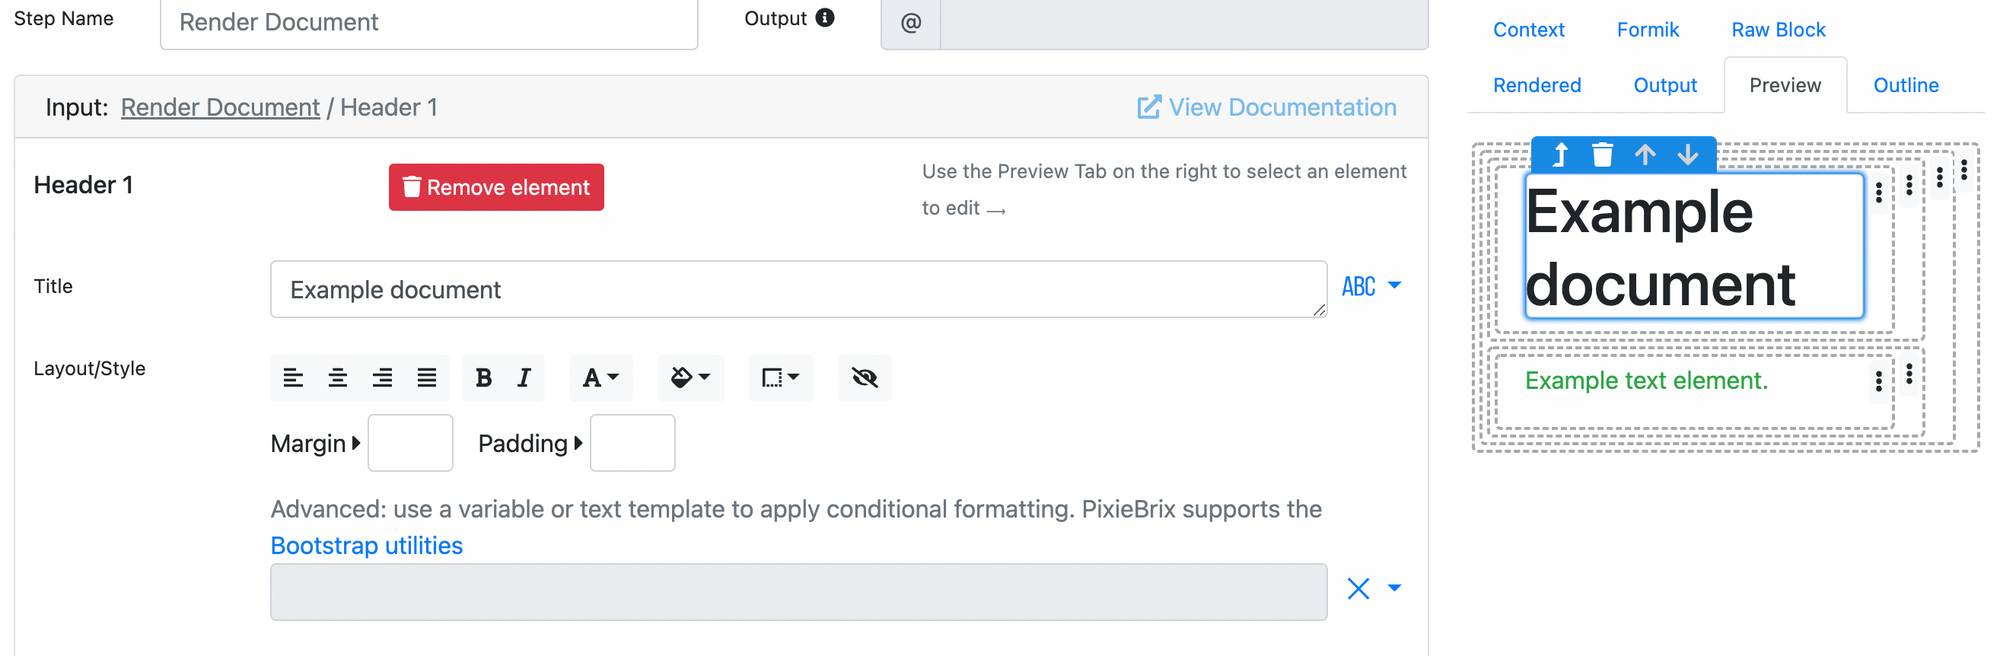
First, you can change the value displayed. In the example we would change Example document to Hello World.
Using the WYSIWYG editor, you can change the style of the text to be bold or italic as well as the color of the text. Additionally, you can change the background of the container, add borders, add padding and margins to space out the element you've selected, and more!
You can also move the position of this text or any other container using the up and down arrows in the blue box on the right side.
If you're more meticulous (or adventurous) then you can even use Bootstrap utility classes (linked in blue in the interface) to alter the look of each element.
Adding elements
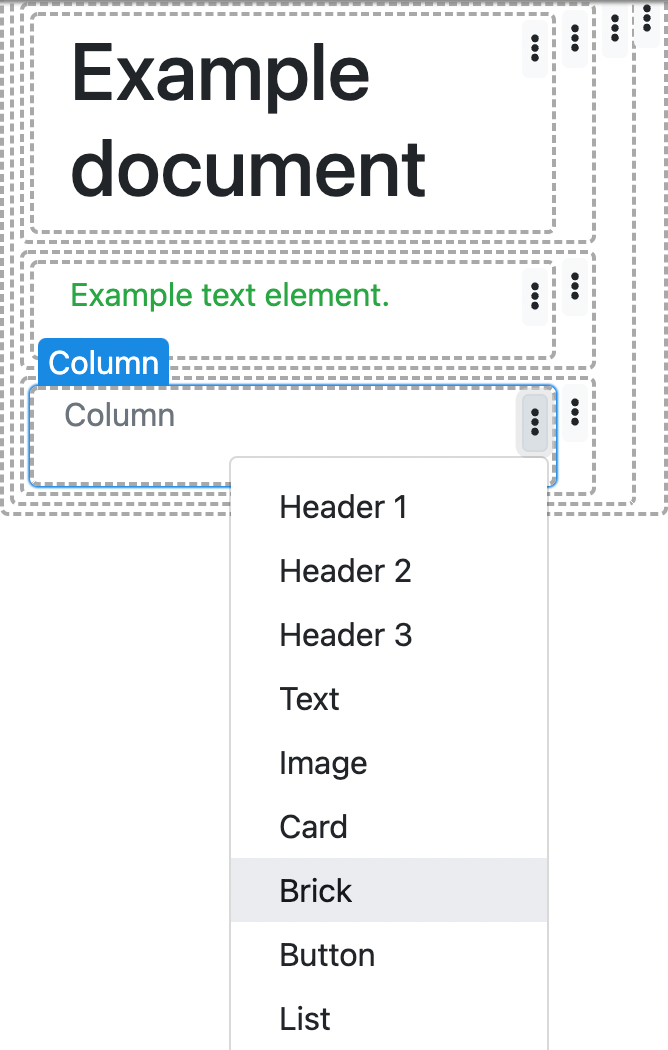
You can add more elements (e.g. Headers, Text, Images, etc.) to the sidebar by clicking the 3-dot menu. You can add elements to an existing container OR you can add a new container.
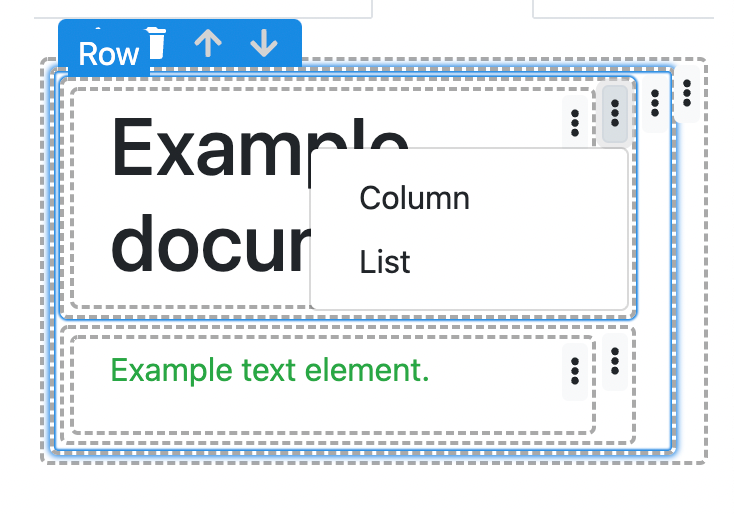

If you decide to add a new container, you can choose from a Row or List. This will help you organize your content.
Removing elements
To remove a block, you can use the big red "Remove Element" button in configuration panel or the small Trash can icon in the blue pop-up menu that appears when you highlight an element (you can select any element or container by clicking on the dotted border).
Using the Auto-Render option
Auto-render is a cool feature that lets you change elements in the sidebar and see the result of your changes in real time in the sidebar.
This is helpful when you are quickly prototyping and you want to immediately see the results of your changes.
Moving and reordering elements
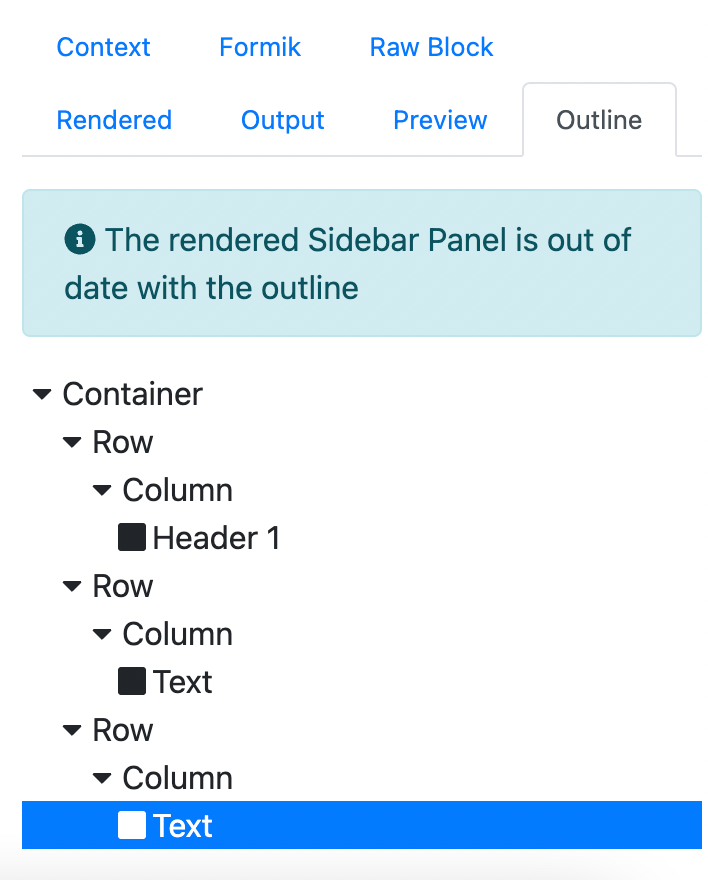
If you don't want to use the tooltip menu to easily reorder elements, you can use the Outline panel. To do so, just drag and drop listed elements to re-order Containers, Rows, Columns, or other elements as you see fit.
How the brick pipeline works in the sidebar
Another important aspect of the sidebar is the ability to have multiple pipelines.
We refer to these as sub-pipelines to distinguish from the main pipeline in a mod.
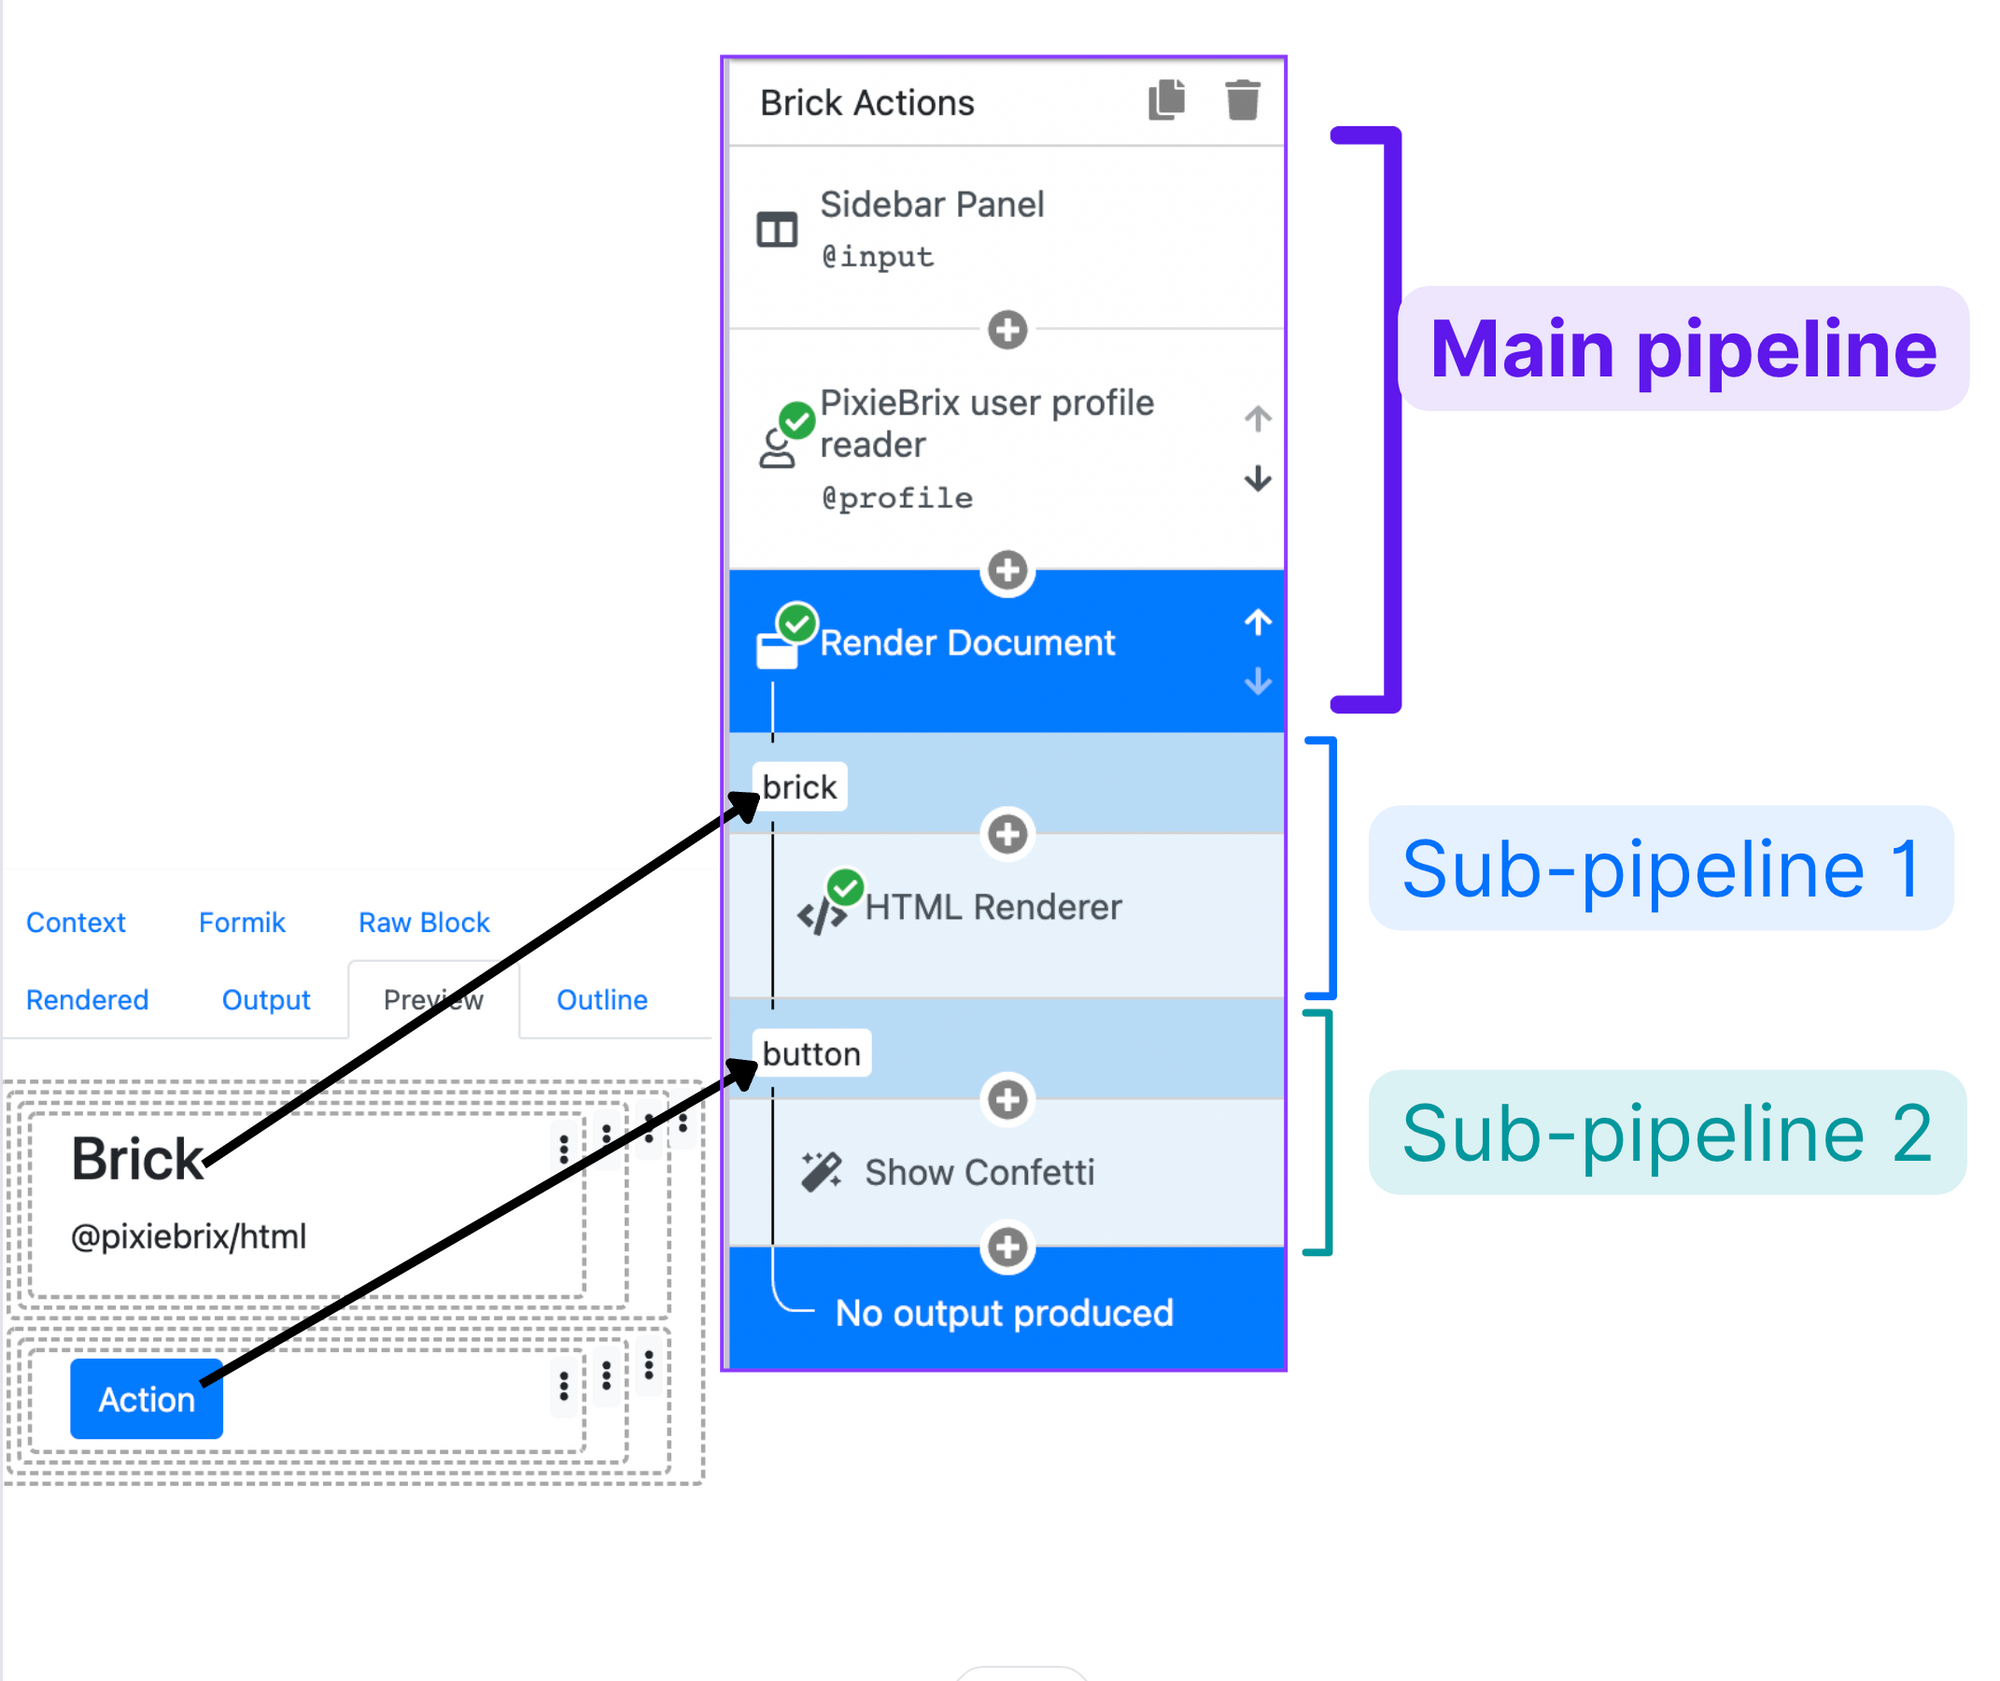
A pipeline is "a timeline" of actions. Bricks within a pipeline (or sub-pipeline) run sequentially. This way you have a series of actions triggered one after the other, by composing bricks and using conditions to control their flow.
To add a sub-pipeline you first need to add a "Brick" or "Button"-type element inside the sidebar through the Document Renderer, as in the screenshot below.
After you add a Brick or Button, you'll notice a sub-pipeline is created in the Brick Actions view on left-hand side of the Page editor.
By adding one or more bricks to the sub-pipeline you can trigger multiple events in succession.
You can run the main pipeline by opening the sidebar, and trigger sub-pipelines by pressing a button or otherwise causing an action to execute.
The best way to trigger a pipeline is to add a "brick" element to the sidebar, and then configure it to output something, whether it's a markdown field, html, iframe, or anything else.
If you encounter this error, add an empty markdown brick to your subpipeline as the last element.
Once you've added bricks to the pipeline you can truly customize actions on the sidebar. For example, you can trigger an API request, save data to a database, or render an image or dynamic text that uses variables.
2. Building a sidebar: Learning Airtable
Now that you've explored the basics, it's time to create your own sidebar.
In this example, you'll create a study sidebar to help you learn how to use Airtable, one of the most popular no-code software tools.
Airtable is a delightful app with loads of documentation that explains how you can maximize your productivity using it.
In the PixieBrix sidebar, you can organize the content that you find most helpful, and make it convenient to access from any webpage. You can add quick links to study resources, automate searches in the Airtable forum, capture notes, collaborate with study partners, and more!
Let's start planning: for this sidebar we're going to add the following sections:
- A header with a title and image
- A simple block of text
- An organized list of links that open in a new tab
- A button that opens a YouTube video
- A button that opens a tab with Airtable templates
- A table that returns results fetched from an API call
- A list of links that are fetched in real-time based on text you highlight
- A way to take notes and store them in a PixieBrix database
This tutorial is very hands-on! Keep reading to learn how to build each section.
First, we'll add basic sections to the sidebar to give it some structure. Afterward, we'll further customize the style of each section.
How to: Add basic sections to structure your sidebar
Start by opening the page editor and adding a sidebar panel mod. If you don't remember how to do this, scroll up to this section to learn how to do it.
Next, click on the Render Document brick to start customizing your sidebar. A picture is worth a thousand words, so here's what it looks like:
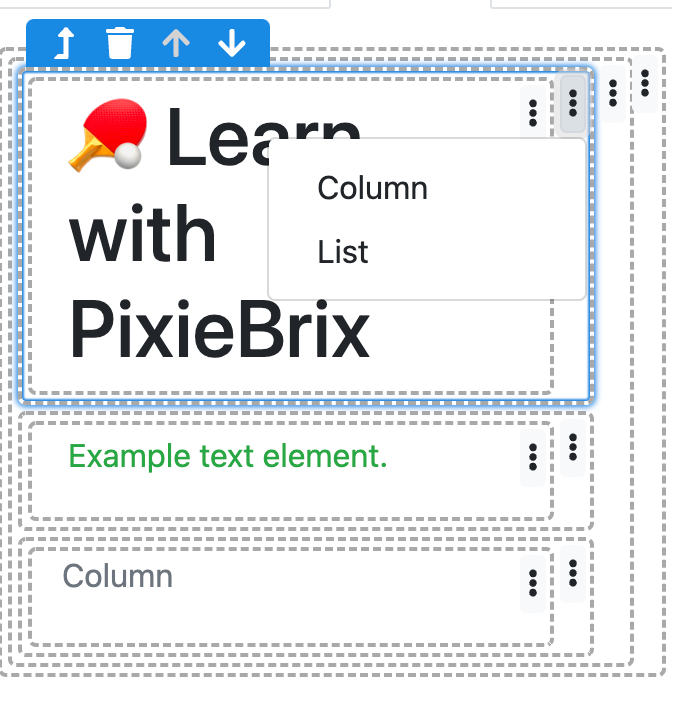
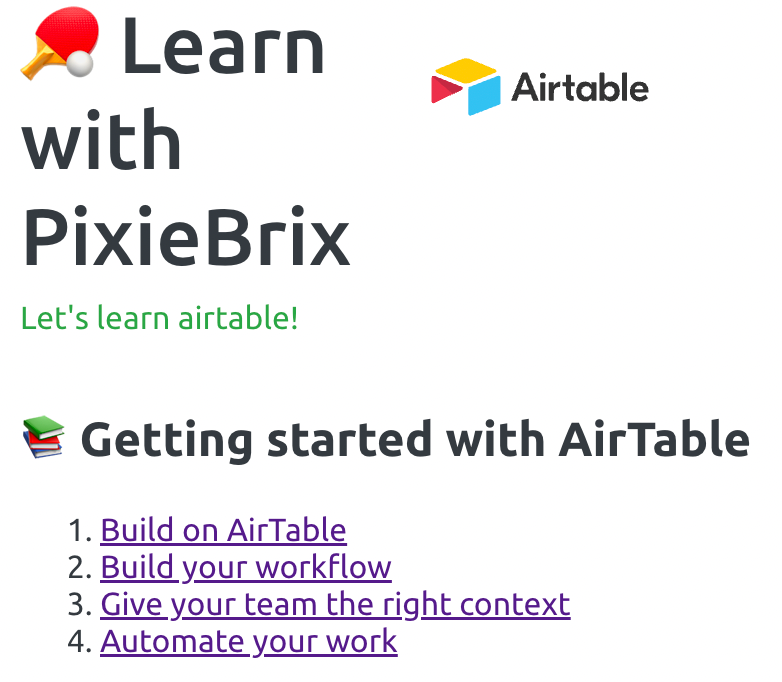
Click the header Example Document and change it to 🏓 Learn with PixieBrix. I've added an emoji to give it a fun touch 😎
Now select the container 2 levels ahead of the Header. It should say "Row" in the Page Editor when you highlight it.
Then, using the 3-dot menu for that row, add a Column.
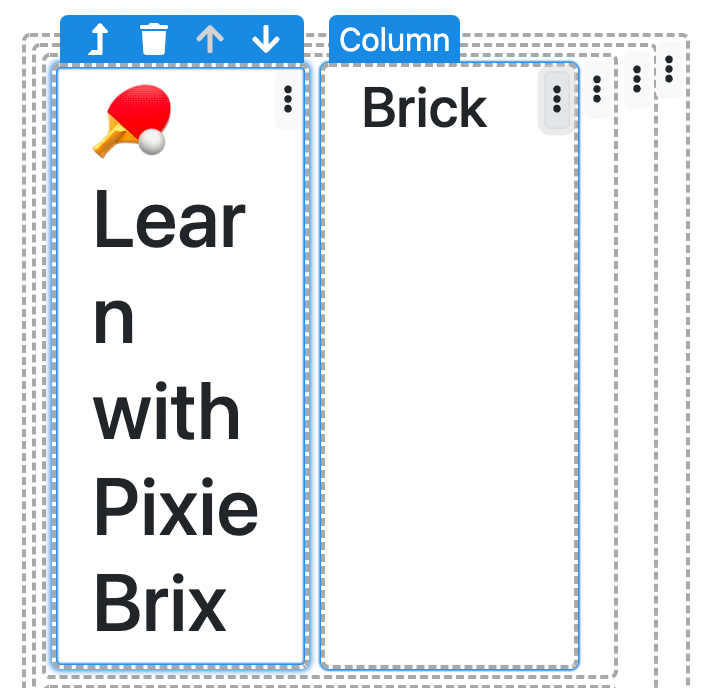
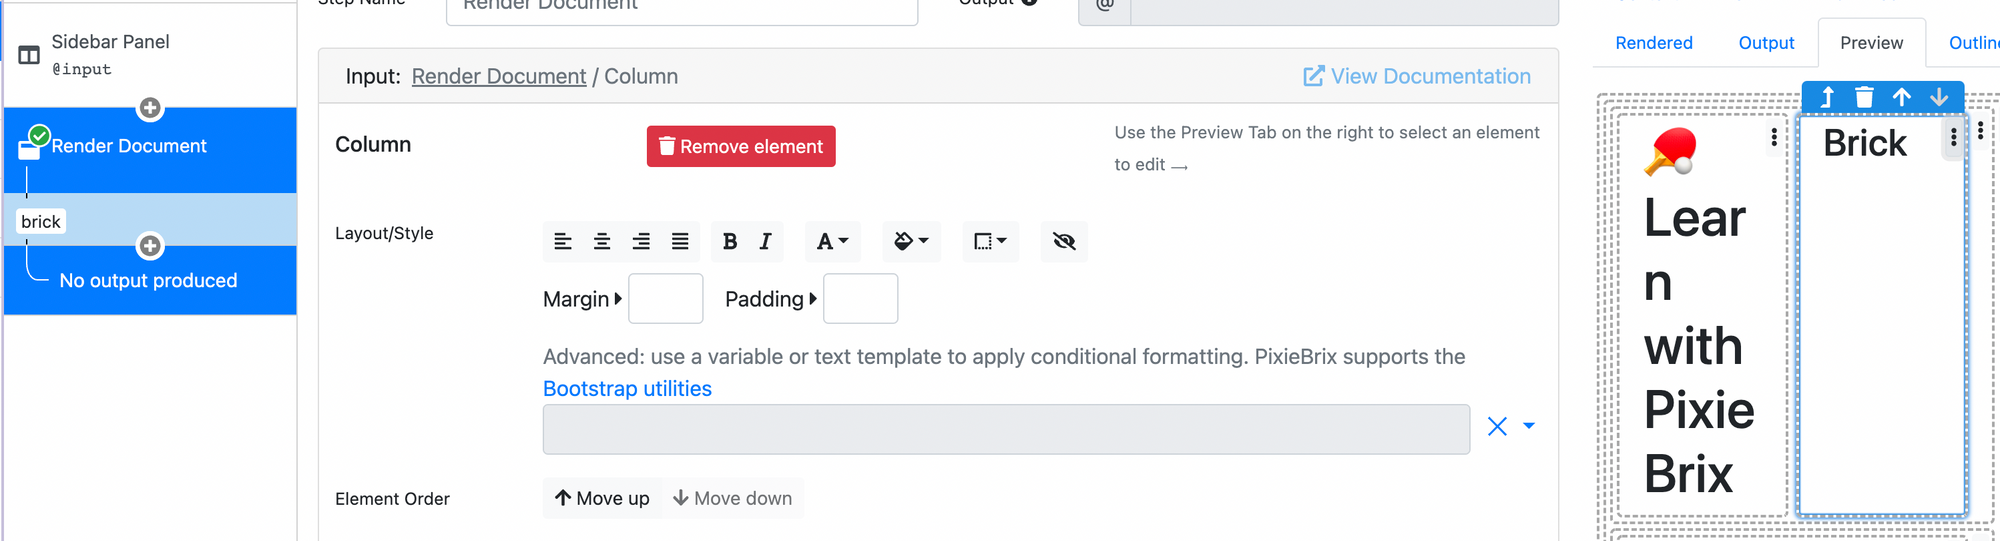
After adding a column, use the 3-dot menu to add another element to this newly-created column. This time we're going to add a "brick".
After adding a brick you should see something that looks like this — a row separated into two columns. One side has a header with text and the other side has a brick that we'll configure in just a minute.
At this point, you'll get an error if you try to render the sidebar or if you've enabled Auto-Render.
We're going to rectify that in just a moment, but focus for a second on what the error says:
"Error rendering panel: Pipeline does not include a renderer"
This error means that when we add a brick to the sidebar, we need to provide it with an output. We haven't specified any yet, so that's the next step.
Head to the left side of the Page Editor and you'll see a "brick sub-pipeline".
Just underneath it there will be a grey plus ("+") symbol and a message saying No Output Produced.
Fix this by adding a brick to render an output. Click on the grey plus symbol and look for the Render Markdown brick. Once you add this brick it should automatically activate (if not just click on it) and you will be able to add Markdown to the sidebar.
To add a logo or other image you can use a markdown markup, such as . For this example we'll add the Airtable logo in SVG format.
One important takeaway: you can use different file formats in the Sidebar which can be rendered using various render bricks, like in this case the markdown brick.
If you click back on the Render Document brick you can go customize the text field below what we just created, which has been added by default in the sidebar and should say: "Example text element."
Clicking on this element in the sidebar allows you to change it. The text field "Text" will appear with the default sentence for its value. Let's change this value to: "Let's learn Airtable together!"
Adding advanced content
Now, to add another section click on the main container — that's the second dotted line from the outside. A 3-dot menu will appear and you can click on it to add a new row to our container.
As we add a row, another element within the row gets added automatically: a column that can contain further elements, like text (headers, paragraphs), bricks, lists, and more!
Select this column, and then click on the 3-dot menu followed by Brick.
As we add a brick to the sidebar, we can once again select from the sub-pipeline that was automatically created.
Click on the grey plus symbol like in the screenshot below to select a brick to add the sub-pipeline.
From the search menu that appears, find Markdown and add it.
Then select it from the sub-pipeline. The PageEditor should now show you a field called "markdown".
In this field paste the following:
## 📚 Getting started with Airtable
1. [Build on Airtable](https://www.airtable.com/guides/start)
2. [Build your workflow](https://www.airtable.com/guides/build)
3. [Give your team the right context](https://www.airtable.com/guides/collaborate)
4. [Automate your work](https://www.airtable.com/guides/customize)
This is markdown syntax that creates a title and a list of links that you can click on.
Here's how it works:
- The two pound (#) symbols indicate an H2 title (if you wanted an H3 title, you would three pound symbols).
2. Using numbers followed by a dot, you can make a styled, ordered bulleted list.
3. Within this list you can create hard-coded links. The displayed text is contained within square brackets and the hyperlink is stored in round brackets.
If you go ahead and render this your sidebar mod should look like this:
As you can see, PixieBrix lets you add emojis to the markdown t0 customize the feel of the text to be more playful 😻
Now that you've learned how to add markdown, let's add another type of brick: a button to trigger an action!
We'll also want to inform the user about the usefulness of a button and their action. You can do this by adding an introduction in another container.
Go ahead and add a row to the container, as we did in the previous step.
- Focus on the main container — that's the second dotted line from the outside.
- Select the 3-dot menu
- Add a row (and a column within it will be added automatically)
Inside this column, using its respective 3-dot menu, let's add a Header 3 element. Then click this header element and set its value to 📹 Video.
Now that you've created a title, let's also add a short paragraph text. Select the 3-dot menu again and add a Paragraph text element. Then select it and set its value to:Prefer watching a video instead of reading article? Click the button below 👇Watch an Airtable tutorial
As the cherry on top of the cake, we're going to add a button.
Using the 3-dot menu once again, let's put a button under the paragraph text we just added a moment ago. Instead of a paragraph text, you'll be adding a "Button" element. The value for the text field of this newly added element is: Watch an Airtable tutorial
As you add this button to the sidebar, a sub-pipeline is once again automatically created.
Go to the left side of the Page Editor and find the corresponding sub-pipeline, then click the grey plus symbol to add a brick. The brick you're going to add is called "Open a tab".
After you've added it, it should look like this.
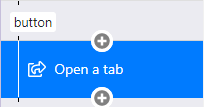
Let's configure this brick in the sub-pipeline to do what it says on the label: Open a URL in a new tab.
The URL attribute for this brick will be set to a YouTube link. You can pick any video you want but for the example I chose it to link to this video, which is a great starting point for your Airtable journey.
If you decide to render the Sidebar, you can test this button right now. As you click it you'll see it open to the relevant YouTube page.
Next up, we're going to add another button that links to a template repository of the best Airtable bases.
It will be a very similar step to the one detailed above (so a little repetitive) but it's a great addition to our sidebar example.
Go ahead and add a row to the container, as we did in the previous step.
- Focus on the main container — that's the second dotted line from the outside.
- Select the 3-dot menu
- Add a row (and a column within it will be added automatically)
This will add the row at the bottom of the Sidebar in the Preview pane with a column within it.
Let's select the column and add two elements within it using the 3-dot menu:
- Header 3
- Button
Now you can set the header's title value to🖼 Templates and the button title to View Official Airtable Templates.
Then go in the sub-pipeline for this button and you can add a brick to perform an action when the button is pressed.
Add the "Open in a new Tab" brick once again and set the page to be opened to: https://www.airtable.com/templates.
You should be able to see the result in the sidebar after you refresh render it. It will look like this:

Let's break for a minute and admire the beautiful yet barebones sidebar that you've created, and everything you've learned so far!
- You know how to create a simple sidebar and add sections to it: rows, elements, containers.
- You know how to configure buttons to perform actions.
- You learned how to use bricks, specifically markdown and images.
Now you'll learn how to call an API and show the results in a neatly formatted table.
The first we're going to do is to add a new Row (which you've already done several times!).
Inside this new row we're going to add two elements:
- An H3 Header
- A brick
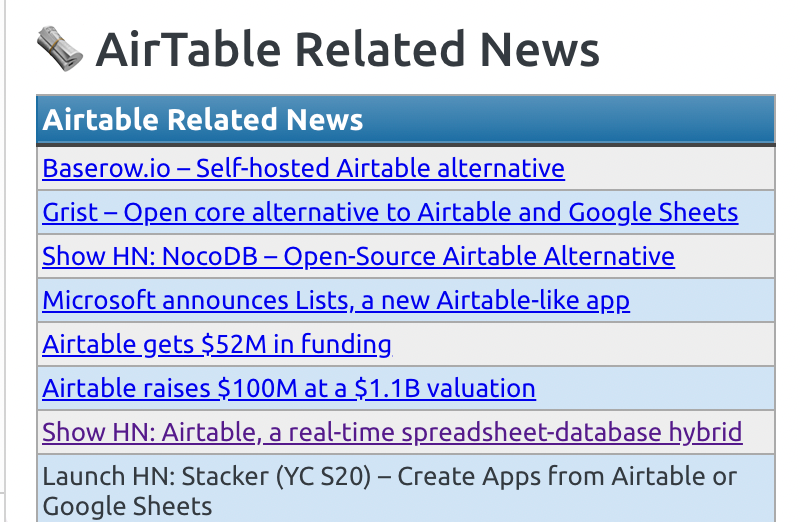
In the H3 Header, set the title field value to🗞 Airtable Related New.
Then go to the automatically generated sub-pipeline and add two bricks in it.
The first brick will perform an HTTP request to get some data from an API. Then you'll display that data in the sidebar within a table.
To add a brick to the sub-pipeline, hit the grey plus symbol and add a HTTP Request brick.
This allows you to hit an API — in case of this specific example, the HackerNews API — and return results for a specific keyword.
To achieve this, set the HTTP Request URL to be:
https://hn.algolia.com/api/v1/search?query=airtableThen set the method of this brick to be GET and make sure the output variable from this brick is set to @response.
Then, add a second brick below the HTTP Request brick called A customizable table.
Go ahead and configure this brick to have the data field set to @response.hits. This allows the data returned by the previously added HTTP brick to be parsed by this table brick.
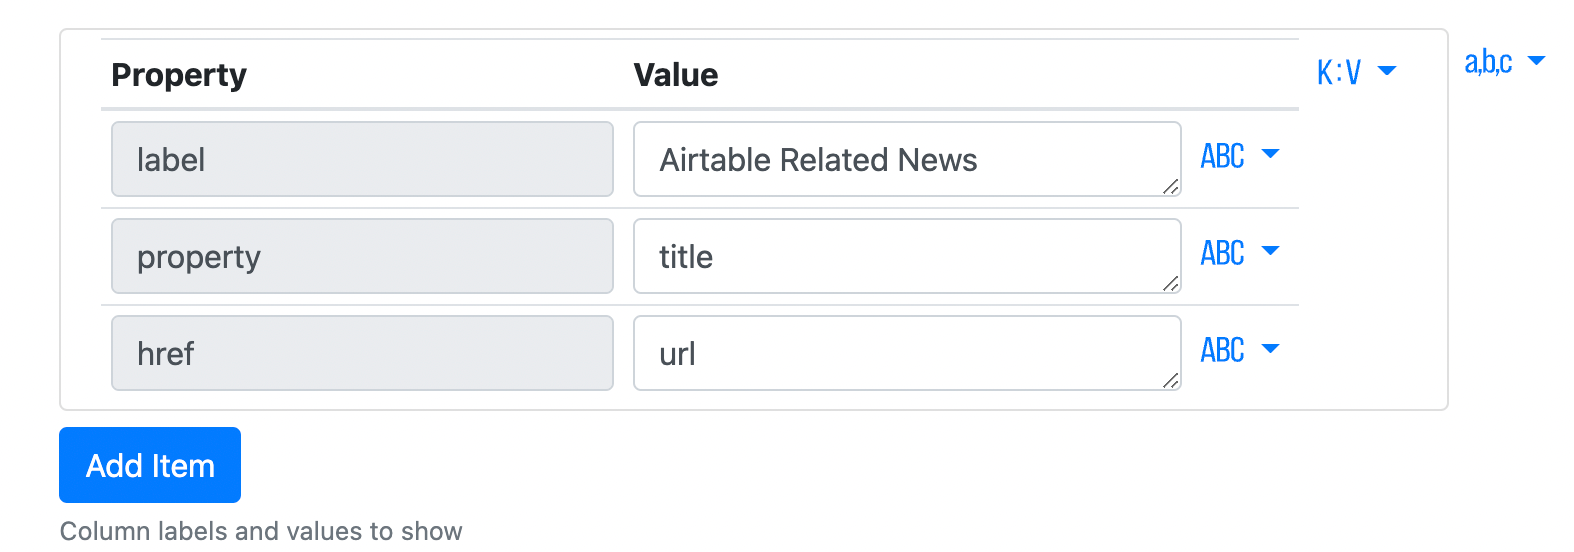
We'll also configure the columns for this brick by adding a Key:Value item and configuring its values as follows:
- label:
Airtable Related News
The label is just the title of the column - property:
title
This will set the text of the value to show in this column's cell - href:
url
This will set the URL that is associated with the title of the cell, which you can click on to open it in a new tab
Once you've done this, you should be able to render the sidebar once again and see the results of your hard work.
3. Triggering advanced actions in the sidebar
We've already triggered some simple actions such as calling an API or opening a URL in a new tab. In this section you're going to take things a step further.
We want to add a simple way to search Google based on a highlighted word on the webpage.
Refreshing the sidebar on selection change
Go ahead and add a new row to your sidebar. Within the row add two elements:
- H3 Header
- Brick
For the H3 header set the title to be ⚡️ Instant Results. This should give a good understanding to the end-user that this part of the document is dynamic.
You can optionally add a paragraph element under this H3 Header to explain how this functionality works.
For the next part, we're going to configure the brick's sub-pipeline. We want it to perform 3 actions:
- First, to retrieve the information that a user has highlighted with their mouse
- Then, to perform a search on Google with the highlighted keywords
- Finally, to show the results in a nicely-formatted way within the sidebar
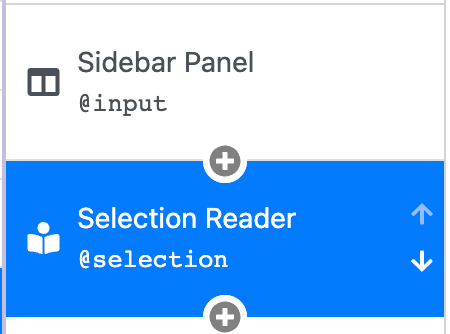
To achieve the first action, the mod needs to be able to read the highlighted text. Using the Page editor, add a Selection Reader brick into the main pipeline.
We are going to use a PixieBrix feature that runs using this specific brick called Panel Refresh on Selection Change
This option can be accessed in the main and first brick of this Pipeline — the brick called "Sidebar Panel".

What this option does is rather useful for our use-case.
It relaunches the rendering of the sidebar — and therefore all the bricks in the main pipeline — when you highlight something on the page.
After setting up this optional feature on the main brick, you'll also want to add a Selection Reader brick to this main pipeline.
Go ahead and add it under the Sidebar Panel brick. Luckily this brick doesn't require any set-up. It will read the text that a user highlights with their mouse. Every time we change the highlighted text it will refresh and store the new value under a variable, called @selection by default.
Now to continue building our sub-pipeline.
We'll want to add a brick whose action is performed when the user highlights some text on the page. Add a "Fetch Google Results" brick. This brick type uses an API key, so if you haven't got one go get one from https://serpapi.com/.
Once you've set up your credentials, configure this brick as follows.
- For the query, set it up to say
Airtable {{@selection.selectionText}}. - Also make sure that the output variable's name is set to
@searchResults. This will allow us to search the internet for a query that contains Airtable AND the text we've highlighted automatically. Isn't that awesome?
Next, let's display the results in the sidebar.
Back in the sub-pipeline, add a new Render Markdown brick brick under the HTTP Request to the Serp API. Then put the following markup in the markdown field.
{% for @search in @searchResults %}
[{{@search.title}}]({{@search.link}})
{% endfor %}
Showing and saving data in a database
Another advanced use case that we include in the sidebar is storing and retrieving data in a PixieBrix database.
Let's build a feature that stores Notes in a database so that you can read and keep track of your Airtable notes. This will also let you edit them anytime you want.
To begin, add a new row to our sidebar!
Inside this newly added row, add three elements:
- a text H3 heading
- a Markdown brick
- a Button
First, add an H3 heading and set its value as📝 Note.
Next, add a brick below the H3 heading. This brick will hold our notes. Go ahead and press the grey plus symbol then type "HTML renderer" in the modal search box that appears and add the brick.
Then we'll add some code to this brick in the HTML field:
<pre>{{@dbData.data.data}}</pre>Using this variable in this way will allow the sidebar to render a structured list of values that we're going to fetch from our database when the sidebar loads.
Now you might be wondering:
- How can I load data from a database in PixieBrix?
- How do I even store data in a PixieBrix database?
Let's tackle the first issue.
Storing data in a PixieBrix database
To store data in a database you need to first decide what kind of data you will be storing. In this example we're going to be storing data in the form of text/notes.
A user's input is required, so let's add a button to trigger the process in the sidebar.
Add a "Button" element under the HTML renderer brick in the subpipeline.
With the Button element added, you can give it a label like "Add a note".
Next, you'll notice that by adding a button, PixieBrix's Page Editor also added a sub-pipeline to the document.
We want a pop-up form to appear when the button is clicked. Look for a brick called "Show a modal or sidebar form" and add it to this pipeline.
Inside this brick, there are a few parameters to set. Configure them as follows:
- Form Title: Take Notes
- Name: Note
- Label: Your note content
- Field Description: A note you want to store
- Input type: Paragraph text
- Default value:
@dbData.data.data
Make sure that this form is cancelable and then set the Submit Button Text to Save note.
You can test this button by pressing it in the sidebar. A pop-up form should appear in the middle of the tab. This form doesn't do anything currently, let's change that!
Go ahead and add a new brick in this pipeline called "Put data in PixieBrix database".
This brick requires a lot of configuration. You want the key of this database to be my PixieBrix login so that it's unique to you.
Go ahead and add it using the Brick search modal. Make sure you're adding it somewhere in the main pipeline (very important).
Then come back to the sub-pipeline and configure the "Put data in PixieBrix database" brick with the following values:
- Database Name: Create one and then select it
- Merge Strategy: Replace
Go ahead and add a K:V item to the value Section by clicking the button in blue. This will allow you to select which data to store in the database.
- Specify the Key name to be
data - Specify the Value to be
@form.note
Now that we're done configuring this brick, we need to add one last brick to this pipeline: "Reactivate All".
What this brick does is reactivate all the bricks in the pipeline, basically refreshing the state of the pipeline to load defaults once again.
How to get data from a database?
You've just added a way to gather users' input data and store it into a PixieBrix database, but what about retrieving it?
We can use a brick called "Get data from PixieBrix database" for this purpose.
Add this brick to the main pipeline and make sure the output variable used to store this data is @dbData.
This variable matches the one we used earlier in the section "Showing and saving data in a database" where we rendered the results in an HTML renderer brick.
Add this brick at the top of the main pipeline and configure it as follows:
- Key: @profile.email
- Database: Choose the database you created earlier
- Missing Behavior: blank
At this point our main pipeline should look like this:

4. Customizing the sidebar elements
Using the WYSIWYG options on the sidebar elements
Throughout the Page Editor you will notice buttons when you select various parts of the Document Reader that look like this.
These allow you to quickly adjust the style (look and feel) for your visual elements in the sidebar.
Layout and Style

Using bootstrap CSS classes to improve the look
Additionally you can also use directly CSS Classes that are available in Bootstrap to improve the look of these elements.
To apply a Bootstrap class, add it in the field below - as the Page Editor implies this is an advanced section and it might be tricky to use if you do not know what Bootstrap classes do.

To compensate for that there's a handy guide available that covers most Bootstrap classes, as a cheatsheet by navigating here
Conclusion
This concludes our article/guide on sidebars. Hopefully you have learned everything there is to know about how to create sidebars.
If you followed this guide you should now be able to build a sidebar by leveraging every aspect of the Page Editor explained above and create your own personal sidebar.
You can also visit our Sidebar Summer page where you will see a lot of inspiration, sidebars built by other users, which might be useful to you!
As usual if you have any questions about sidebars, join our Slack community here and ask away!