Walkthrough: Collaborate Across the Web with PixieBrix and Crunchbase

As more and more businesses shift to remote work, digital collaboration is an essential puzzle to solve. Email, Slack, and Zoom fill some of the void of course, but there are other in-office experiences that are hard to recreate. Something in the office as simple as tapping someone on the shoulder to show them something on your screen now requires a meeting invite and calendar coordination.
If you’re looking for a better way to collaborate across the entire web and share notes with your colleagues, PixieBrix can help.
In this detailed walkthrough we’ll break down how to build a custom browser mod that unlocks collaborative notes on any website. We’ll be illustrating this process using a use case common in the venture capital and recruiting worlds: leaving notes on business directory websites like Crunchbase or LinkedIn. This use case allows you to quickly share your thoughts on certain companies/profiles, and for your colleagues to do the same.
Here's a sneak peek of what that looks like in action:
Of course, you can customize this mod to suit your specific use case for website notes and ease collaboration within your team.
Let's dive in!
Sign up for PixieBrix
If you haven't already, you'll need to start this journey by creating your PixieBrix account. You can simply authenticate your account through Google or Microsoft and get started on a free account or pick the plan to suite your needs.
Then, install the PixieBrix browser extension and you can start building your own mods!
Build a PixieBrix database
The example mod we're going to walk you through requires a PixieBrix database in order to function.
Once you're all set up, now you can start building your mod.
For this one browser mod, we're actually going to build three separate PixieBrix mods that work together to achieve the result you need. Let's start with the first one.
Step 1. Add a Quickbar
Start by opening the PixieBrix Page Editor. Right click on any website, choose “inspect” from the menu that appears, and scroll through until you see the PixieBrix Page Editor.
Once there, click "Add" and select a Quickbar. The quickbar will be used to trigger the opening of a form, get some metadata, and leave your notes.
To achieve this, enter your Mod Name as Leave a note and the Action Title as: ✍️ Leave a note.
For our example mod, we'll in the Sites field we'll enter: https://www.crunchbase.com/organization/*. Obviously you can replace this with the site relevant to your needs. Similarly, for an Icon we selected crunchbase.
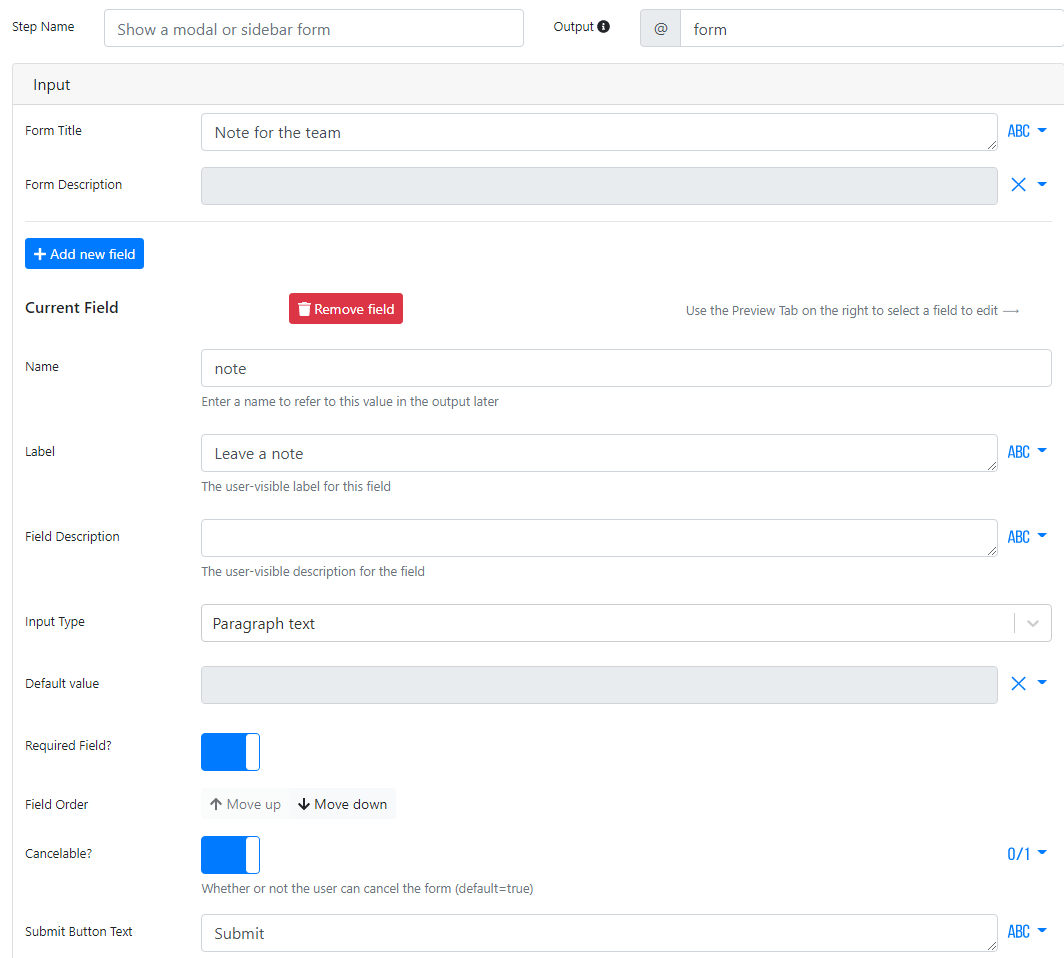
Step 2. Add a "Show a modal or sidebar form" brick
Now you'll want that quickbar to trigger the creation of a form in a modal.
Go ahead and add the Show a modal or sidebar form brick.
Configure the brick as follows:
- Form Title:
Note for the team - Name:
note - Label:
Leave a note - Field Description: Leave it blank
- Input Type:
Paragraph Text
Finally, make sure the "Required Field" is enabled.
Step 3. Add a "PixieBrix user profile reader" brick
Add the PixieBrix user profile reader brick. Your mod will use the metadata from this brick in the following steps. No additional configuration is needed for this step.
Step 4. Add a "Generate a timestamp" brick
Next, add the Generate a timestamp brick so some of the bricks you'll be including in future steps can make use of this information.
Rename the output key of this brick @timestamp.
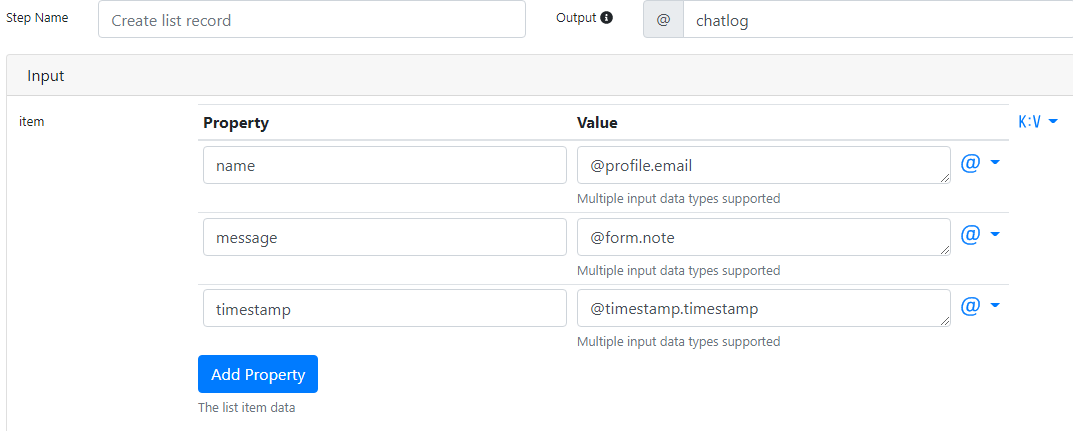
Step 5. Add a "Create a list record" brick
The Create a list record brick will return an array filled with useful information for your mod.
Set the output of this brick to @changelog. Then, using the blue button, add three properties.
1.
- Property:
name - Value:
@profile.email
2.
- Property:
message - Value:
@form.note
3.
- Property:
timestamp - Value:
@timestamp.timestamp
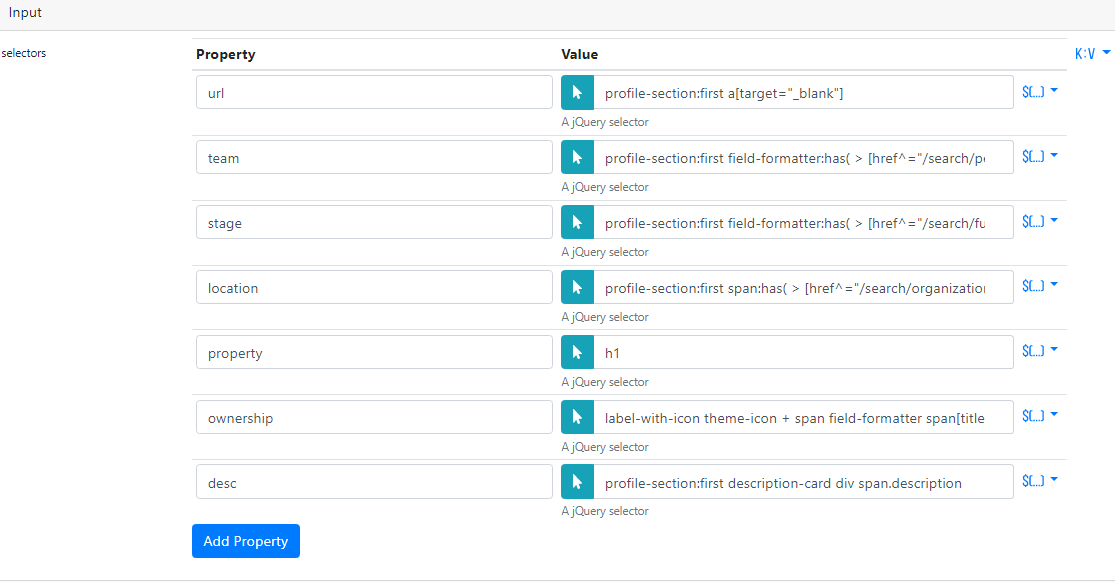
Step 6. Add a "jQuery Selector Reader" brick
The jQuery Selector Reader brick allows your mod to automatically parse data from a webpage.
Make sure the output variable is set to @data. Then add the following seven properties to this brick:
1.
- Property:
url - Value:
profile-section:first a[target="_blank"]
2.
- Property:
team - Value:
profile-section:first field-formatter:has( > [href^="/search/people/field/organizations/num_employees_enum/"])
3.
- Property:
stage - Value:
profile-section:first field-formatter:has( > [href^="/search/funding_rounds/field/organizations/last_funding_type/"])
4.
- Property:
location - Value:
profile-section:first span:has( > [href^="/search/organizations/field/organizations/location_identifiers"])
5.
- Property:
property - Value:
h1
6.
- Property:
ownership - Value:
label-with-icon theme-icon + span field-formatter span[title]
7.
- Property:
desc - Value:
profile-section:first description-card div span.description
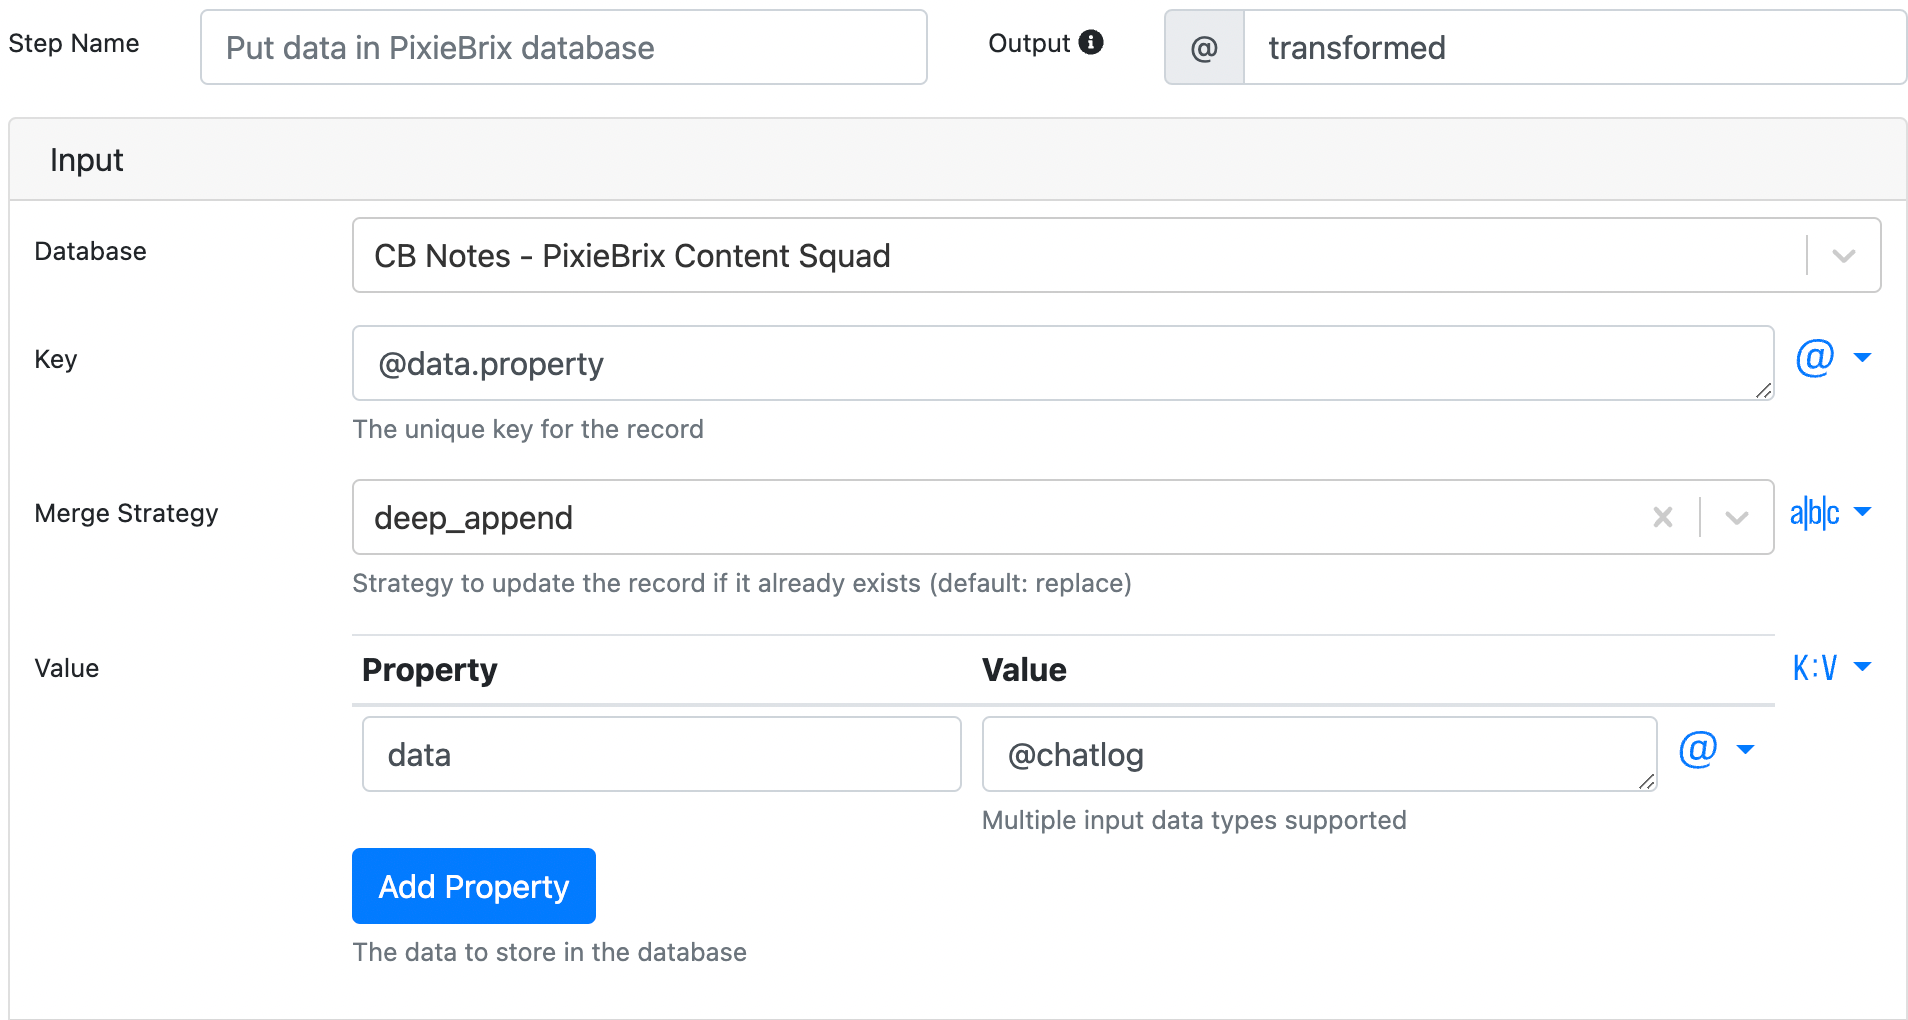
Step 7. Add a "Put data in PixieBrix database" brick
This next brick will pull all of this data into your PixieBrix database.
First, you're going to need to specify which database to use.
A database can support a large number of "entries." In this database design each entry will contain the chatlog of all the sticky notes left on a specific company's profile and its relevant metadata.
In our example we've created a database called CB Notes referencing the PixieBrix content team in the name.
Once your database is set up, configure the input fields of this brick as follows:
- Key: @data.property
- Merge strategy:
deep_append
Then add a Key:Value object to the Value field and set it as follows:
- name:
data - Value:
@chatlog
Step 8. Add a "Send to Slack" brick
This is an optional addition to your mod, but if you want to alert people on Slack about the notes you're leaving, the Send to Slack brick does exactly that..
You'll need to configure it as as follows.
For the Slack value, pick your slack integration from the dropdown. If you don't have any, create one by clicking the blue link.
For channel, pick whatever Slack channel you want to post to within your workspace.
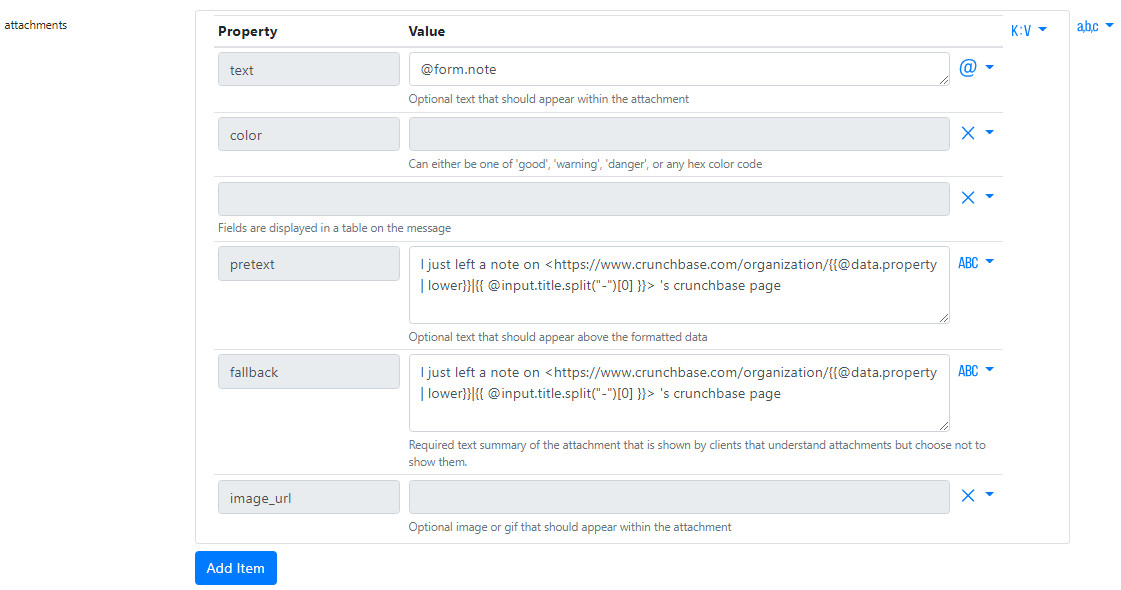
Then add some attachment fields:
- text:
@form.note - pretext:
I just left a note on <https://www.crunchbase.com/organization/{{@data.property | lower}}|{{ @input.title.split("-")[0] }}> 's crunchbase page - fallback:
I just left a note on <https://www.crunchbase.com/organization/{{@data.property | lower}}|{{ @input.title.split("-")[0] }}> 's crunchbase page
Scroll down to the advanced section and set conditional field to:
{{ "true" if @form.slack }}
Step 9. Add a "Hide Sidebar" brick
To keep this mod clean and snappy you can automatically close the sidebar after adding a sticky note using the quickbar.
This is more than stylistics. Hiding the sidebar after submitting a new note means that when the sidebar gets re-opened it will perform a request from the PixieBrix database the data again — refreshing the view and showing any new notes that might have been added to the "chatlog."
Step 10. Add a "Show Sidebar" brick
This is the counterpart to your last brick. Since you've already closed the sidebar, you now need to trigger it to re-open, refreshing the data in the process.
Your first mod is now complete. This one does much of the heavy lifting.
The second mod is the sidebar. The sidebar allows you to see other people's notes.
Let's get started.
Step 1. Add a "Sidebar Panel" brick
First step in this second mod will be to add a sidebar. You'll need to give it a name and a heading.
- Mod Name:
Crunchbase Sidebar - Heading:
Crunchbase notes
This sidebar will open when you trigger the creation of a sticky note.
You'll also need to set up the Sites field: https://www.crunchbase.com/organization/*
Step 2. Add a "jquery selector reader" brick
You're going to be reusing some items from the page in this sidebar. To do you will need to detect their values. Add the jQuery selector reader brick and configure it as follows.
This brick takes the same configuration as the brick we created in step 6 of the previous mod.
Make sure the output variable is set to be named @data.
Then add the following seven property items to this brick:
1.
- Property:
url - Value:
profile-section:first a[target="_blank"]
2.
- Property:
team - Value:
profile-section:first field-formatter:has( > [href^="/search/people/field/organizations/num_employees_enum/"])
3.
- Property:
stage - Value:
profile-section:first field-formatter:has( > [href^="/search/funding_rounds/field/organizations/last_funding_type/"])
4.
- Property:
location - Value:
profile-section:first span:has( > [href^="/search/organizations/field/organizations/location_identifiers"])
5.
- Property:
property - Value:
h1
6.
- Property:
ownership - Value:
label-with-icon theme-icon + span field-formatter span[title]
7.
- Property:
desc - Value:
profile-section:first description-card div span.description
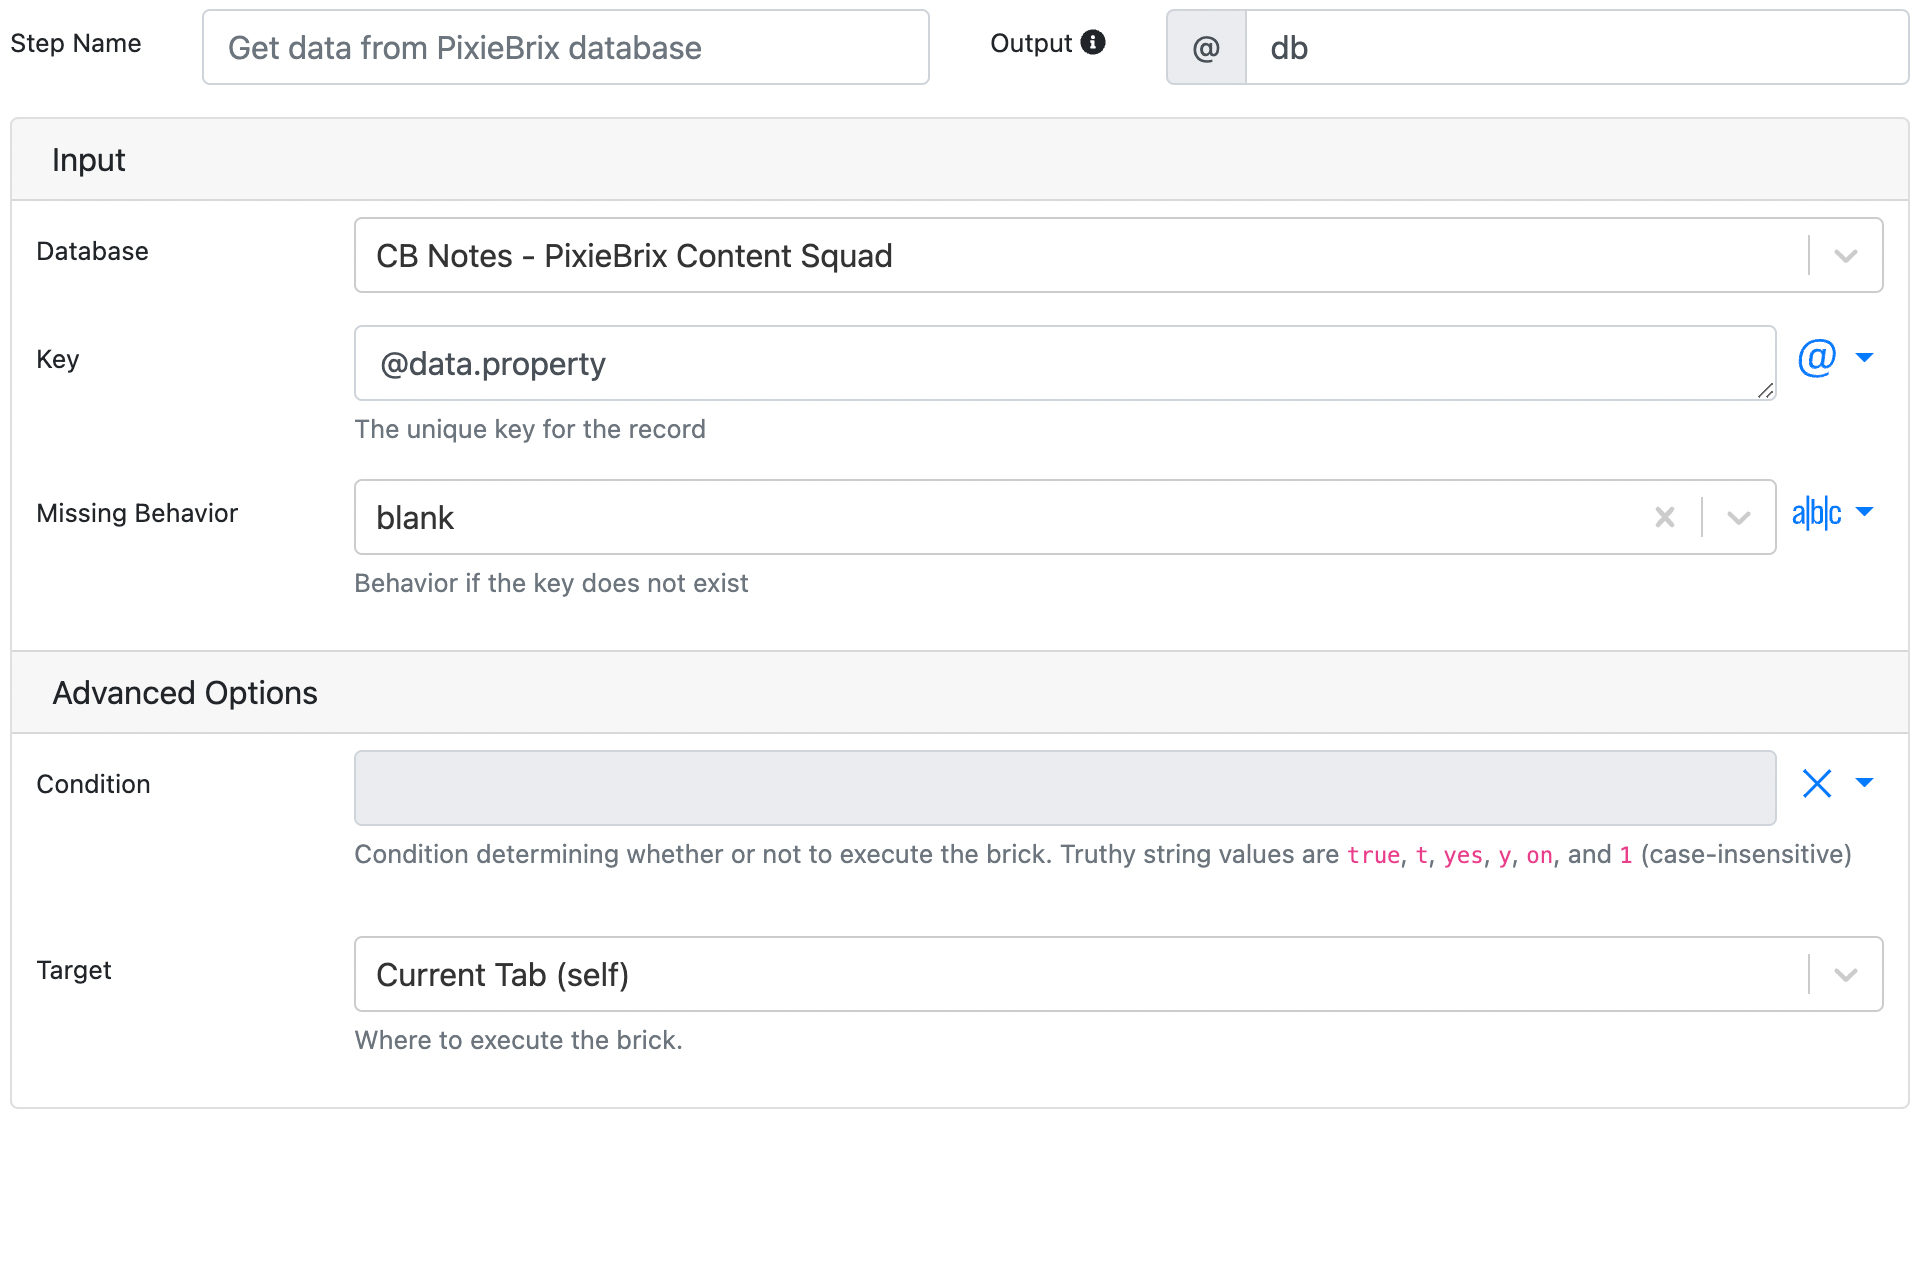
Step 3. Add a "Get data from PixieBrix database" brick
Now add one more brick, this time to pull data out from the database that you have pushed data into in the previous mod. You'll store this data in a variable and then use it in the next step.
Go ahead and change the output key variable to @db.
Then configure this brick as follows:
- Database:
CB Notes - Key:
@data.property - Missing Behavior:
blank(to be clear I mean the actual value from the drop down)
Step 4. Add a "Render Document"
Now the part everyone loves the most in these walkthroughs: adding the Render Document brick and building out the visual part of the sidebar.
We define a section as a combination of a both a Row and a Column within it.
Add this brick and configure it out as follows:
- At the top of the sidebar, add a Block brick to replace the default Header.
- Then select the brick to be the
@pixiebrix/htmlbrick. - Pass this value to the HTML field of this brick:
<img src="https://logo.clearbit.com/{{@data.url}}" style="width: 50px; height: 50px; object-fit: cover;">
Now add another section to the sidebar with a Header 1 component.
- For this sidebar component, define its title to be
@data.property— this will be the value you captured with the jQuery brick for the header of this page a couple of steps ago.
For the next section of the sidebar, add a Text component.
- The text you're going to pass to this component is
@input.description— this is the description of the page that you get when you trigger the sidebar on this page.
On to another sidebar section. Within it add two Text components:
- For the first one, write down in the text field:
🌐 {{@data.url} - In the second one, write down in the text field:
📍 {{@data.location}
And another one! For the next sidebar section you're going to do things a little differently. Instead of adding one row and a text component within it, create three columns and within each one of them add text components for a total of three:
- The first one's text will be set to `👨👩👧👧 {{@data.team}}`
- The second one's text field will be set to
💰 {{@data.stage} - The third one's text field will be set to
🚩 {{@data.ownership}
Phew. Time for the last section of this sidebar.
Within it you're going to add two blocks of type @pixiebrix/markdown. Go ahead and add those blocks and select the Markdown component brick by clicking on the turquoise Select a brick button.
Now you can configure those two markdown blocks as follows:
- The first one will be a simple separator. You can create a separator in markdown by entering the following four dashes in a row
---- - For the second markdown brick, you're going to set its markdown to be:
{% for @item in @db.data.data %}
{{@item.name}} said on {{@item.timestamp | truncate(10, false, "")}}
> {{@item.message}}{% endfor %}
This markdown iterates through the items stored inside the variable @db.data.data you set up a couple of steps above.
The data inside this variable is the chat logs you retrieved from the database.
It is from this data that your mod then displays the name and the timestamp of every chatlog.
Your second mod is now complete. The second mod is a helper to ensure the correct loading of the whole blueprint.
Now let's move onto the third and final mod.
Step 1. Add a "Trigger" brick
From the add menu create a new mod.
Add a Trigger brick with the following fields.
- Mod Name:
Page Watch - Trigger:
Appear - Element:
h1 - Attach Mode:
watch - Sites:
https://www.crunchbase.com/organization/*
Step 2. Add a "Get shared page state" brick
You're going to need to get the shared page state in this step:
- namespace: mod
Step 3. Add a "Reactivate All" brick
In this step you're going to use the Reactivate All brick to reset the state of the mod.
You need to add a conditional statement for this brick because you only want to reactivate the mod: {{true if @state.orgName != @input.element.text}}
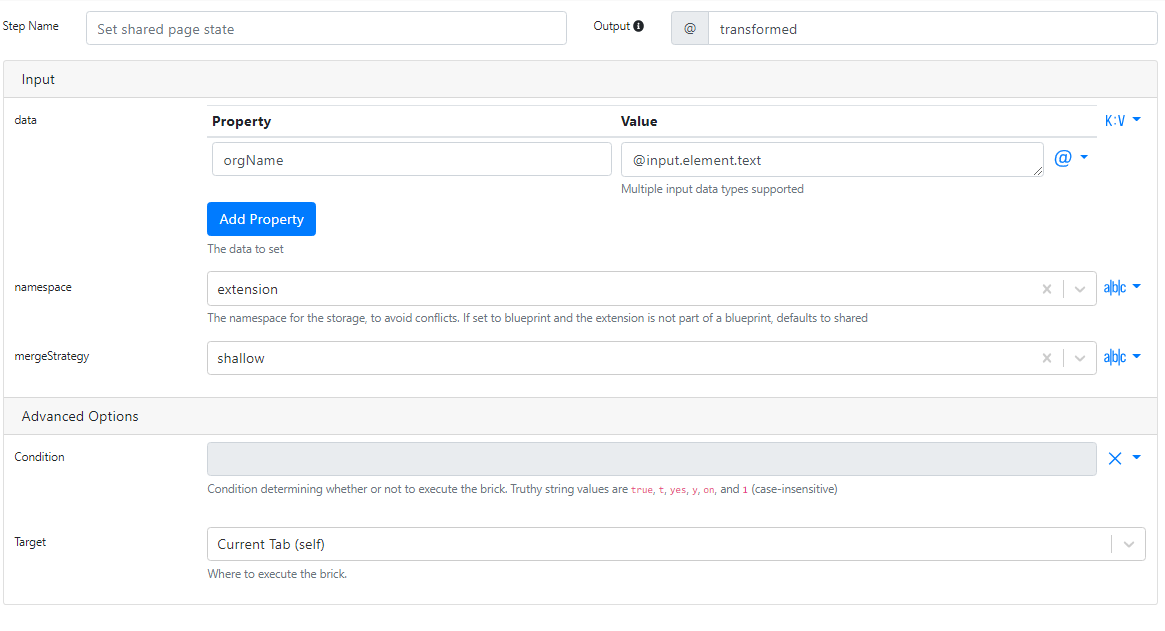
Step 4. Add a "Set shared page state" brick
It's the final step! Add a Set shared page state brick. This will take the context of the page and store it in the page state so that when you load a page you can check whether we loaded the right page.
Next you'll add an item to the storage by clicking the blue button and setting it like this:
- Value name:
orgName - Property:
@input.element.text
Then set the namespace to mod and leave merge strategy as shallow.
On that note…
When it comes to solving the problem of digital collaboration, customized solutions are always best. You want to find or build the right tool for your needs and those of your team.
This walkthrough demonstrated how PixieBrix could be used for a specific note-sharing use case, but this is really only the tip of the iceberg. You can swap a few variables, add in the websites relevant to you, and build something truly extraordinary to help your team excel.
And do remember that to have others use and see the sidebar, you will need to have them use the same mod set and make sure they've installed PixieBrix.
Back to it! Best YouTube Chrome Extensions for Content Creators.