
Search your vector database from any webpage
Imagine having a database of your own specific knowledge that you can access at your fingertips. We're not talking about Google and searching the entire web, but instead being able to organize and query a specific data set.
For instance, maybe you want to query your favorite tool's documentation without having to open a tab and click around - you'd like to use all the magic we have available today with AI to help you find exactly the right results based on your search.
I'd have thought this would require senior development skills and a lot of work. But I recently learned how to scrape documentation from websites, pass that to a vector database, and then query it - all with significant ease thanks to a few tools.
Scraping docs with Apify
First, you'll need to identify what kind of content you want in your knowledge base. We have a lot of PixieBrix users that also use Automation Anywhere, so I thought those docs might be a useful data set to be able to query quickly and get answers from wherever you're working.
Create an account with Apify and go to the Actors section then create a run for the site you want to scrape. In my case, the Automation Anywhere docs.
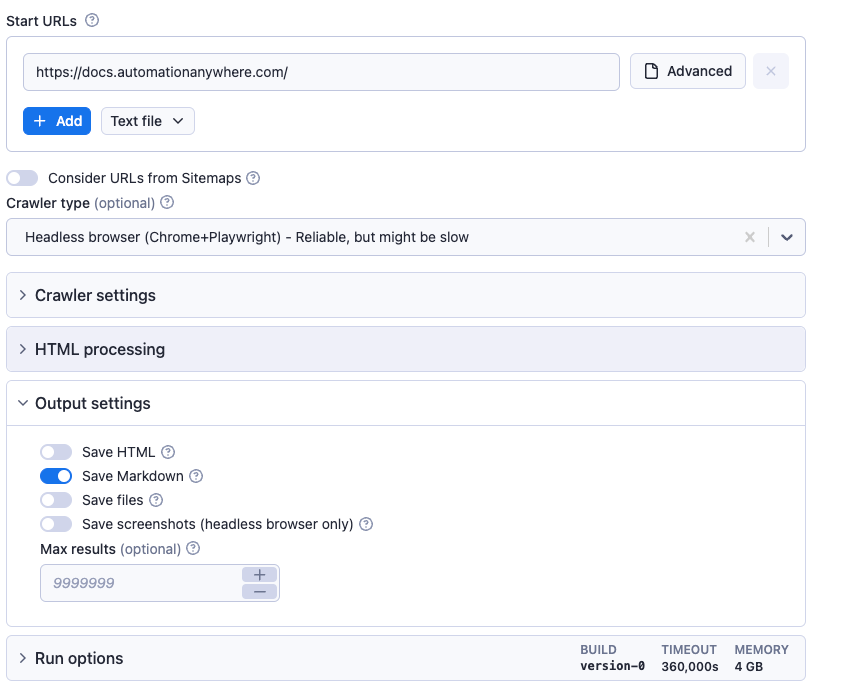
In the output settings, check the way you want to store the data. I chose Markdown because I wanted to be able to display the results (the content of the docs) in my PixieBrix sidebar.
Just press the Start button when you're ready.
It may take a couple of hours to scrape your data, but this can happen all in the background without you needing to do a thing! Go make coffee or work on something else, then check on it later.
Once your job is done running and your dataset looks as expected, you're ready to send it to Pinecone!
Insert Apify dataset into a Pinecone namespace
Use the Apify Python client to access your dataset:
from apify_client import ApifyClient

apify_client = ApifyClient(settings.APIFY_API_KEY)
dataset = apify_client.dataset(apify_dataset_id)
texts = [item["text"] for item in dataset.list_items().items]
Then use OpenAI with Langchain to convert the dataset's text strings into text embeddings. A text embedding is a numerical representation of text that captures its semantic meaning. It enables accurate searches by mapping words or sentences to vectors in a way that preserves their contextual relationships, facilitating more precise comparisons and retrieval of relevant information.
from langchain.embeddings import OpenAIEmbeddings

embeddings_model = OpenAIEmbeddings()
embeddings = embeddings_model.embed_documents(texts)
Then use the Pinecone Python client to upsert your vectors of text embeddings into a Pinecone namespace of your choice. If upserting more than a hundred vectors, upsert the data in batches.
index = pinecone.Index("pixiebrix")
vectors = [
    {
        "id": f"vec-{i}",
        "values": embedding,
        "metadata": {"text": texts[i]},
    }
    for i, embedding in enumerate(embeddings)
]
index.upsert(
    vectors=vectors,
    namespace="automation-anywhere-documentation",
)
Search a Pinecone namespace
Now that your dataset is in Pinecone, you can query it using the Pinecone query method. Like the last step, we need to convert the query text into a text embedding using OpenAI with Langchain.
embeddings_model = OpenAIEmbeddings()
embedded_query = embeddings_model.embed_query("How do I automate document processing?")

index.query(
  vector=embedded_query,
  namespace="automation-anywhere-documentation",
  top_k=2,
  include_metadata=True,
)
The query returns the most similar vectors in the namespace, along with their similarity scores (the higher, the more similar) and metadata. The metadata includes the original text strings, which can be used to provide context for the search results.
{
  "matches": [
    {
      "id": "vec3",
      "score": 0.863496239,
      "metadata": {
        "text": "Document Automation is the new intelligent document processing solution..."
      }
    },
    {
      "id": "vec4",
      "score": 0.743491709,
      "metadata": {
        "text": "Document Automation is fully integrated into Automation 360..."
      }
    }
  ]
}
You can wrap the search functionality in a simple API endpoint hosted on the web, providing a powerful search experience for yourself or your users, and enabling them to quickly and accurately find the information they need quickly and accurately.
Customize the Knowledge Data Mod with your URL
The last step is the easiest! Activate the PixieBrix Knowledge Base search mod, and customize it to point to the new API endpoint you created.
To do this, open the Page Editor. This is where you create new or customize existing PixieBrix mods.
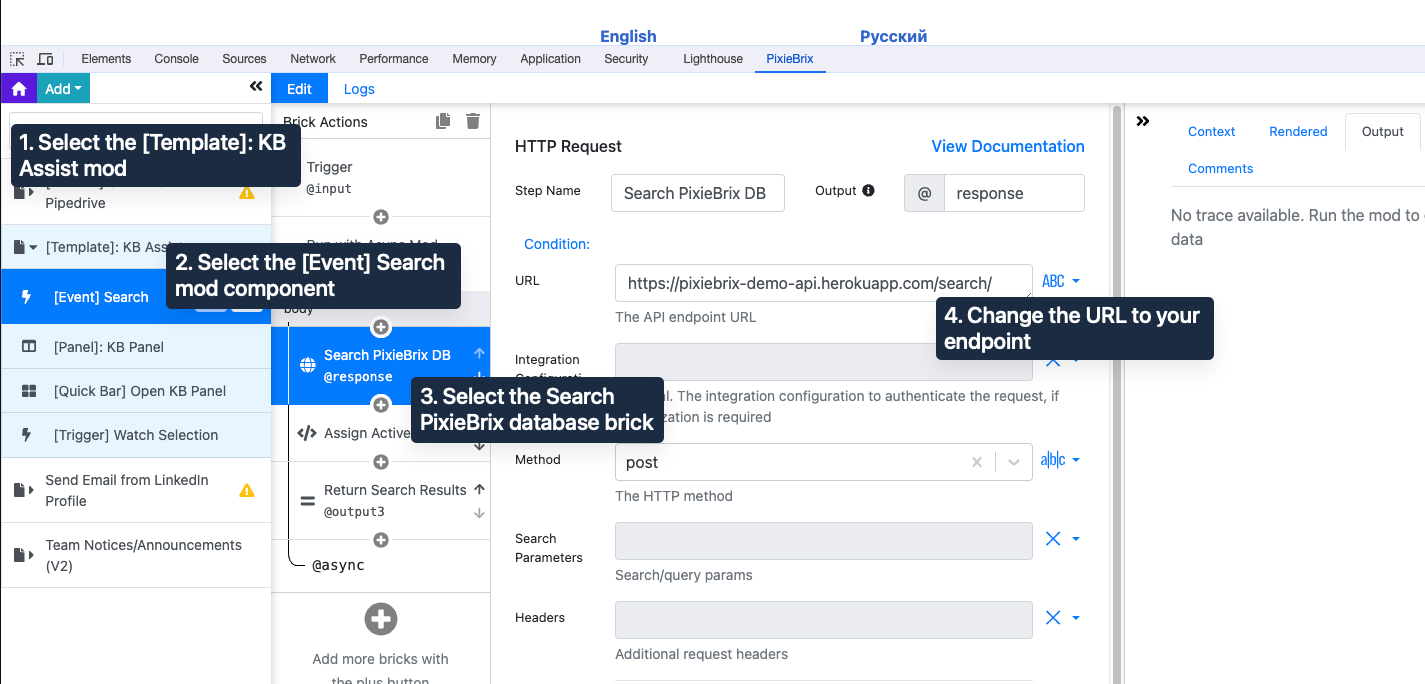
Go to the [Template]: KB Assist mod on the first panel on the left side. Open it up to click the [Event] Search mod component, then choose the Search PixieBrix DB brick.
Finally, in the middle panel, update the URL field to point to your endpoint.
Click the save icon that appears in the first panel on the left, and you'll be prompted to copy the mod and save it.
(You can go ahead and remove the original one so you don't have two that search different tools!)
Now it's time to test it out! From any page in Chrome, click the PixieBrix icon in your extension toolbar. The sidebar appears inviting you to type your query. Search the query and you'll see results appear in your sidebar. Happy searching!