Translate Text Anywhere on the Web With PixieBrix
For many of us, translation is so ingrained in our daily workflows that we don’t even stop to consider how much time it eats up. But PixieBrix provides a better way.
How often do you use Google Translate? Weekly? Daily?
For many of us, text to text translation is so ingrained in our daily workflows that we don’t even stop to consider how much time it eats up. Copy text. Jump to new tab. Paste in Google Translate. Search for the relevant language. Translate. Jump back into the old tab. And on and on.
If you’re spending valuable minutes each day repeating this process, here’s a better way to translate text anywhere on the web with the help of PixieBrix.
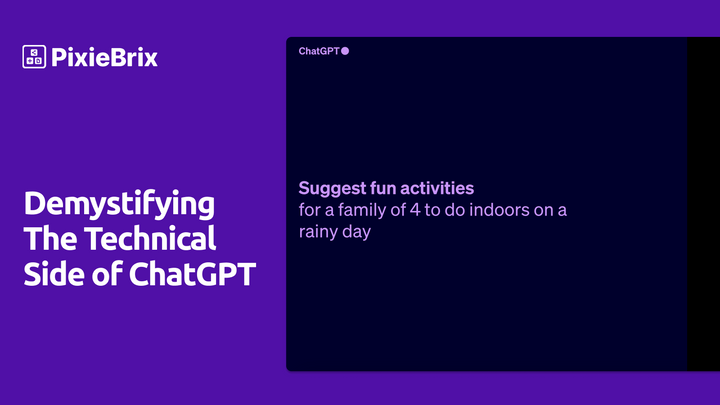
PixieBrix is a low-code platform you can use to build browser mods that automate work, improve your productivity, and make your online life just a bit easier. But PixieBrix also has a marketplace full of premade blueprints you can deploy right now without any extra work. Think of them as intelligent overlays and context-specific menus that make the tools and websites you use more interactive while eliminating boring manual work.
With the Translate mod, you can add a right-click menu that automatically translates any highlighted text on a webpage. You can even translate text on YouTube. No need to jump back and forth between Google language translator and whatever you're working on.
To do this, just add the Translate mod from the PixieBrix marketplace. If you don't have a free PixieBrix account, you'll be able to sign up right from the marketplace.
And just like that, without any coding, you have your own custom mod for translating any text you find online.
That's not the only translation help you can get from the PixieBrix marketplace, though. You'll also find a mod for translating text from images, and this mod for translating text to and from any language.
Curious to see how it works? Here's how easy it is to build a simple version of the Translate mod with PixieBrix. Note that this basic process can also be used to create your own mods or customize some of the many mods you’ll find on the marketplace.
Build your very own translation mod
PixieBrix is a browser automation tool that allows you to scrape, automate, and customize your way to greater productivity online. One of the many things you can do with PixieBrix is build your own browser mods. In this case, you can use it to build your very own translation tool in Google Chrome. And it only takes five steps! Here’s how to do it.
Step 1: Sign up for PixieBrix
First things first, you need to sign up for PixieBrix. This can be done in seconds by authenticating with a Google or Microsoft account and starting on a free plan. Once that’s done, you’ll need to install the PixieBrix Chrome extension. Then you’re off to the races.
Step 2: Open the Page Editor
Next, right click on any page in Chrome and click “Inspect.” If you’ve properly installed the extension, you should be able to scroll through the menu items in the top bar until you see PixieBrix. Clicking this brings you to the page editor, where the actual building happens.
Step 3: Add a Context Menu Brick
Start by clicking the “add” button in the top left of your page editor. This displays a list of potential “bricks” you can use to build with PixieBrix. Think of bricks as pre-built functions that you can easily pull into your new mod.
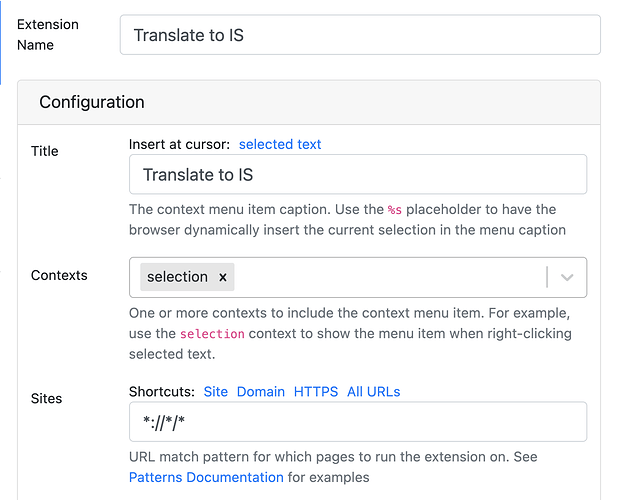
Pick “Context Menu” from the list. This brick allows you to build a menu that appears when you right-click on a page.
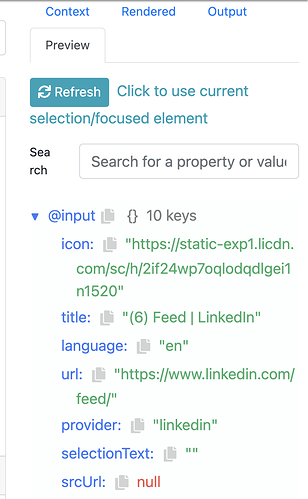
In the “Contexts” section, change the preset option from “all” to “selection.” Then under the Sites section, click the “All URLs” option. Then name your mod — probably something translation-related.
Your settings should look something like this:
Now if you go back to your browser, right click and under the PixieBrix option select your newly-named translation mod. When clicked, you should now see some data pop up in the Page Editor again on the preview section. This means it’s working!
Step 4: Add the Translate Brick
With your first brick in place, it’s time to add your second “Translate” brick. Back in the Page Editor (which, again, you can access by right-clicking on any page and selecting “Inspect), click the “+” symbol under your context brick. Search for the “Translate” brick, then add it.
To get the translation working, you’ll need to configure two things:
- The text you want translated (query)
- What language you want it translated to (target)
To get the text you want translated, you’ll need to reference your first brick (the context menu). To do that, change the field type from the preset “ABC” to @ (at the end of the query row), then type @input.selectionText.
To set the language for translation, you’ll need to figure out what the two letter code is of the language you want to translate to. For instance, if you want it translated to English, you just need to type “en”. French is “fr”, Spanish is “es”, Icelandic is “is”... you get the idea.
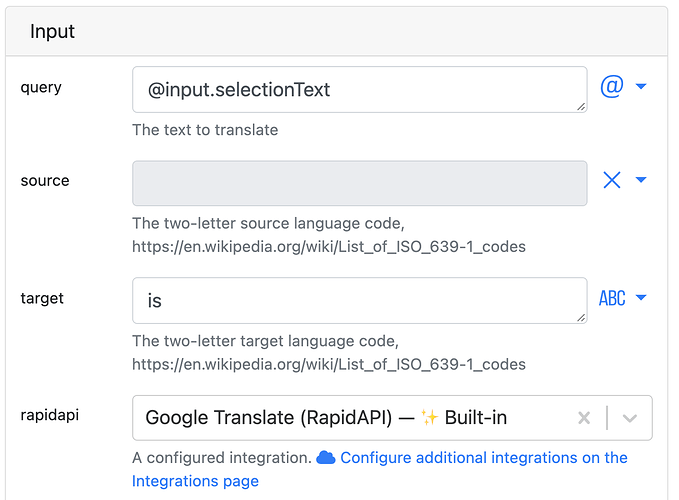
And that’s all there is to brick two.
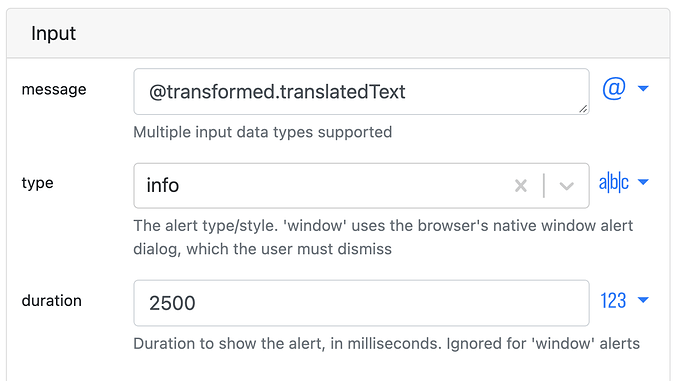
Step 5 (Final Step!): Add the Window Alert Brick
The last brick is what you’ll use to display the newly-translated text. You could do this a variety of ways, but a simple option is the window alert brick. This is great for small amounts of text, since the window alert will just display the translation on top of your screen.
And that’s the only thing you need to configure. Change the “ABC” preset at the end of the message row in your third brick to “@”. Then enter the value @transformed.translatedText. This is a reference to your second brick, and will pull that translated text into the window alert.
And voila! Your translation mod is complete. Try highlighting some text on any webpage, right click it, select your mod and boom: a full translation right there in your window. No need to navigate between tabs or spend your day copying and pasting.
As always, if you get stuck, head to the PixieBrix Slack Community and folks will jump in to help you out!