Build a Smart Bookmark Sidebar
Create a Sidebar that shows you specific bookmarks based on the page you're currently on!

I personally have a love/hate relationship with bookmarks. They're fantastic for keeping track of links, but I've got so many to keep up with that seeing them all in my bookmarks bar is overwhelming and I can never find exactly the one I need.
Creating a Smart Bookmark Sidebar allows me to determine which bookmarks I see based on which page I'm on. For instance, if I'm on PixieBrix's site, rather than seeing all my personal finance bookmarks, I'll see ones related to documentation or joining the Slack Community or jq filters.
All I had to do was build a simple Sidebar with PixieBrix. Follow along with this tutorial and you'll learn how you can do it, too!
Watch this video...
or ... Follow the steps below if you prefer to read the text version!
0. Create a PixieBrix account and prep your spreadsheet
To build this Sidebar, you'll need a PixieBrix account. It's free and only takes a minute to create. After creating your account, you'll be prompted to install the PixieBrix Chrome Extension.
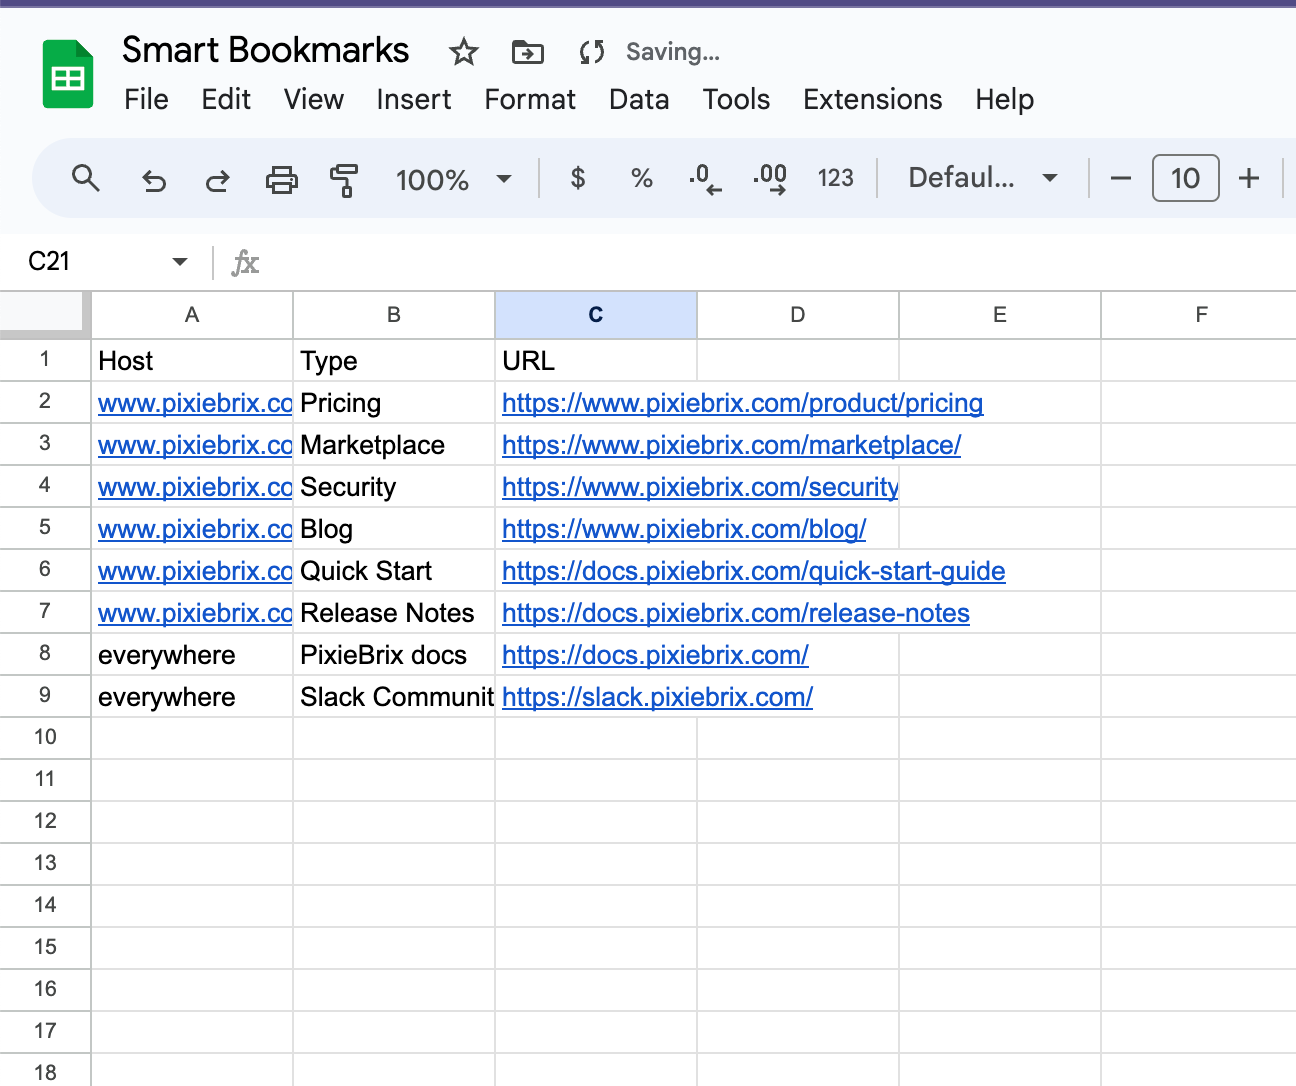
One other thing you'll need to do - before we start is create a Google Sheet and fill it in with links. You can copy this template, which is already prefilled with some links. Feel free to customize it and add or remove links - just remember, Don't change the Header Row or the Tab name. Make sure to follow this format:
Once you've got that, you're ready to roll! Let's get started.
1. Open the Page Editor
You can access the PixieBrix building tools from the Chrome DevTools. To open this, right-click from any page, even this one, and select Inspect. Choose the PixieBrix tab. Don't see it? You might have to click the >> or move your dock to the bottom!

Read these docs if you need help opening the Page Editor.
2. Add a Quick Bar starter brick
Every mod starts with a starter brick that determines how that mod is triggered. You can trigger a mod by creating a button on a page, watching for a specific event (like page load on certain pages), right-clicking on a page, or accessing actions from a dropdown in the Quick Bar (opened with a keyboard shortcut from any page!)
Let's use the Quick Bar for this mod. To add a starter brick, click the Add button at the top of the left panel in the Page Editor.
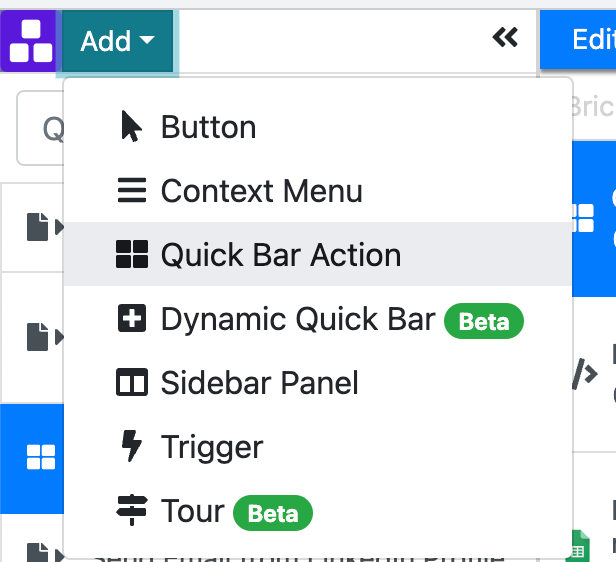
From there, you'll need to configure a few details about the mod, like the name and title you want to appear in the Quick Bar.
Give it a Name and Action Title Related Links , and choose the All URLs button in the Sites section. Lastly, click Advanced, and you should see an option for setting an icon. You can use any icon you want!
Your starter brick should look something like this.
Now that you have your starter brick, any bricks that you add below this one will run whenever you select this action from your Quick Bar.
3. Get the domain from the URL
Since we want to display links related to the URL we're on, we will need to parse the domain name. We can get the current URL from the page where we trigger a mod by referencing the variable @input.url but this returns the entire URL, and we only want the domain, so we'll add the Parse URL
Look for the + icon below the Quick Bar action in the second panel from the left.

Click that and search for Parse URL. Hover over the brick that appears, and click the blue Add button. This adds the brick to your pipeline. Now, we need to pass it the current URL so we can break it down.
Set the url field to @input.url, and go ahead and run the mod to see what we view in the Data panel (far right panel). To run the mod, press the keyboard shortcut to open the Quick Bar (by default, it is CMD/CTRL + M) and click the Related Links action.
You should see some information appear in the Output panel. Click the caret in front of @parsedUrl if you don't see the data below.
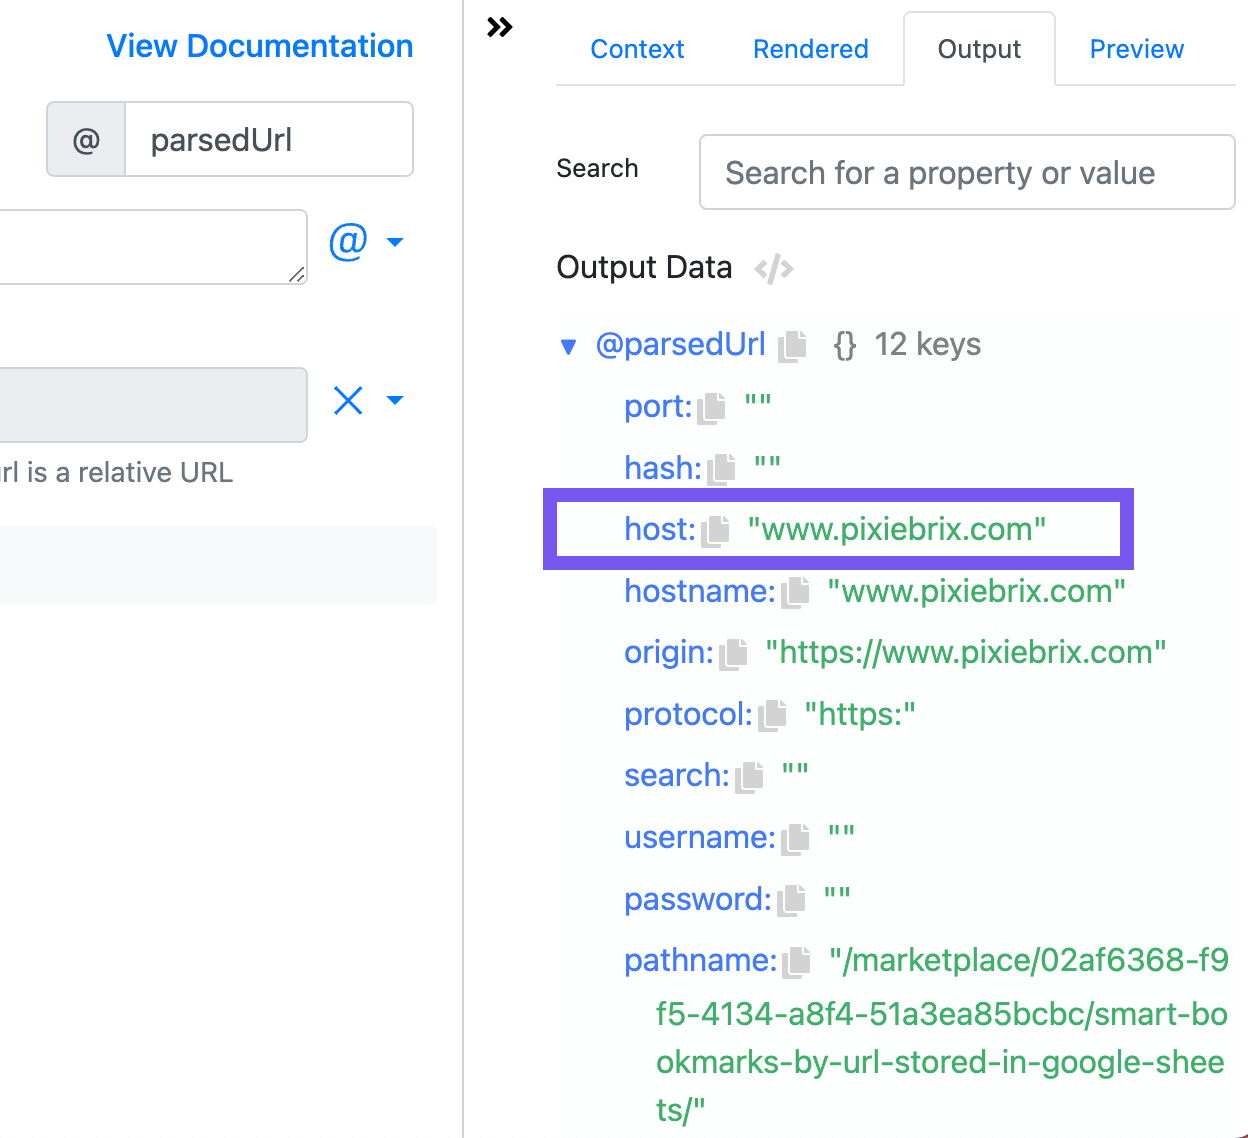
To reference www.pixiebrix.com, all we need to do is click that copy icon, and we'll have the path, which is @parsedUrl.host. We'll use that in our next brick to look up the bookmarks we have associated with that domain!
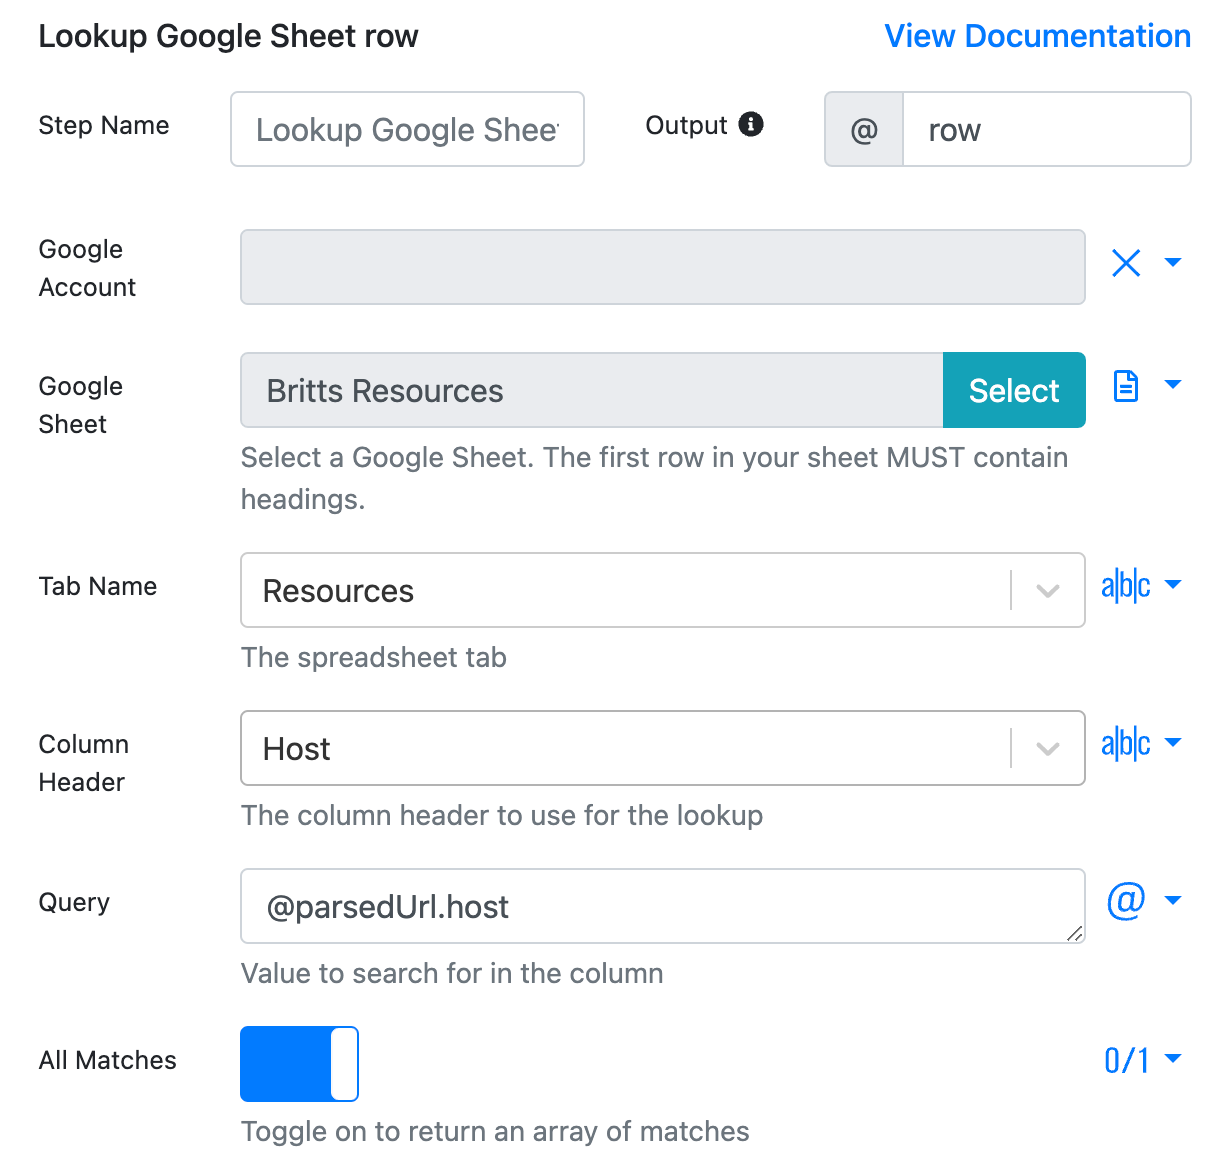
4. Fetch Data from Google Sheets
It's time to fetch our bookmarks from our Google Sheet. This is super easy, as we have bricks that will do exactly that—all you have to do is select the spreadsheet and say what you want to look for!
Click the + below the Parse URL brick and search Lookup Google Sheet row. Hover over the brick, and click the blue Add button. Once added to your pipeline, you'll need to:
- Rename the Output to
rowto make it easier to access - Select the Google sheet you created in Step 0,
- Choose the tab (in our case, it's Resource)
- Specify the Column you want to query (in our case its Host)
- Set what you want to query. (We want to search for any rows that contain our specified domain, so we'll set the query to
@parsedUrl.host. ) - Lastly, toggle the All Matches button.
Your brick should look like this.
Let's copy this brick because we want to return any rows for our current domain and anything that is meant to be listed everywhere.
To copy a brick, select the brick you want to copy (you can tell if it's selected when it's a dark blue color) and click the copy icon at the top of the Brick Actions pipeline.
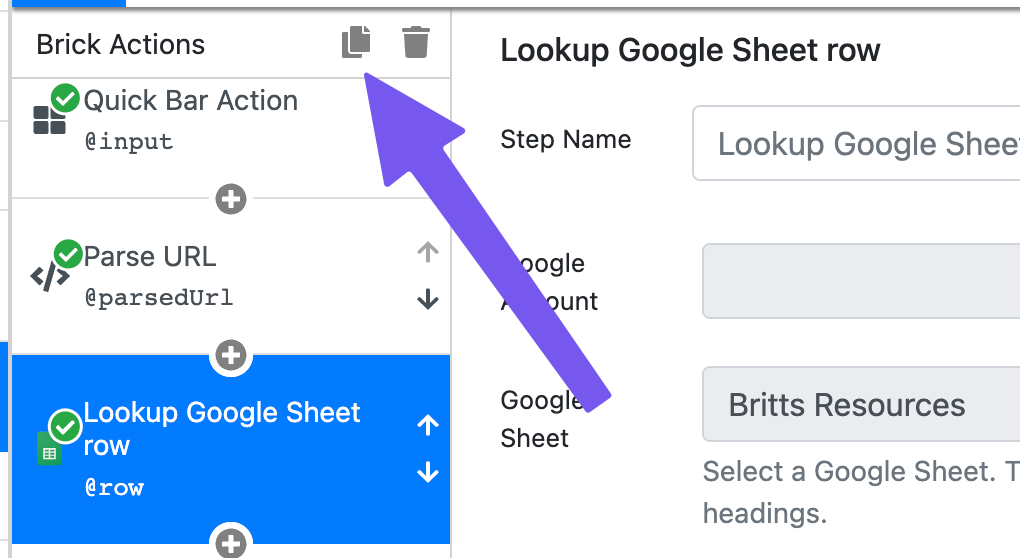
The copied brick will be exactly the same, but we need to change two small things.
- Change the output to
row2, that way we can distinguish between the two. - Change the Query field to
everywherebecause we want to return any rows that are meant to be set everywhere instead of just ones for this domain
Move to the next step to combine the data we get from our Google Sheet rows.
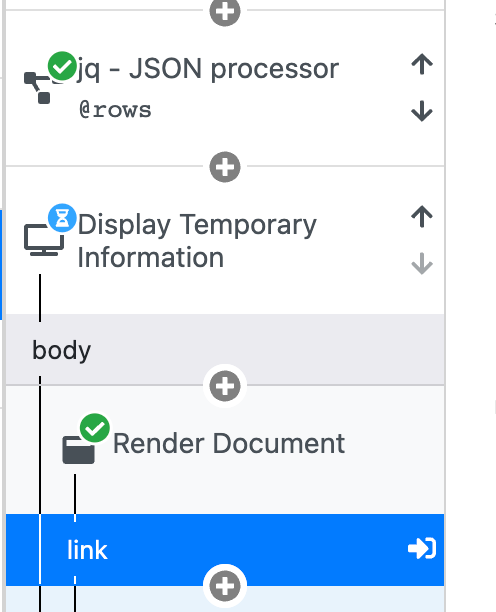
5. Use JQ to combine both Google Sheet filters
Add another brick below the Google Sheets bricks called jq - JSON processor. This brick lets us filter and re-organize data. Even if you don't know the jq filtering language, a quick Google search or asking ChatGPT can help you find your need.
But I'll do you one better and go ahead and provide the filter you need for combining two arrays of data!
In the filter field, set the value to .a + .b.
In the data field, click the X and select K:V Object properties. This lets us define multiple items to use in our filter (specifically, we'll define a and b as the data from each Google Sheet brick.
Click the blue Add Property button and create two properties like this:
- Name:
a, Value:@row - Name:
b, Value:@row2
Your jq brick should look like this.
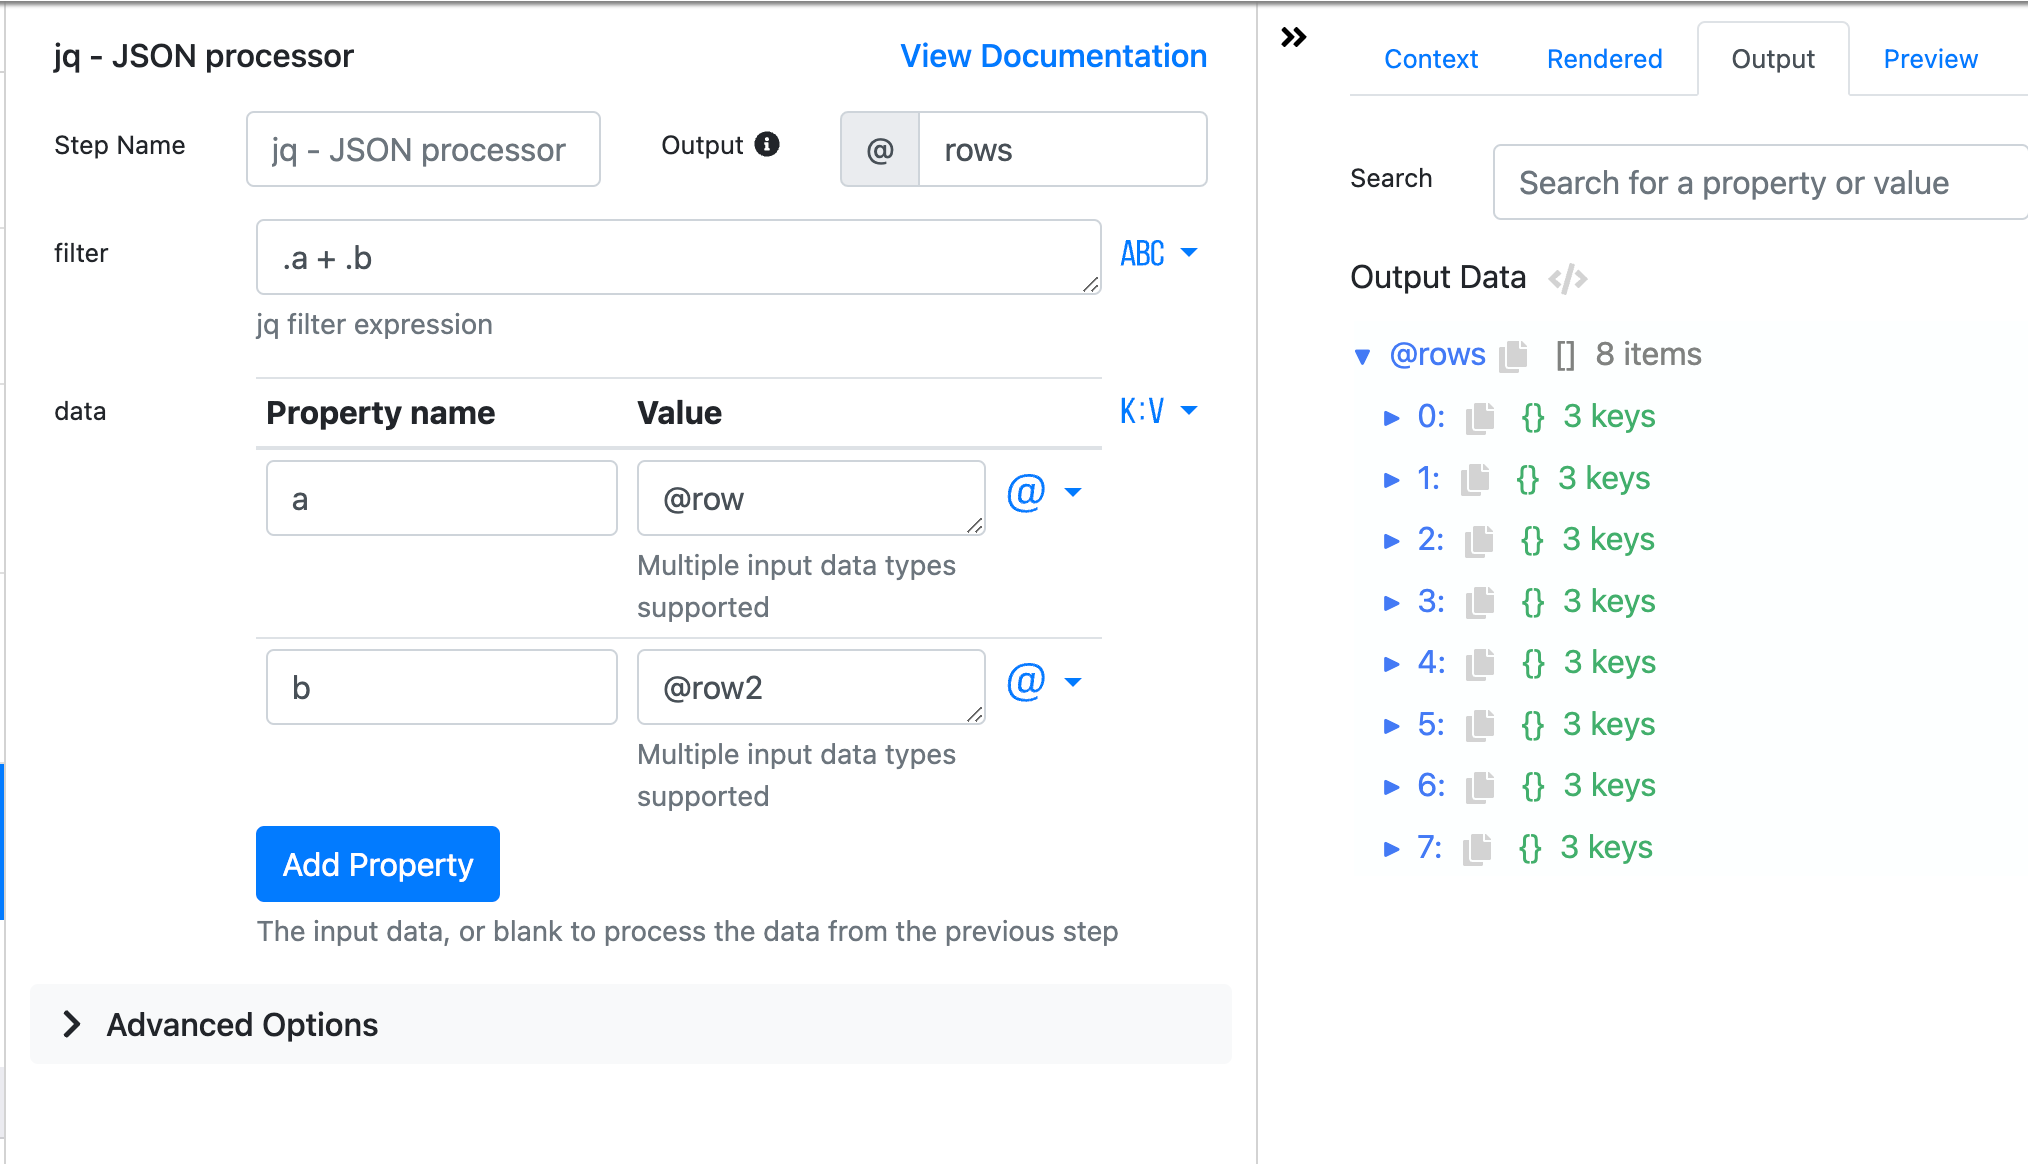
Go ahead and run your mod and confirm your jq brick's output looks like this 👆
All good so far?? Great! Now, we need to display the links.
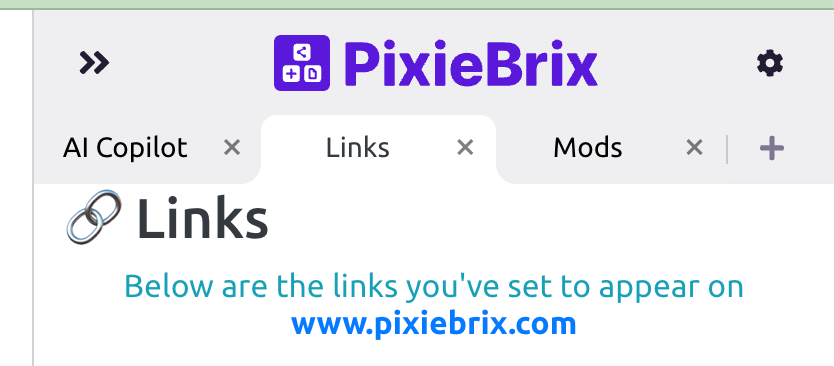
6. Display buttons for each link in a sidebar
Below the jq brick, add another brick called Display Temporary Information. This brick makes a sidebar appear. You control what shows inside that sidebar and how it looks!
Once you add the Display Temporary Information brick, all you need to do is change the title field to Links (or something more descriptive than example - this is the text that appears on the sidebar tab name).
You might have noticed a new brick was automatically added inside the Display Temporary Information brick. This is called Render Document. Click that, and you'll have all the options for styling your sidebar.
If it's your first time in the Document Builder, it might be a little intimidating, but don't worry—I'll guide you through, and you'll learn your way around fast. The first thing to notice is your far right side panel. When you select the Preview tab at the top, you'll see a preview of what the Sidebar will look like. We call this the Preview Panel.
When you click an element in the Preview Panel, you'll be able to customize it in the middle panel (just to the left of the Preview Panel).
Rename the header
Click the text on the right panel that says Example document and in the middle panel that appears, change the text to something like 🔗 Links
Rename the example text
Now click the default text below the header that says Example text element...
Replace that text with something like this:
This is what our sidebar looks like so far:
Now, let's add the actual links we pulled from the Google
Add buttons for each link
Now, this is a bit adventurous, so follow along and watch the GIF to visualize these steps.
- Click the three dots on the secondmost outer box and select Row
- Then click the three dots inside the inside-most box that appears, and select List
- Click the List element, and in the middle panel, update the Array value to
@rows(This references the output of all the links from our jq brick), and change the Element Key tolink, and change the item type to Row - Inside the newly created row element, click the three dots once more and select Button
In case you're curious, we've just added a new row element that contains a list element and given it our list of links. We've said for each link, create a row, and inside that row, create a button.
Now we need to tell the buttons what to do!
Click the blue button that appears in the Preview Panel, and make a few updates to the middle panel:
- change Pipeline name to
linkso it's more recognizable. - make the Button Label
@link.Type(this returns the title of the link from the Type column in our spreadsheet) - [optional] change the Button Style. Select the dropdown to choose your favorite.
- [optional] change the Button Size
Did you notice that when we added the Button element a new section appeared in our Brick Actions Pipeline? (Second panel from the left.)
Click that + to add a brick. Any bricks added here will be triggered whenever the button in the Sidebar is clicked. We need to add one brick— the Open a tab brick.
Once you've added it, update the URL field to @link.URL. This will open a tab with the actual link!
7. Try it out!
It's time to take it for a test drive!! Run your mod by selecting Related Links from the Quick Bar, and you should see a Sidebar appear with links for the current domain, and any links that you've specific with everywhere location.
If you want to make any tweaks, like adjusting spacing, changing colors, or even adding more elements, head back to the Render Document brick and click the element you want to change.
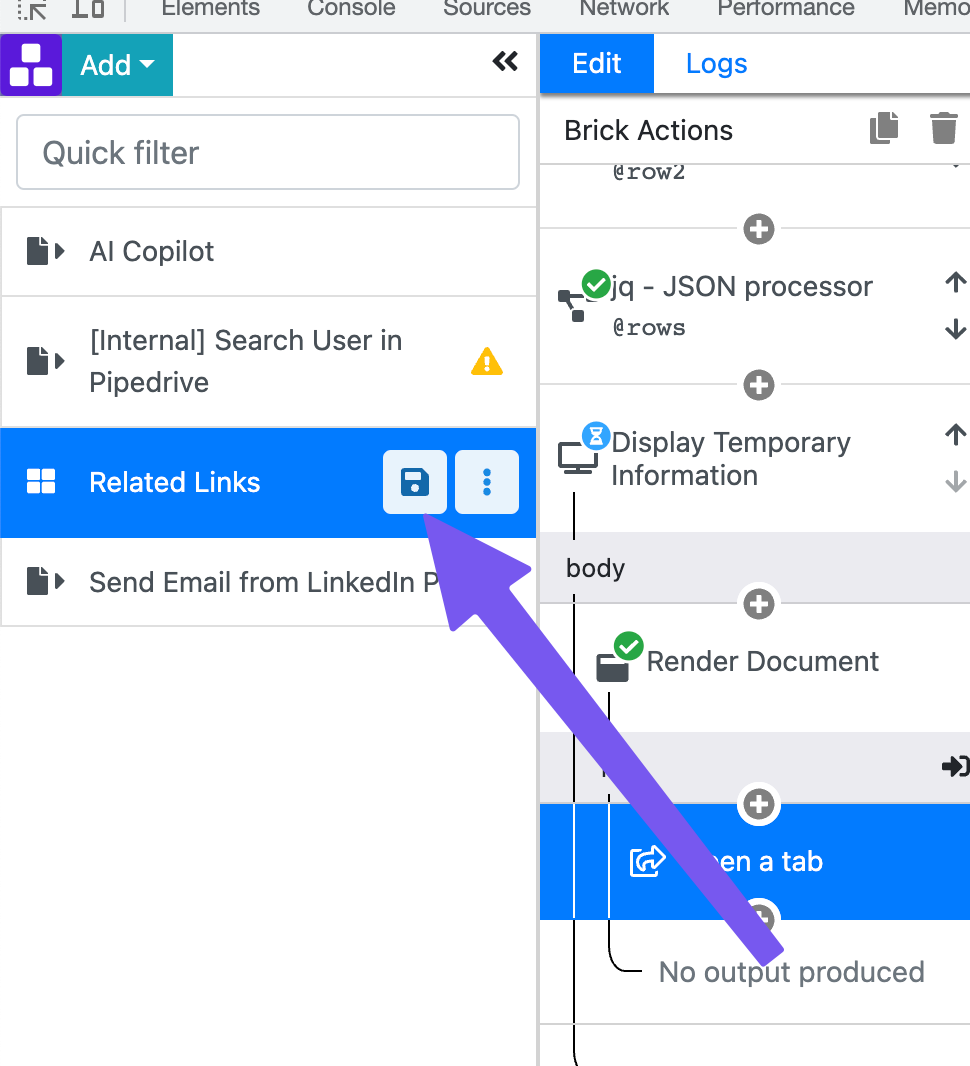
To save your mod, click the Save 💾 icon in the Mod Panel on the far left.
And now you're ready to run this anywhere on the web!
And the best part is if you want to add new links, go to your spreadsheet! You don't have to open the Page Editor. Every time you run this mod, it will look for the latest data in your Google Sheet.
If you want an easy to build smart bookmarks, start with our Smart BookMark Sidebar Template.