Build a ChatGPT Knowledge Base Article Recommender
Build a low code for suggesting relevant Knowledge Base articles in 7 easy steps.

If you want to build your own low-code AI tool, try your hand at this Knowledge Base Article Recommending tool. It takes minutes to build, and when you're finished, you'll be able to highlight a question from a user on any webpage and ask ChatGPT to search your own custom knowledge base to provide the perfect answer.
And even if you don't have a knowledge base or care to use it, you can use these same skills to build a variety of different tools and learn how to serve custom content when you need it, such as relevant links, products, or notes!
The best part... you can build it in 7 easy steps!

Keep reading for text instructions, or watch this video to see how to build.
Prereq: Set up a free PixieBrix account
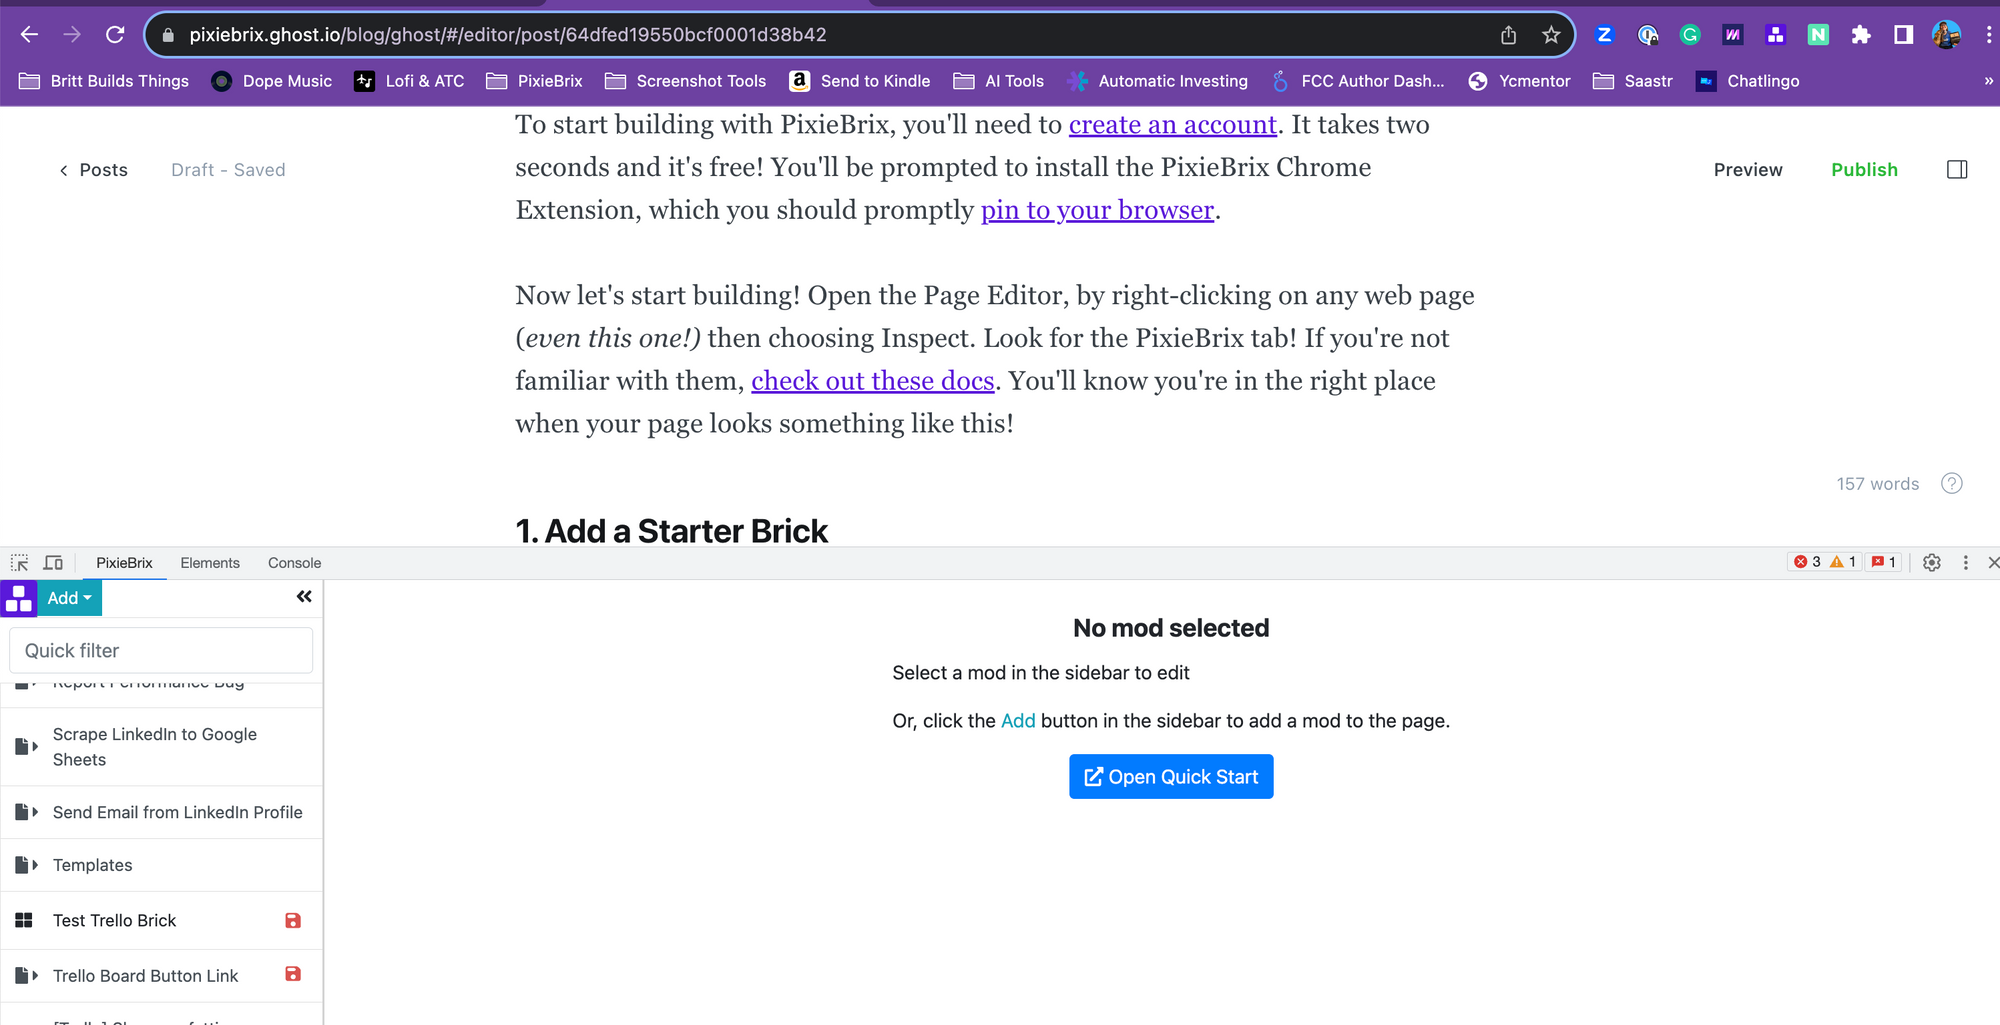
To start building with PixieBrix, you'll need to create an account. It takes two seconds, and it's free! You'll be prompted to install the PixieBrix Chrome Extension, which you should promptly pin to your browser.
Now let's start building! Open the Page Editor by right-clicking on any web page (even this one!) and then choosing Inspect. Look for the PixieBrix tab! If you're not familiar with them, check out these docs. You'll know you're in the right place when your page looks something like this!
1. Add a Starter Brick
From the Page Editor, click the Add button next to the PixieBrix logo. From the dropdown, you'll be able to choose various ways to trigger your mod.
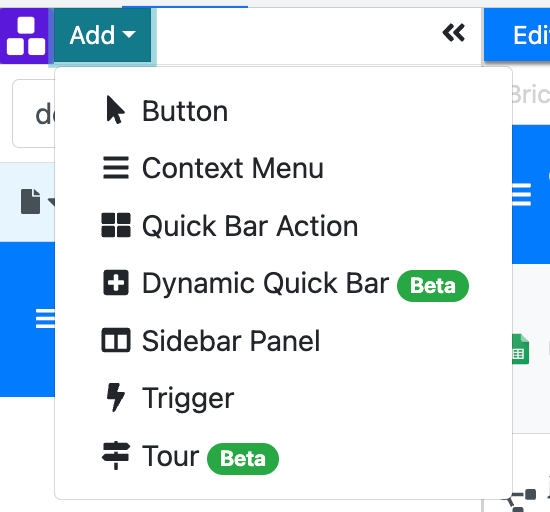
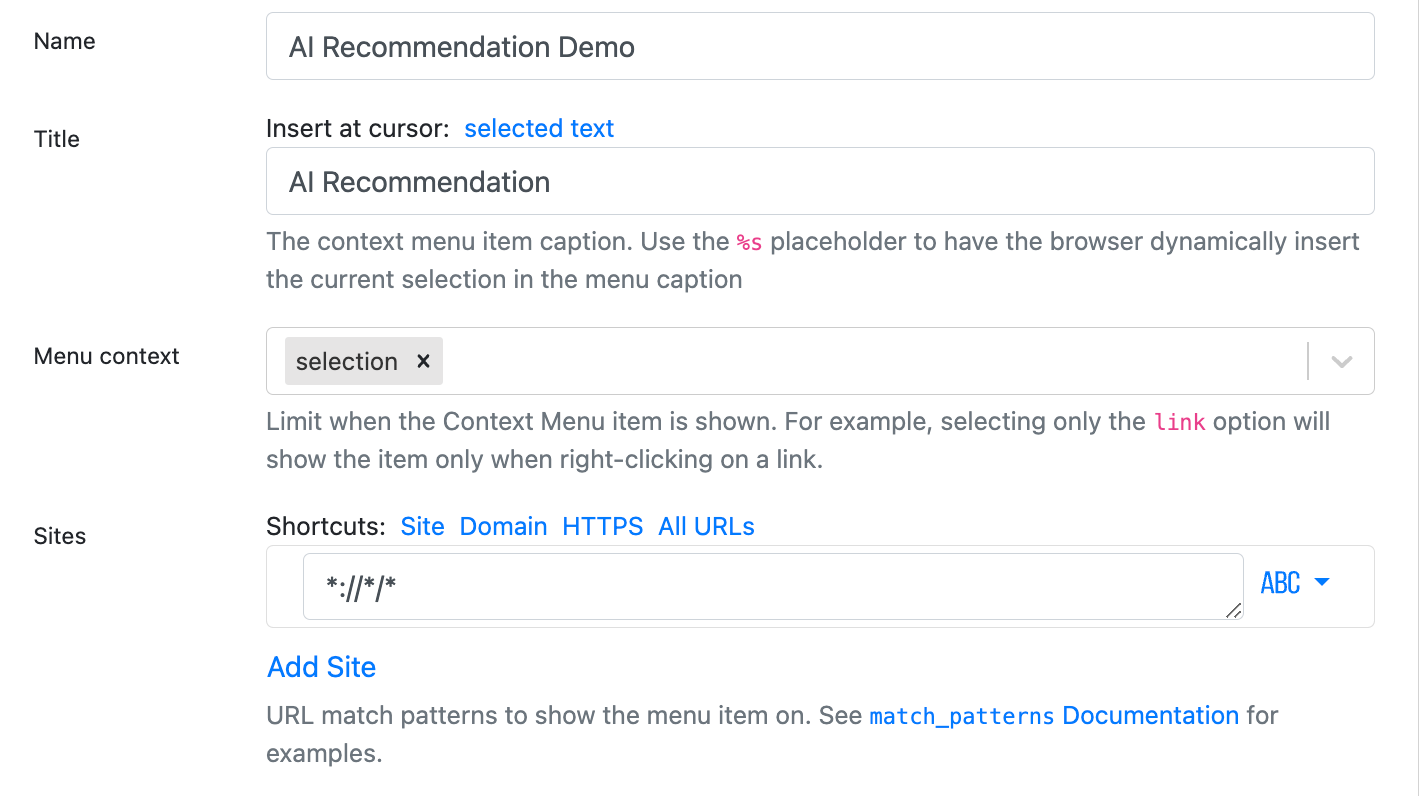
Let's choose the Context Menu option, which means we can choose to trigger this by right-clicking on any page, which is easy to do after we've selected text.
Rename the Name and Title to something descriptive, like AI Recommendation. Choose the selection option for the Menu context, which will allow this to show when text is selected. Click All URLs to allow this mod to run on all pages.
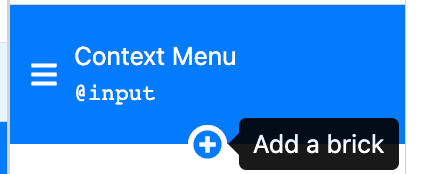
To add more actions to your mod, you'll add bricks. So let's configure our next brick to search Google Sheets. You'll do this by clicking the + button below the Context Menu brick.
2. Lookup your data in Google Sheets
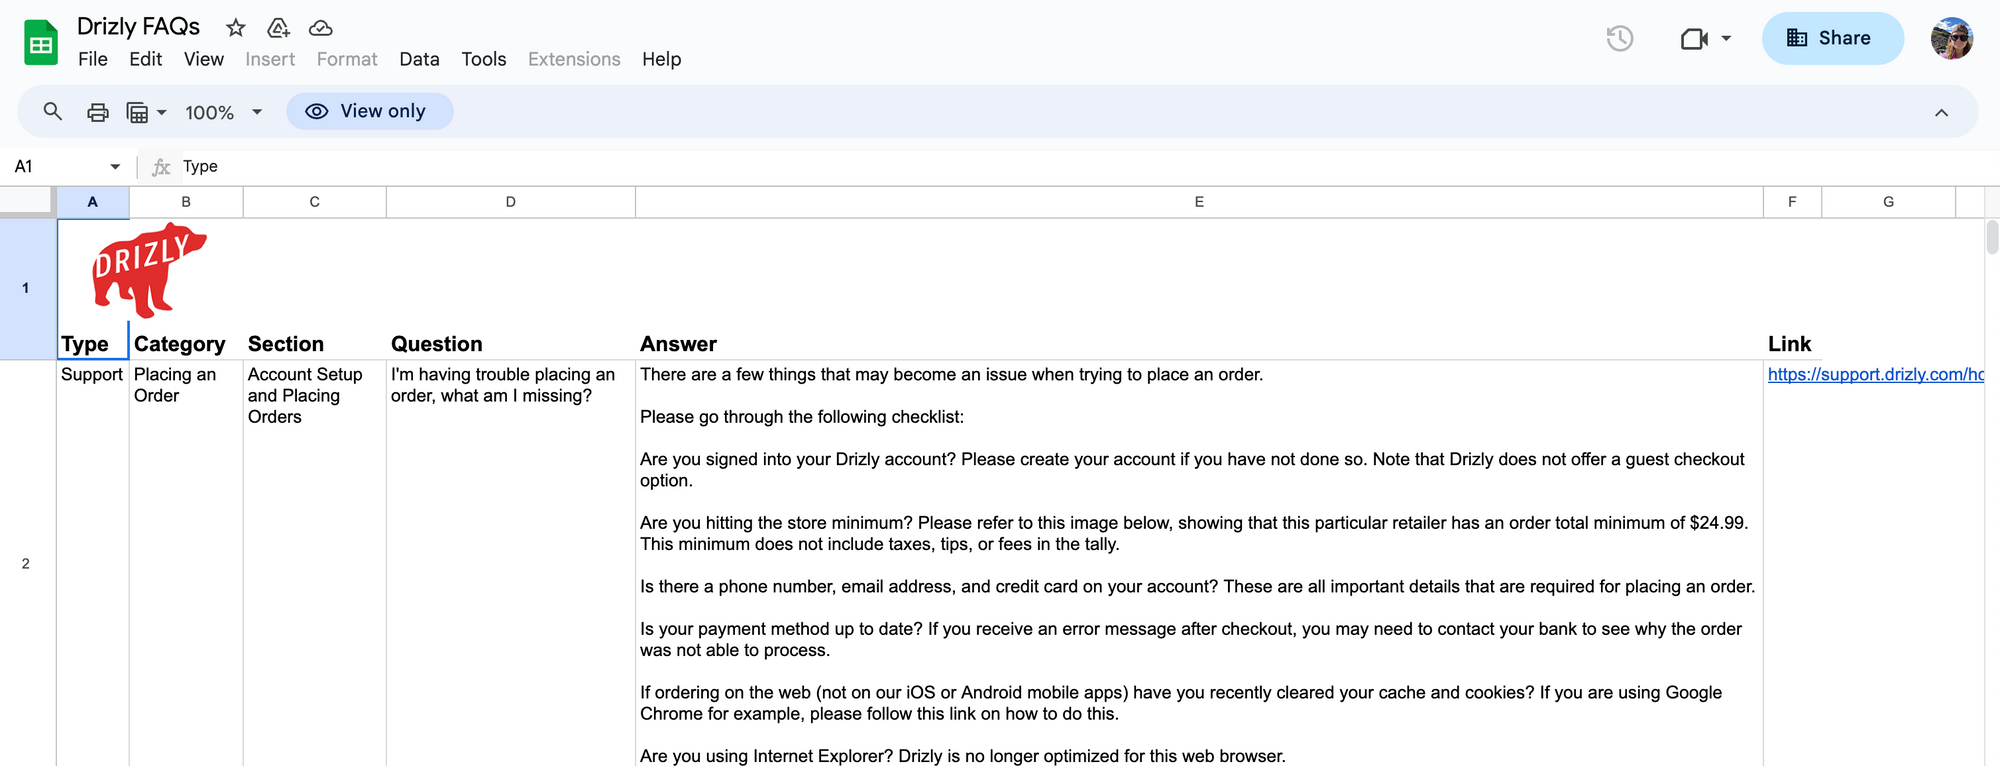
With PixieBrix, you can fetch data from any source. You could use bricks to fetch data from AirTable, Google Sheets, or anything else with our HTTP Request brick. We'll use Google Sheets for this example. If you want to follow along, you'll want to organize your FAQs in a Google Sheet formatted like this. You can copy this sheet if you just want to try it out.
After you've opened the brick search modal, search for the Lookup Google Sheet row brick. Hover over it, and click the blue Add button.
All you need to do is connect your Google Account, select the Sheet, Tab Name, and then type your Query (for our spreadsheet, we used Support since that was included in every row for Type). Lastly, toggle on All Matches so it returns all results.
If you run the mod at this point (highlight some text on a page, right-click, then choose the AI Recommendation action), you'll see some results appear in the output panel for the Google Sheet brick.
3. Use a JQ filter to return just the title
We now want to get just the FAQ titles so we can pass those to ChatGPT and get a suggestion for the most relevant ones. Time to add another brick! This time, add the jq-JSON processor brick.
In the data field, reference the returned data from Google Sheets with @row. And use this jq filter in the filter field: .[] | .Question.
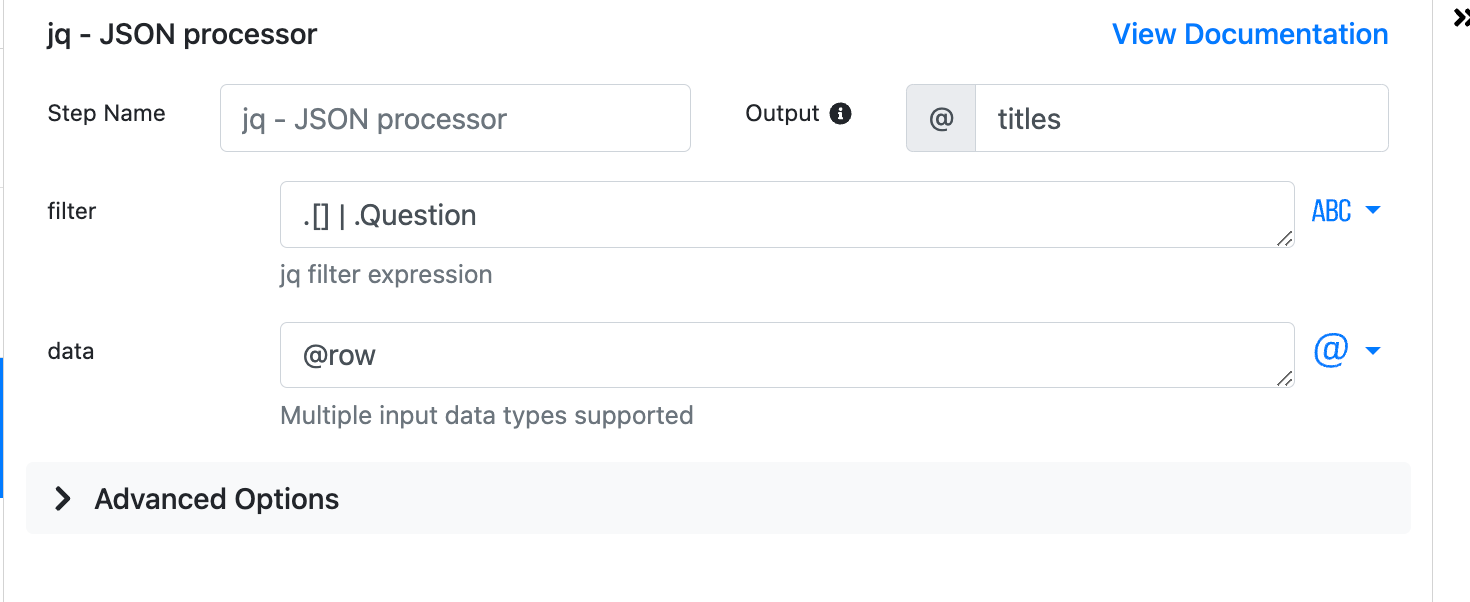
Run this, and you'll see the output show similar data to what we saw in Google Sheets, but just the title this time.
Go ahead and rename the output titles so it's easy to reference.
4. Ask ChatGPT to suggest an article title based on the response
Now let's ask a ChatGPT which of the FAQs might best address the selected question. We'll add the Create Chat Response with ChatGPT brick to do this.
Use our built-in OpenAI integration, or configure your own. In the message field, add an item, and choose the role of system and pass this prompt in the content field.
Here are the titles of knowledge base articles:
{{@titles | join("
") }}
Provide JUST the most relevant article title to the customer support ticket provided and no other text.
The join function allows you to reference the array of article titles and join each into a long list, a better format for ChatGPT to read.
Add one more message, this time with the role of user and for the content field, pass the selected text by setting @input.selectionText.
We're asking ChatGPT to take the selected text and act as an article recommender to pick one of the titles from the Google Sheet that is most relevant.
5. Get the recommended article's content
After ChatGPT returns the title of the article that is most relevant, we need to get the answer to it. We'll add another jq-JSON processor brick, and pass it the Google Sheet info by setting the data field to @row , and for the filter value, use this: .[] | select(.Question == "{{@transformed.choices[0].message.content}}")
This is saying to find the object with the question title that ChatGPT recommended.
Rename the output articleObject so it's more clear and easier to reference.
And you're done! This will return the answer! 🧙 But we want that to be visible in the browser, so let's add a Sidebar to display it.
6. Display the answer in the sidebar
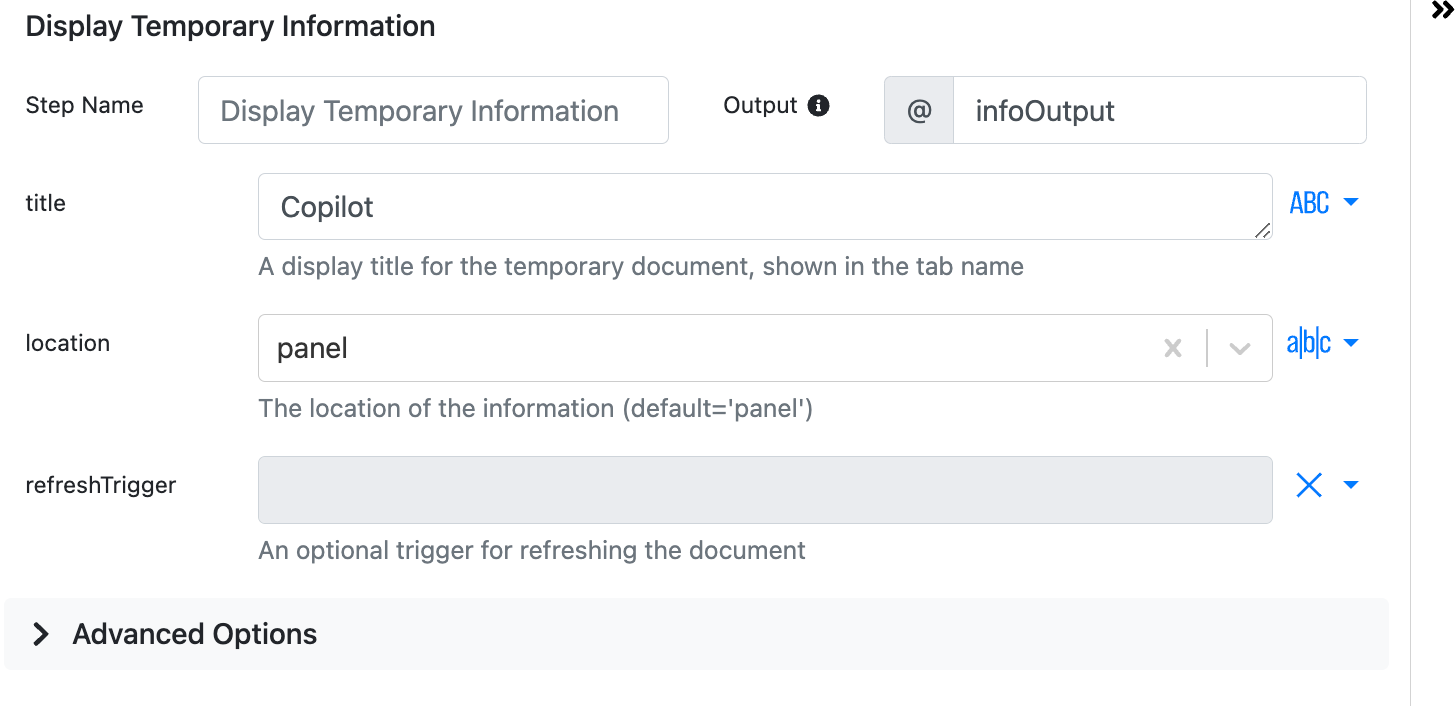
To display content with PixieBrix, you'll need to use one of our document rendering bricks. In this case, we'll use the Display Temporary Information brick. When you add it, you'll notice another brick added inside of it called Render Document. We'll head to that in a second, but first, set the title of your Display Temporary Information brick to something like Copilot.
Now click inside the Render Document brick. On the right side, you'll see a preview of what the Sidebar will look like. Let's change the text to swap it out with more useful information.
Rename the title to something like "Recommended Article" you can add emojis and change the size of the header. Feel free to style it however you'd like with the options in the middle panel.
We'll also change the paragraph text below by clicking on it and then editing it in the middle panel.
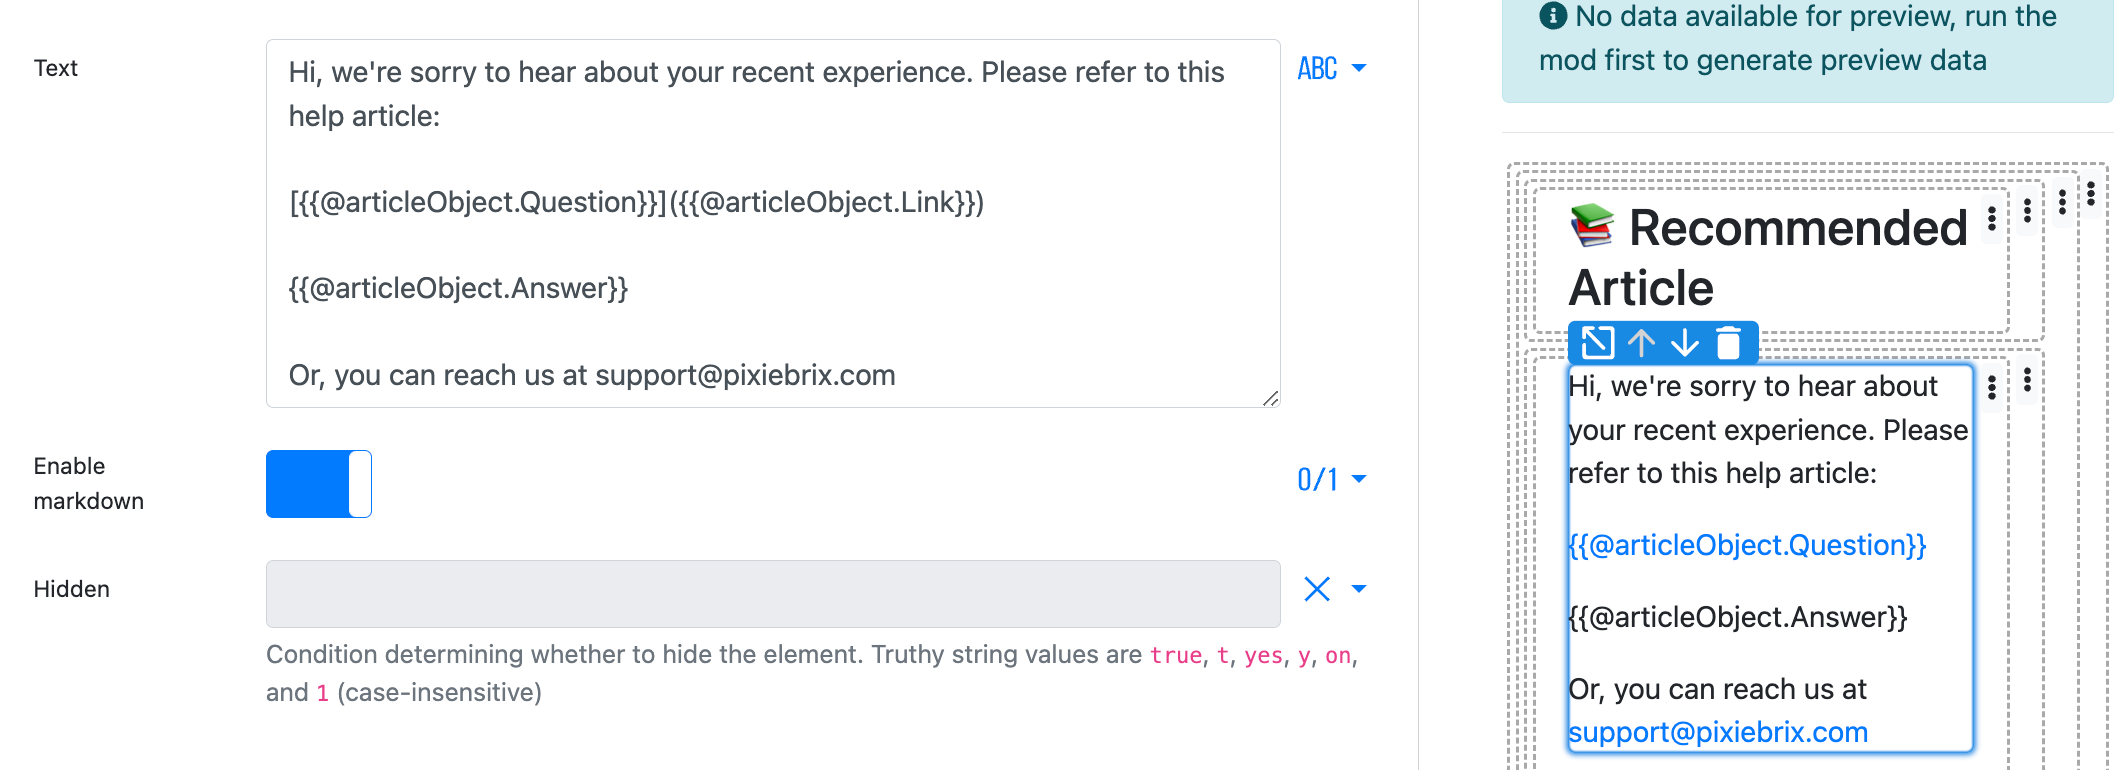
You might want to add some boilerplate text above and below the article text and include a link to the article as well.
Use nunjucks and text templating to reference the recommended article content, link, and title.
You can copy this snippet if you'd like:
[{{@articleObject.Question}}]({{@articleObject.Link}})
{{@articleObject.Answer}}
Or, you can reach us at [email protected]
And now try it out! Select a question in your browser, then right-click and ask for a recommendation. You'll see an answer appear in your sidebar! Let's do one more thing to make this even more useful.
7. Add a button to copy and paste the response
Click the three dots next to the paragraph text in the preview panel to see the option to add a button.
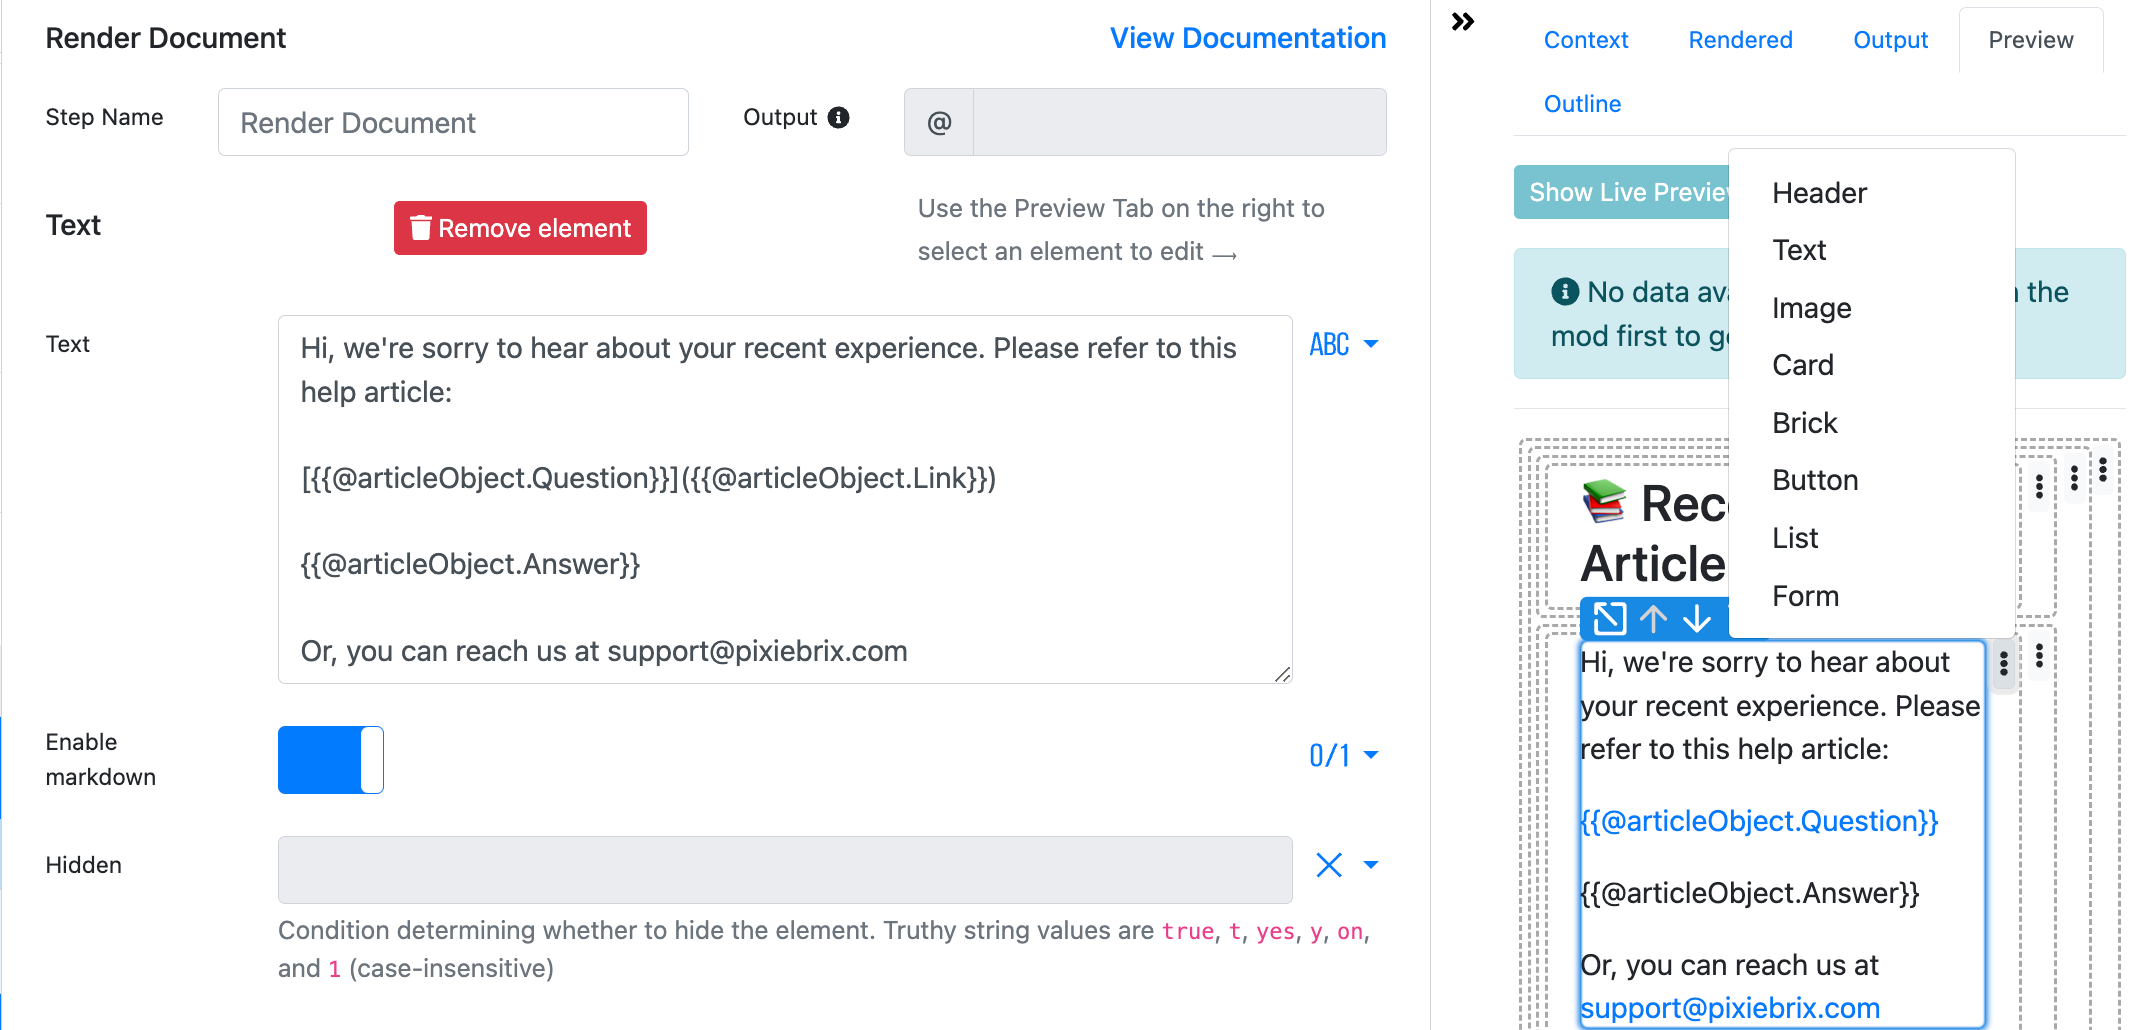
Adding buttons gives you the functionality to copy the content to a clipboard, send a message in Slack, or any other action you can imagine.
A new button pipeline appears, and you'll be able to rename the button and style it.
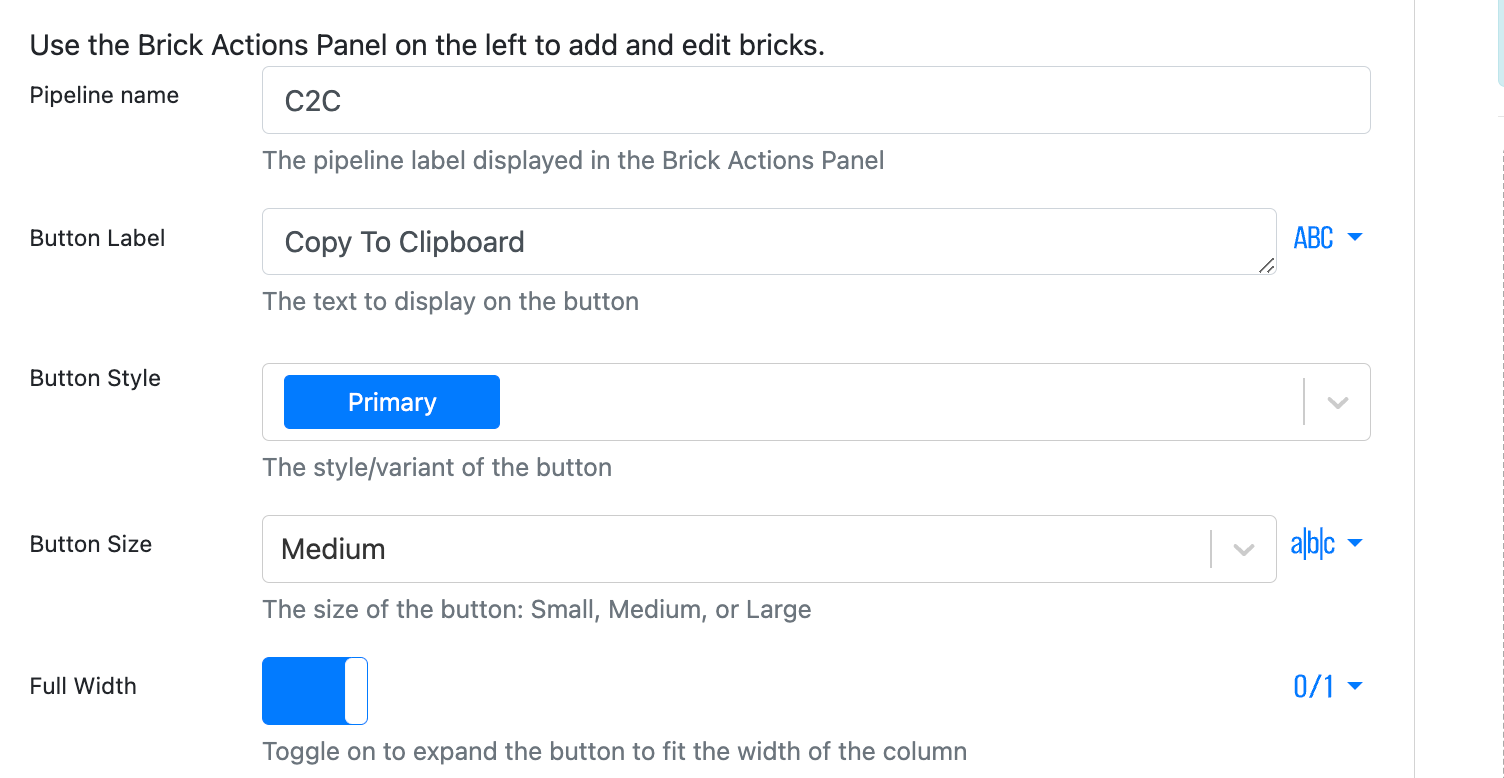
You can change the text on the button, select another color, change the size, or even make it full-width. Within the button pipeline in the Brick Actions pipeline, you'll see a + icon, allowing you to add bricks to trigger when the button is clicked. Add the Copy to Clipboard brick, and set the Content to the same as the content you are displaying in the sidebar. You might want to change the link only to include the actual link, not wrapped in markdown, which won't copy the hyperlink.
And now you've got a handy sidebar that will let you search your database for questions and then return the answer, with the option to copy it to your clipboard so you can share it with users anywhere. You can run this mod from any webpage, so you're not limited to a single tool or channel.
Go ahead and try it out and see for yourself!
Is it not working as expected? Head to the PixieBrix Slack Community and post in #learning, and we'll sort you out.