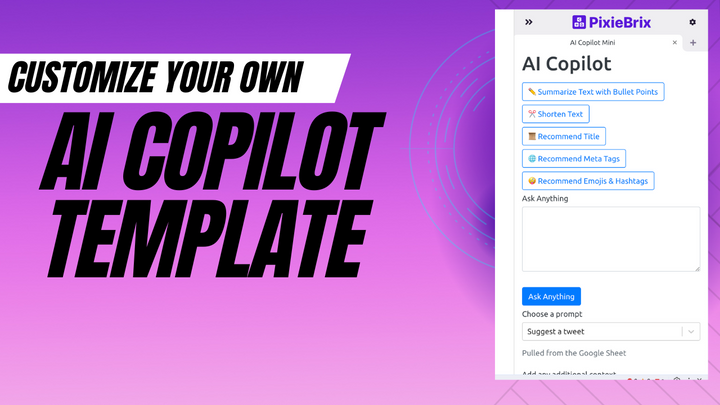
Customize AI Knowledge Base Recommender Mod Template
Create your own AI Knowledge Base Recommender tool with PixieBrix. Activate this template mod and customize to your knowledge base.

If you want to create your own Knowledge Base Recommender, you can customize our template to build one to fit your specific needs. Knowledge base software like PixieBrix allows you to integrate semantic search and AI search into your internal tools.
Here are a few steps for customizing the PixieBrix AI Knowledge Base mod.
- Make a Copy of the KB Recommender Mod Template
- Connect your knowledge base
- Add handling for No Article Found
- Suggest multiple articles.
📋 Make a Copy of the KB Recommender Mod Template
🏁 Before you can do any customizations, you'll need to get the template in editable format.
💽️ Connect your Knowledge Base
One of the first things you may want to customize is where your templates come from. In the template example, the templates are defined in a Google Sheet, and we use the Lookup Google Sheet row brick (renamed Fetch data from Google Sheet) to query a Google Sheet.
You might need to modify the query if your Google Sheet is set up differently than our template. Click the Fetch data from Google Sheet brick and check out the Brick Configuration Panel in the middle of the Page Editor.
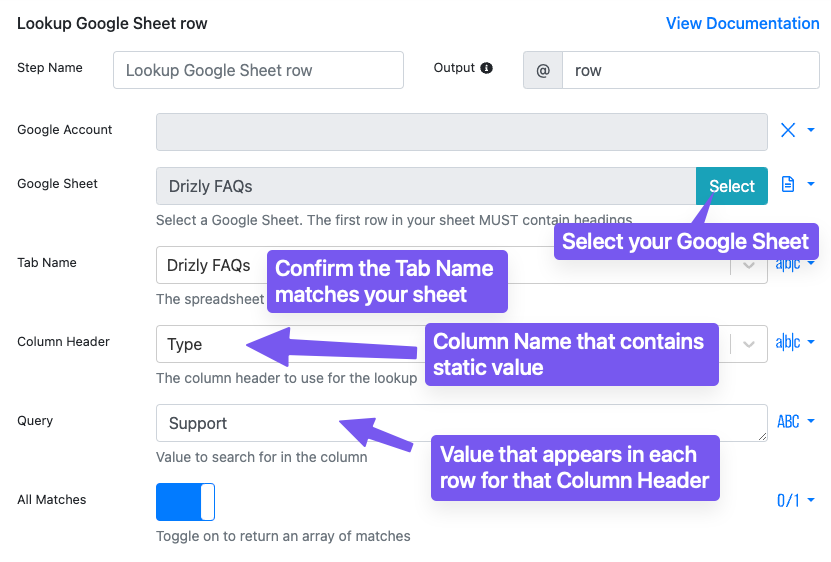
If you're using some other column to get every row, you can change the Query text to match. For instance, you might have a * or Include in your row.
You also might want to fetch data from other tools entirely, such as:
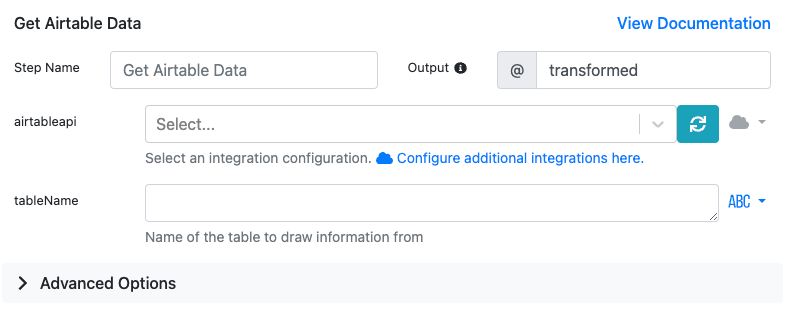
Connect to Airtable
First, add an Airtable integration configuration. Use the Get Airtable Data brick to fetch all data from an Airtable database. If you want to extract only specific data, you'll need to add a jq - JSON processor brick afterward and use JQ to filter the data returned.
Connect a PixieBrix database
You can store your FAQs in a PixieBrix database and use the List All Records brick to return all your FAQs. PixieBrix databases have access control, allowing you to specify which team members should have access.
Connect to Zendesk (or other knowledge base tools)
If you want to use another tool, like your Knowledge Base, to fetch your FAQs, you can search for an existing brick by clicking the + button under any brick in the Brick Actions Pipeline.
If the tool you're searching for isn't available as a brick, use the HTTP Request brick to fetch data from any API with PixieBrix.
➕ Add handling for No Article Found
If no article is found, PixieBrix and ChatGPT won't return anything in your sidebar except the templated text. But when nothing is found, that's a great opportunity to add something to your knowledge base because the question will likely come up again!
If you want to improve handling for when no article is found and make a way to add a new item to your knowledge base, all you need to do is incorporate a bit of logic for adding a button when nothing is found and then create an action for that button when clicked.
This is an example of doing it with Google Sheets, but you could follow the same approach with Airtable or any HTTP Request.
- Add another row and button to the panel in the Render Document Brick.
Click the second-outermost three-dot menu, choose "Row", then add a button inside that element. Click the button to configure information.
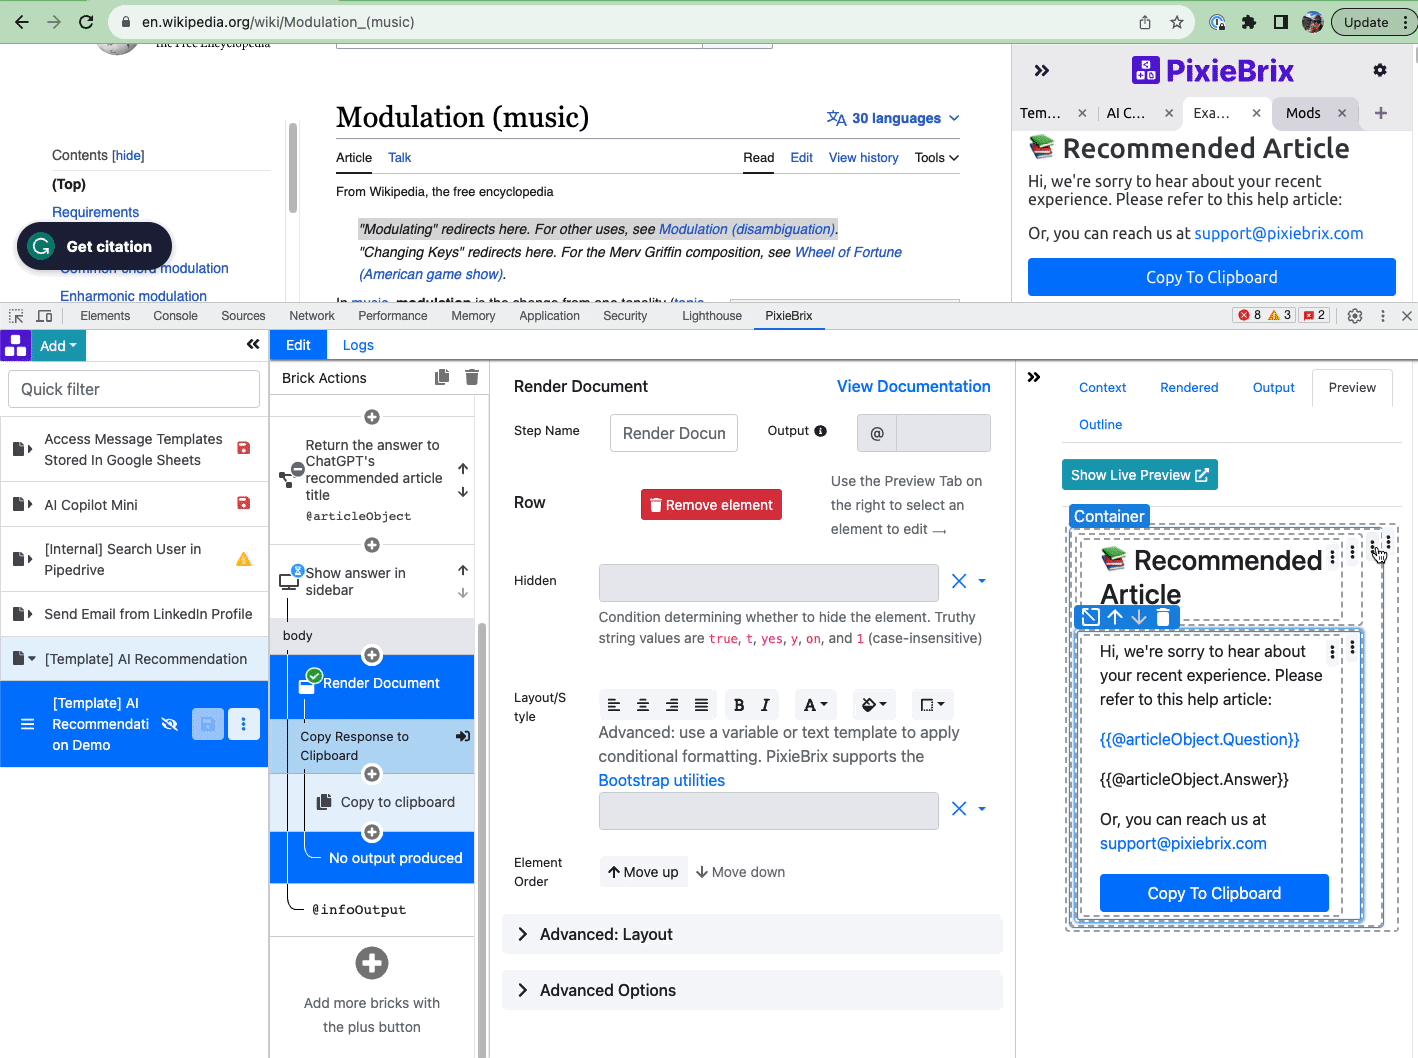
2. Customize the button.
Rename the button pipeline and label to Add new item, and change the color from the Style dropdown if you'd like.
Scroll to the Hidden field, and click the 0/1 field at the end of the row, then choose ABC Text.
Set the value to {{ true if @transformed.choices[0].message.content != "none"}}, which will show the button if ChatGPT has not found anything in your knowledge base.
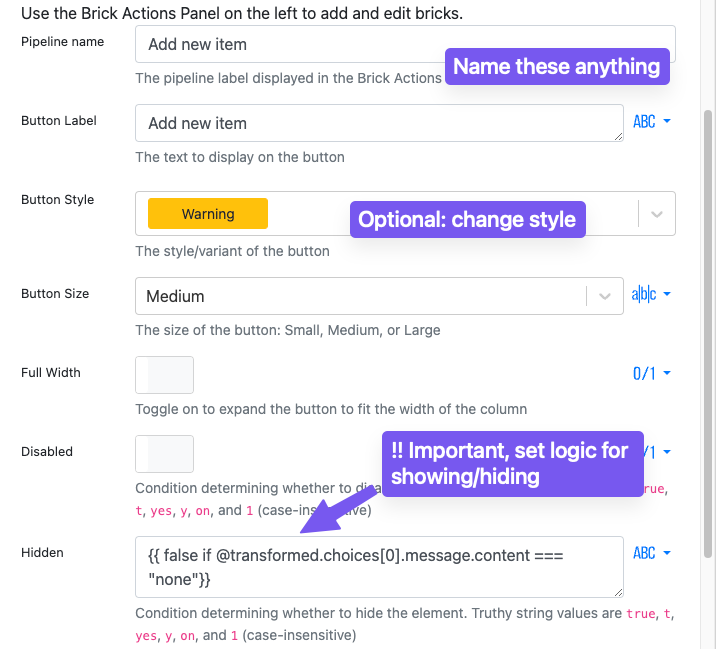
3. Add a form to the button.
In the Brick Actions pipeline, click the + button to add a Show modal or sidebar form brick. Customize the form with three fields to capture the question, answer, and a link for a new FAQ item.
To add a new field, click the + Add new field button at the top of the brick. Make sure all three fields are Required.
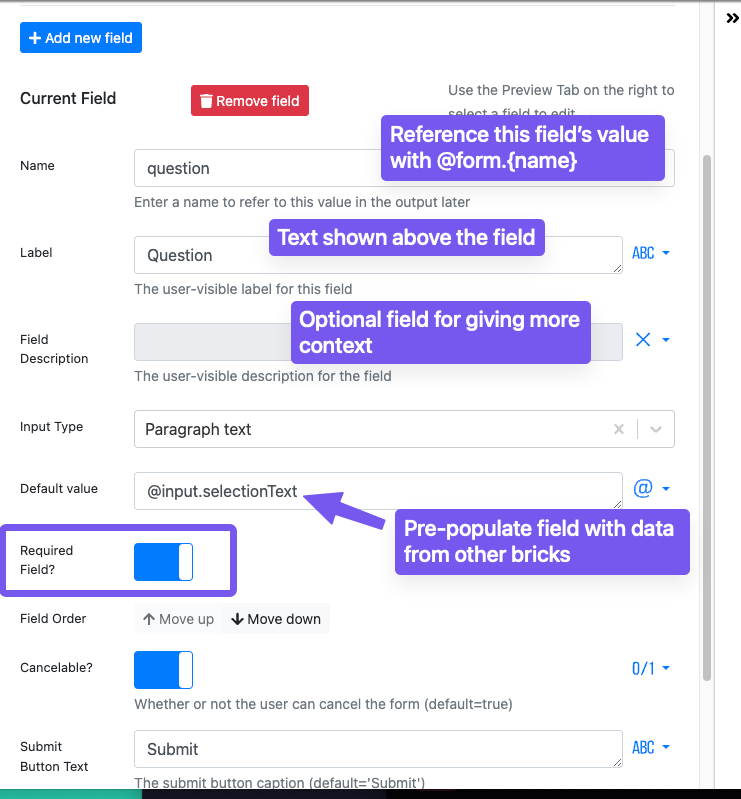
4. Add an action to update the FAQ directory
Since our example is hosting FAQs in Google Sheet, we will simply add another brick after the form to create a new row in our Google Sheet with the submitted data.
If you want to send your information to another tool, search for an existing brick, or use the HTTP Request to use any tool's API.
📚 Suggest multiple articles
The template is configured to only look for one relevant article from the FAQ database, but you could edit this mod to return more options in case the first one suggested isn't a better fit.
This will require a few changes as we'll be working with a list of items returned, instead of a single item.
- Adjust the prompt
Start by going to the Ask ChatGPT to suggest an article based on question brick, and use the following prompt:
Article Titles:
{{@titles | join("
")}}
or
No article found
---
Provide your response as valid JSON in the following format:
{
articles:["<article 1 title>","<article 2 title>","<article 3 title>"]
}
2. Add the Parse JSON brick
Click the + button below the ChatGPT brick and add the Parse JSON brick, and pass it the content from ChatGPT's response, like this.
@transformed.choices[0].message.content
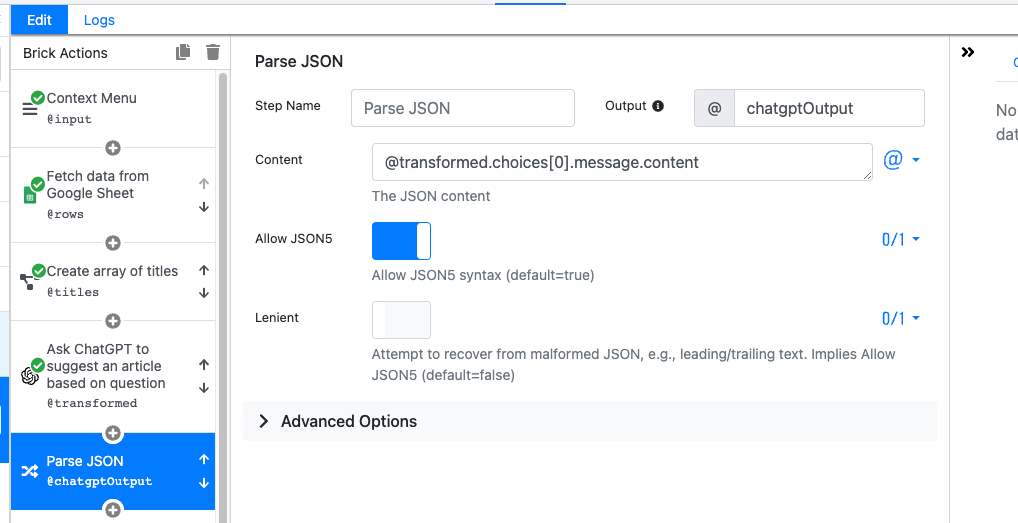
You may also want to rename the brick output to make it easier to reference later. Call it something like chatgptOutput.
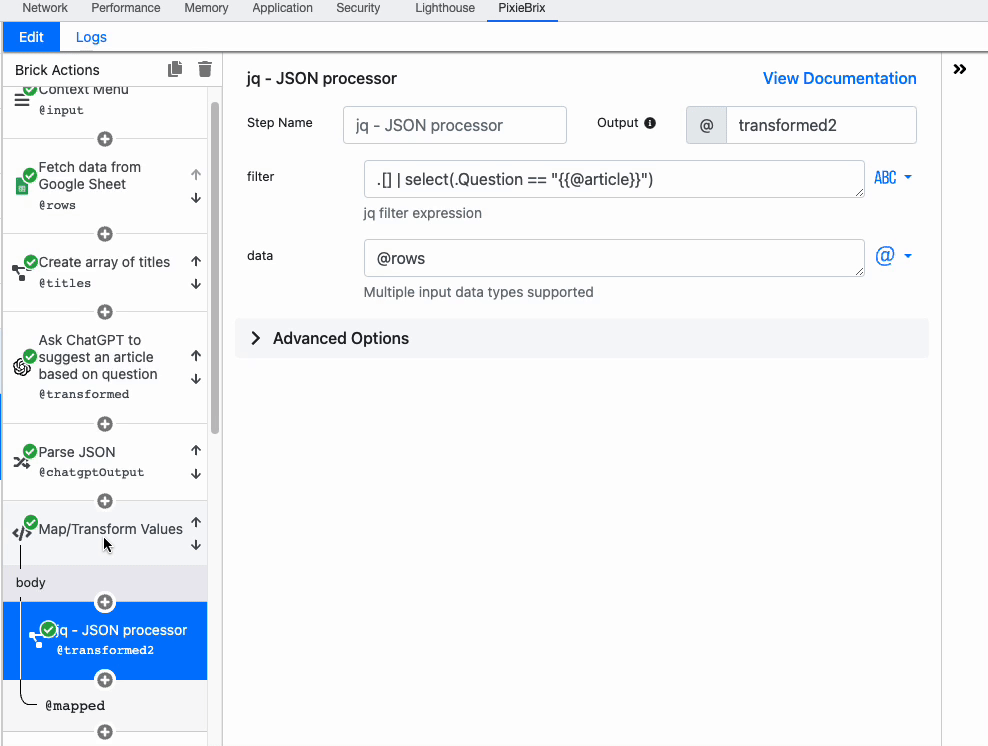
3. Map the values
Now we need to get the whole FAQ object with the question, answer, and link so we can reference all three in our sidebar. Below the Parse JSON brick, add the Map/Transform Values brick and pass the Elements as @chatgptOutput.articles (make sure the type is @), and set the Element Variable Name to article.
Inside the body, add the JQ brick, and use this jq filter .[] | select(.Question == "{{@article}}") and the pass the Google Sheets through the data field with @rows.
4. Update the sidebar.
To update the sidebar, you'll want to delete your first element by clicking it in the preview panel and then clicking the trash icon.
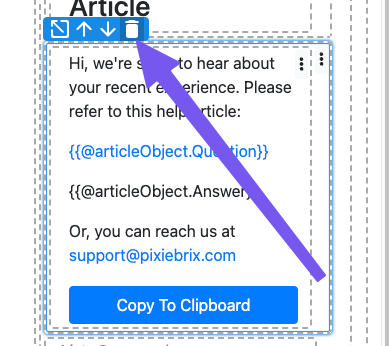
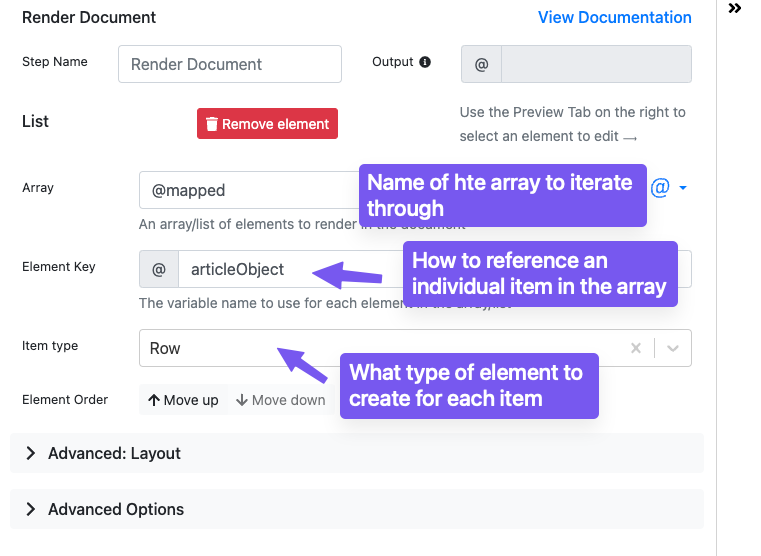
Now add a new row, and then add a new List element inside that Row. Set the Array to @mapped, which will use the output from the Map/Transform Value brick.
You'll see a new Row element appear. Click the three-dot menu inside that to add a Text element, and fill the text with the same text we used initially for our sidebar.
Hi, we're sorry to hear about your recent experience. Please refer to this help article:
[{{@articleObject.Question}}]({{@articleObject.Link}})
{{@articleObject.Answer}}
Or, you can reach us at [email protected].
Next, add a button by clicking the three-dot menu again and selecting the Button type. You'll see a new Button section appear in the Brick Actions pipeline. Click the + button to add the Copy to clipboard brick, and use the same value as above for the content field. This will copy that article's message to your clipboard whenever you click the button.
Need to see an example? Activate this template to see how to set up an AI Knowledge Base Recommender to suggest multiple articles.
🎉 Congrats! You've successfully modified an AI Knowledge Base template. But this is just the start. You can build anything else on top of this!
If you want to create your own Knowledge Base Recommender, you can customize our template to build one to fit your specific needs.